
In the ever-evolving digital landscape, blogging remains a powerful medium for individuals and businesses alike to express themselves, share their expertise, and connect with a global audience. At the heart of this blogging revolution lies WordPress, a versatile and user-friendly platform that has redefined the way we create, manage, and publish content online.
WordPress is not just a blogging platform; it’s a content management system (CMS) that empowers millions of bloggers and website owners worldwide. With its intuitive interface, rich feature set, and extensive customization options, WordPress has become the go-to choice for bloggers of all backgrounds, from hobbyists to professionals.
What is a Blog?
A blog is a regularly updated website or web page, typically run by an individual or a small group, that is written in an informal or conversational style. Blogs can cover a wide range of topics and serve various purposes, such as providing information, expressing personal opinions, sharing experiences, or promoting products and services.
Steps to Create a WordPress Blog
Step 1: Pick Your Blog Name and Platform

Choosing the right blogging platform is crucial when starting a blog. For most beginners, WordPress.org (self-hosted WordPress) is the recommended choice.
Here’s why:
- WordPress is Free and Open Source: You can use it without cost, and a community of developers continuously improves it.
- Customization: With WordPress, you have full control over your blog’s design and functionality. You can install plugins to add features and themes to change the look of your site.
- Monetization: Unlike other platforms, WordPress allows you to make money from your blog without restrictions.
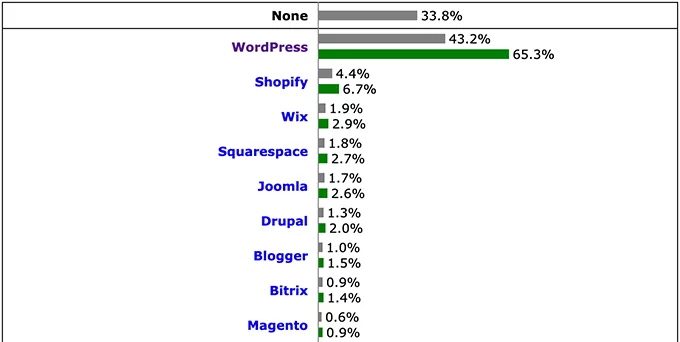
- Popularity: It’s the preferred platform for many successful blogs. About 43% of websites on the internet use WordPress.
But here’s the catch:
You’ll need to handle the setup and hosting yourself. Here’s what you’ll need:
- Domain Name: This is your blog’s web address, like google.com or wpbeginner.com. Typically, a new domain costs around $14.99 per year.
- Web Hosting: Your website’s files need a place to live online. This is your website’s “house.” Web hosting plans usually cost around $7.99 per month.
This cost can seem like a lot for beginners just starting, but it’s an investment in your blog’s future. With the right content and strategy, your blog can eventually generate income that surpasses these initial expenses.
Step 2: Install WordPress Blogging Software with Nestify

Congratulations on choosing Nestify as your hosting provider! Now that your hosting and domain are set up, the next crucial step is to install WordPress, the versatile and user-friendly blogging software. In this guide, we’ll walk you through installing WordPress on Nestify, making it easier than ever to start your blogging journey.
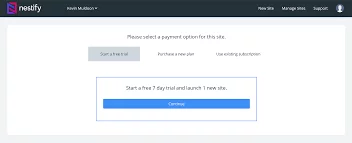
- Sign Up with Nestify
If you still need to do so, the first step is to sign up for a hosting plan with Nestify. Nestify offers a streamlined and hassle-free WordPress installation process, perfect for bloggers of all levels.
- Automatic WordPress Installation
The beauty of Nestify is its simplicity. Once you’ve signed up and chosen your hosting plan, you can enjoy the convenience of automatic WordPress installation. This means you won’t have to delve into the technicalities of manual installation.
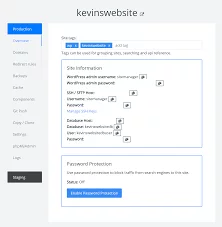
- Accessing Your WordPress Dashboard
Now that WordPress is installed, you can dive into building your blog. To access your WordPress dashboard, follow these easy steps:
1. Log in to your Nestify account.
2. Look for the “Login to WordPress” button. This handy button will whisk you directly to your WordPress dashboard, eliminating any guesswork.
Alternatively, you can access your WordPress dashboard by entering your blog’s URL in your web browser’s address bar, followed by “/wp-admin/”. For example, if your blog is hosted at “yoursite.com,” enter “yoursite.com/wp-admin/”.
Step 3: Exploring Your WordPress Dashboard
You’re now inside your WordPress dashboard, where the magic happens. Here’s what you can do:
- Create Blog Pages: Begin by crafting essential pages such as the About page, Contact page, and any other pages relevant to your blog’s niche.
- Customize Design: Tailor the appearance of your blog by selecting a theme and customizing it to match your unique style and appeal to your audience.
- Start Blogging: Dive into the heart of blogging by composing and publishing your blog posts. You can also enhance your blog’s functionality by installing plugins.
- Explore Settings: WordPress offers many settings to fine-tune how your blog functions, from permalinks to comment settings. Take your time to adjust these settings to suit your preferences.
Step 3: Choosing Your WordPress Theme

The appearance of your WordPress blog is determined by its theme. When you initially access your blog, it will have a default WordPress theme, which might need to be more visually appealing to most users.
Customizing the look and feel of your blog is one of the most exciting and rewarding aspects of creating your WordPress blog. A vast selection of pre-designed WordPress themes is available, including free and paid premium options.
To change your theme, follow these steps:
- Access your WordPress dashboard and navigate to “Appearance” » “Themes.”
- Click the “Add New” button.
- On the next screen, you’ll find over 10,000 free WordPress themes in the official WordPress.org themes directory. You can filter them by popularity, latest additions, featured themes, and other categories like industry or layout.
- When you hover your mouse over a theme, you’ll see a “Preview” button. Clicking it lets you know how the design would appear on your website. Remember that the preview may not match the screenshot exactly, as you can customize it later. Pay attention to design, colors, typography, and other elements.
When selecting a WordPress theme, opting for a clean and simple design is advisable. This helps maintain a clear and user-friendly interface.
Once you’ve found a theme, hover over it, and an “Install” button will appear. Click it and wait for the theme to be installed. After installation, the “Install” button will change to an “Activate” button. Click on it to activate the theme. Once your theme is activated, you can customize it by clicking on the “Customize” link under the “Appearance” menu. Depending on the theme you’ve chosen, built-in widgets and customization options will allow you to tweak your blog’s design.
You can use a WordPress page builder like SeedProd or Divi for even greater design control. These tools enable you to create custom headers, footers, sidebars, and more without writing any HTML code. With your WordPress theme in place, you’re now ready to create your first blog post.
Step 4: Crafting Your Inaugural Blog Entry

To compose your first blog post, navigate to the “Posts” » “Add New” menus within your WordPress dashboard. Within this interface, you’ll encounter a dedicated editor area where you can craft your debut blog post.
WordPress employs a block-based editor, facilitating the creation of visually appealing content layouts for your blog posts. For a comprehensive introduction to this editor, refer to our WordPress block editor guide.
Once you’ve completed your writing, click the “Publish” button in the upper-right corner of the screen. This action will make your blog post accessible to the public. You’ll also notice additional sections on the posts screen, such as “Categories” and “Tags.” These elements serve to organize your blog posts into various sections. If you’d like to understand the distinction between categories and tags, we recommend reading our article.
To harness the full array of features available on the posts screen, we suggest consulting our article on how to add a new post in WordPress (including a video tutorial). This resource encompasses instructions on embedding videos, incorporating blog images, utilizing headings, crafting tables of contents, including sub-headers, creating bullet lists, implementing call-to-action buttons, embedding social media posts, and more – all designed to streamline your content creation process.
Newcomers to WordPress often grapple with distinguishing between the “Posts” and “Pages” menus in the WordPress dashboard. To alleviate any confusion, we’ve produced a comprehensive guide elucidating the disparities between posts and pages in WordPress.
If you’re seeking inspiration for fresh blog post ideas, we offer several valuable resources:
- Utilize our free blog post idea generator tool available on WPBeginner.
- Explore a collection of 103 blog post ideas that resonate with your readers.
- Discover 73 proven blog topics that captivate audiences.
- Learn the art of composing an exceptional blog post with structural insights and illustrative examples.
Many seasoned bloggers strategically select their topics by conducting keyword research. This approach enhances the visibility of their content in Google search results, driving more traffic to their blogs.
Step 5: Enhancing Your Blog with Plugins and Customizations

After composing your inaugural blog post, you’ll likely want to incorporate additional standard elements onto your website, such as a contact page, image galleries, sliders, email lists, forums, and more.
To introduce these supplementary features, you’ll turn to the power of plugins. WordPress plugins are applications that enable you to seamlessly integrate new functionalities into your website, all without requiring coding expertise. The free WordPress plugin directory alone boasts an impressive library of over 60,000 plugins. This vast selection ensures that, regardless of your specific needs or aspirations, there’s likely a plugin available to fulfill them.
How to Generate a Contact Form in WordPress
A contact form is essential to any website, as it allows users to reach out via email. Since WordPress lacks an integrated contact form feature, you’ll require a WordPress form builder plugin to incorporate this functionality into your site.
We recommend utilizing the WPForms Lite plugin. This plugin represents the free version of the well-regarded WPForms plugin, which ranks as the top choice in our list of the finest contact form plugins for WordPress.
Remarkably, over 6 million websites actively employ WPForms!
To install this plugin, navigate to the “Plugins” » “Add New” page and enter “WPForms” into the search field. Following this, click “Install” and then “Activate.” Once activated, proceed to the “WPForms” » “Add New” page to initiate the creation of your inaugural form.
Setting Up Google Analytics Tracking
Google Analytics is a powerful tool that provides valuable insights into your blog’s performance, including visitor statistics, traffic sources, and user behavior. Installing Google Analytics at the beginning of your blogging journey lets you track your blog’s growth over time. Here’s a step-by-step guide on how to set up Google Analytics tracking for your blog:
A: Visit the Google Analytics Website
- Start by visiting the Google Analytics website (https://analytics.google.com/).
- If you don’t have a Google account, you’ll need to create one. If you already have a Gmail account or any other Google service account, you can use that to sign in.
B: Sign In or Create an Account
- Once you’re logged in with your Google account, click on the “Sign up” button to create a new Google Analytics account.
C: Set Up Your Property
- A “property” typically represents your website or blog in Google Analytics. Fill in the required information, including your Account Name (you can name it after your blog), Website Name, Website URL, Industry Category, and Reporting Time Zone.
D: Choose Your Data Sharing Settings
- Google Analytics will ask you to choose your data-sharing settings. Review the options and select your preferences based on how you want Google to use your data. These choices are typically related to Google’s data-sharing policies.
E: Get Your Tracking Code
- After completing the setup, you’ll receive a unique tracking code. This code is crucial for tracking visitor data on your blog.
- Google Analytics will provide instructions on where to place this tracking code on your blog. Usually, you need to add it to the header section of your website’s code. If you’re uncomfortable with coding, many WordPress plugins can simplify this process.
F: Install the Tracking Code on Your Blog
- Depending on your blog’s platform, the tracking code installation process may vary. Here’s a general guide for WordPress users:
- Log in to your WordPress dashboard.
- Go to “Appearance” » “Theme Editor.”
- Locate the “header.php” file on the right side.
- Paste the Google Analytics tracking code just before the closing </head> tag.
- Save your changes.
G: Verify Tracking
- After adding the tracking code, return to your Google Analytics account. Data may take a few hours or even up to 24 hours to start appearing.
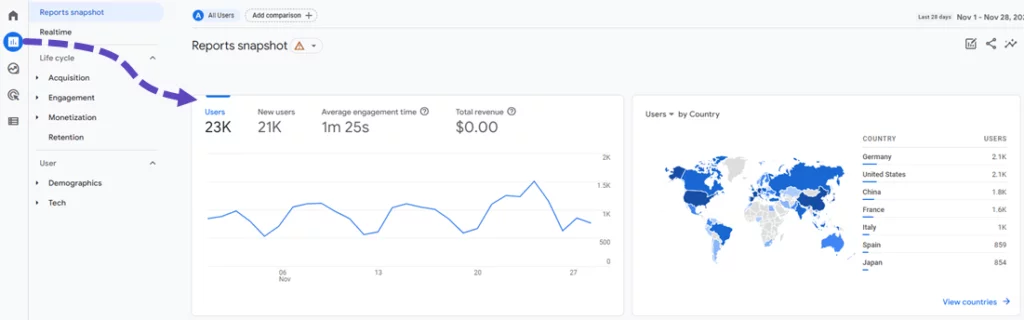
- You can verify if Google Analytics is tracking your blog by going to the “Realtime” section in your Google Analytics dashboard. It should show that there are active users on your website.
H: Explore Google Analytics
- Once data starts flowing, you can explore the various reports and insights Google Analytics provides. You can see how many people visit your blog, where they are coming from (e.g., search engines, social media), which pages are the most popular, and much more.
Step 6: Optimizing Your WordPress Blog for SEO

Search Engine Optimization (SEO) is critical to building a successful blog. It ensures that your blog ranks well in search engine results, making it easier for users to find your content. Optimizing your blog’s traffic for SEO from the outset is essential if you’re looking to increase your blog’s traffic. Here’s a comprehensive guide on how to do it:
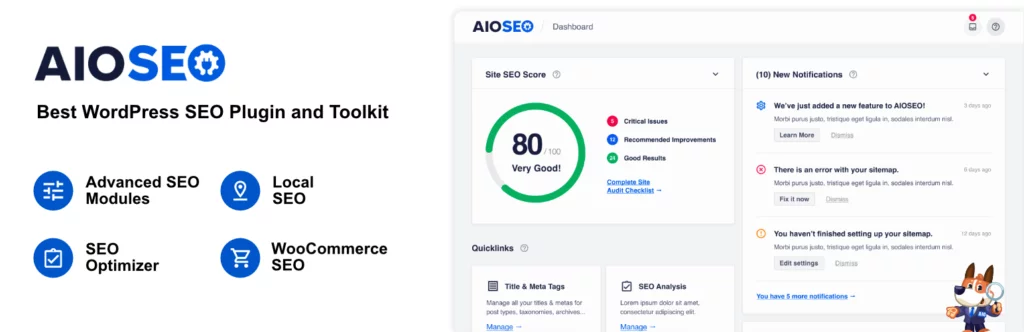
A: Install and Activate the All-in-One SEO Plugin
- Installing and activating the All in One SEO (AIOSEO) plugin is the first step. This plugin is a comprehensive WordPress SEO tool that simplifies the optimization process.
- You can install it by going to your WordPress dashboard, navigating to “Plugins” » “Add New,” and searching for “All in One SEO.” Click “Install” and then click “Activate.”
B: Configure AIOSEO
- Once activated, AIOSEO will guide you through a quick configuration wizard. This wizard will assist you in setting up your WordPress sitemap, adding appropriate keywords and meta descriptions, implementing schema markup, and more.
- Follow the wizard’s instructions to ensure your blog is optimized for SEO.
C. Consider Keyword Research
- In addition to using an SEO plugin, consider using a keyword research tool. These tools help you discover popular search terms related to your blog’s topic.
- By understanding what keywords people are searching for, you can tailor your content to match their interests and needs.
- Some SEO tools also allow you to analyze your competitors’ keywords, enabling you to create superior content and outrank them in search results.
D: Implement On-Page SEO Techniques
As you create content for your blog, apply on-page SEO techniques. This involves optimizing individual blog posts and pages.
- Key on-page SEO elements include:
- Use target keywords strategically in your content.
- Creating descriptive and engaging meta titles and meta descriptions.
- Incorporating relevant header tags (H1, H2, H3) to structure your content.
- Including internal and external links.
- Optimizing images with descriptive alt text.
- Ensuring your content is user-friendly and easy to read.
E: Build High-Quality Backlinks
- Backlinks (links from other websites to your blog) are a significant factor in SEO. High-quality backlinks can boost your blog’s authority and search engine rankings.
- Focus on creating quality, shareable content that naturally encourages other websites to link to your blog. Additionally, consider contacting other bloggers in your niche for guest posting opportunities or collaborations.
F: Monitor and Analyze SEO Performance
- Regularly monitor your blog’s SEO performance using tools like Google Analytics and Google Search Console.
- These tools provide valuable insights into your blog’s traffic, search queries, click-through rates, and more.
- Use this data to make informed decisions and refine your SEO strategy.
By following these steps and consistently optimizing your WordPress blog for SEO, you can increase its visibility in search engine results, attract organic traffic, and build a strong online presence. SEO is an ongoing process, so stay committed to refining your strategy as you grow your blog.
Backup and Security:
- UpdraftPlus: An alternative backup plugin offering free and premium versions, allowing you to schedule backups and store them on various cloud storage platforms.
- Wordfence Security: A comprehensive security plugin with firewall protection, malware scanning, and login attempt monitoring.
Performance:
- W3 Total Cache: A popular caching plugin that helps improve website performance by caching pages and reducing server load.
- Autoptimize: An optimization plugin that minifies and combines your CSS and JavaScript files, resulting in faster page loading times.
Customization:
- Elementor: A powerful and widely-used page builder plugin that offers extensive customization options for building unique layouts and designs.
- Beaver builder: Another popular page builder plugin known for its ease of use and flexibility in creating custom page layouts.
Traffic and Subscribers:
- MonsterInsights: A Google Analytics plugin that directly provides detailed insights into your website’s traffic and user behavior from your WordPress dashboard.
- Sumo: A suite of tools for growing your email list and increasing website traffic, including email capture forms and social sharing buttons.
Email Marketing:
- Mailchimp: An email marketing service that offers automation, segmentation, and integration options for managing your email campaigns.
- SendinBlue: An email marketing platform known for its affordability, automation capabilities, and transactional email services.
Step 7: Generating Income from Your Blog

Now that you’ve established your blog and tailored it to your preferences, you’re likely eager to explore ways to monetize your blogging efforts. It’s essential to understand that numerous legitimate methods exist to make money from your blog, but there are no shortcuts or get-rich-quick schemes to rely on.
Refrain from being swayed by the allure of flashy images showcasing luxury cars and mansions, as these are often deceptive representations.
In contrast to other “make money online” resources, we’ve crafted an extensive guide on effectively generating income from your WordPress-powered blog. This guide spans over 4,000 words, serving as a valuable resource for anyone looking to monetize their blog. It draws upon our accumulated knowledge from over 15 years of online experience.
The key to success lies in your willingness to invest hard work and effort into your blog. While there are no quick fixes, the rewards will follow as you persist and dedicate yourself to your blogging journey. Remember, genuine success in blogging is built on dedication and perseverance.
Google AdSense: Monetizing Your Blog with Ads

One of bloggers’ most popular methods to monetize their blogs is displaying advertisements. If you’ve created your blog to generate income, Google AdSense is an excellent choice for achieving this goal. It is the largest advertising platform for bloggers and publishers, offering a straightforward way to earn revenue from your content.
Here’s a detailed look at Google AdSense and how it can help you generate income from your blog:
A. How Google AdSense Works:
- After you’ve set up a Google AdSense account and your blog is approved, you can place an ad code on your website.
- Google’s technology scans your blog’s content and determines its context and keywords.
- Advertisers bid in real-time to display their ads on your blog when the content matches their target keywords.
- When a visitor to your blog clicks on one of these ads or views them (depending on the ad type), you earn a portion of the advertising revenue, while Google also takes a cut.
B. Tips for Maximizing AdSense Earnings:
- Quality Content: High-quality, valuable content attracts more targeted ads and higher bids from advertisers.
- Ad Placement: Experiment with ad placement to find the most effective locations for displaying ads without overwhelming your readers.
- Ad Types: Utilize a variety of ad formats, including text ads, display ads, and responsive ads, to see which performs best on your blog.
- Ad Sizes: Consider using a mix of standard ad sizes, such as 300×250, 728×90, and 336×280, to accommodate different ad spaces on your site.
- Ad Balance: Use Google’s ad balance feature to find the right balance between user experience and ad revenue.
C. Google AdSense Policies:
- It’s crucial to adhere to Google AdSense policies to maintain your account’s integrity. Violations can result in account suspension.
- Common policies include not clicking on your ads, not encouraging others to do so, and avoiding prohibited content.
Step 8: Unlocking Income with Affiliate Marketing
Affiliate marketing stands as the second most widely embraced monetization strategy among bloggers. This method revolves around endorsing products or services you genuinely love to your audience. You earn a referral commission when your readers purchase based on your recommendations. Here’s a comprehensive look at how affiliate marketing works and how to succeed with it on your WordPress blog:
Steps to Thrive in Affiliate Marketing:
- Select the Right Affiliate Programs: Choose affiliate programs that align with your blog’s niche and cater to your audience’s interests.
- Create Quality Content: Craft informative, engaging content seamlessly integrating affiliate product recommendations.
- Transparent Disclosures: Be transparent with your audience by disclosing your affiliate relationships. It fosters trust and complies with regulations.
- Optimize Your Affiliate Links: Utilize affiliate link management plugins like PrettyLinks or ThirstyAffiliates to streamline link insertion and tracking.
- Monitor Performance: Regularly assess the performance of your affiliate marketing efforts. Identify which products resonate with your audience and refine your strategy accordingly.
Learn about top websites to learn affiliate marketing here.
Step 9: Integrating an E-commerce Hub into Your WordPress Blog

Expanding your WordPress blog’s potential revenue streams can involve setting up an online store. Many bloggers harness this avenue to generate income by directly selling various items, whether physical products, digital downloads like ebooks, artwork, music, or even consulting services. Here’s a comprehensive look at incorporating an online store into your WordPress blog:

A. Diversifying Income Streams:
- Bloggers can tap into a wide array of monetization options by selling products or services through their blogs. This approach lets you explore selling physical and digital goods, expanding your income potential.
B. Selling Digital Downloads with Easy Digital Downloads:
- Easy Digital Downloads (EDD) is a highly recommended plugin if you focus on selling digital products, such as ebooks. EDD is known for its user-friendly interface and robust features tailored for digital product sales.
- EDD simplifies selling digital downloads while providing essential tools like digital rights management (DRM) and payment gateways for secure transactions.
C. Venturing into E-commerce with WooCommerce:
- For those aiming to sell physical products, WooCommerce emerges as the go-to choice. As the leading e-commerce plugin for WordPress, WooCommerce offers a comprehensive platform for creating and managing an online store.
- It boasts a wide range of features, extensions, and themes that cater to various e-commerce needs, making it the most widely used e-commerce solution worldwide.
D. Detailed Guidance for Setting Up an Online Store:
- To help you seamlessly establish your online store using WordPress, refer to our comprehensive guide on creating an online store with detailed instructions and insights.
E. Exploring Amazon Affiliate Stores:
- Some bloggers opt for Amazon affiliate stores, bypassing the intricacies of creating their product inventories. With this approach, you can promote and sell products listed on Amazon while earning a commission for each sale.
- Amazon affiliate stores provide a convenient way to monetize your blog without the need for inventory management or order fulfillment.
Conclusion:
In conclusion, creating a WordPress blog offers an excellent platform for individuals and businesses alike to express themselves, share valuable content, and even generate income. With its user-friendly interface, robust customization options, and extensive library of plugins and themes, WordPress empowers bloggers to bring their visions to life on the web.
Starting with the selection of a compelling blog niche and a unique domain name, the journey of creating a WordPress blog involves several key steps, from setting up web hosting to designing your website and crafting engaging content. Whether you aim to share your expertise, promote products and services, or connect with a like-minded community, WordPress provides the tools and flexibility to achieve your goals.
Furthermore, WordPress continually evolves, offering the latest features and security updates to ensure your blog remains up-to-date and competitive in the digital landscape. The availability of monetization options, including advertising, affiliate marketing, and e-commerce integration, allows you to turn your passion into a sustainable income stream.
FAQs on Blog for WordPress:
Is it possible to create a blog without hosting?
No, it’s not possible. Web hosting serves as the storage location for all your website files. Without web hosting, your blog cannot exist. To embark on your blogging journey, you must secure your domain and web hosting.
How can I generate a memorable blog name?
Blog names often derive from the creator’s identity or the blog’s central topic or industry. To help you brainstorm blog name ideas, we provide access to an AI-powered business name generator that can inspire creative naming choices.
What constitutes the best blgging niche?
Selecting the appropriate niche for your blog significantly influences your ability to craft engaging content and maximize your online earnings. Our team of experts has thoroughly researched and identified the seven best blogging niches you should consider when launching your blog.
