
In today’s digital age, where content creation and blogging have become a popular form of expression, it is essential to have a well-organized blog. With thousands of blog posts being published every day, it can be challenging for readers to navigate through your content and find what they are looking for. This is where organizing your blog posts on WordPress becomes crucial.
Understanding the Importance of Organizing Your Blog Posts
Organizing your blog posts on WordPress is more than just tidying up your content. It plays a vital role in enhancing the user experience, improving search engine optimization (SEO), and establishing a logical structure for your website. In this section, we will delve into the importance of organizing your blog posts and the benefits it brings.
1.1 Improving User Experience
One of the primary reasons to organize your blog posts is to enhance the user experience. When visitors come to your blog, they want to find relevant and engaging content easily. By categorizing your posts and providing clear navigation, you make it convenient for users to explore your blog and discover the topics that interest them.
Organizing your blog posts allows readers to navigate through your content intuitively, finding related posts and exploring different categories. This creates a seamless and enjoyable browsing experience, encouraging visitors to spend more time on your site and increasing the chances of repeat visits.
1.2 Enhancing Search Engine Optimization (SEO)
Properly organizing your blog posts also has a significant impact on your website’s SEO. Search engines like Google value well-structured websites that offer relevant and organized content. By categorizing your posts, using tags effectively, and creating logical menus, you provide search engines with valuable information about your content’s organization and improve your chances of ranking higher in search results.
When you categorize your blog posts, search engines can easily understand the relationship between different topics and keywords on your website. This helps search engines index your content more accurately, making it more likely to appear in relevant search queries. Additionally, by using tags and providing clear navigation, you create additional opportunities for search engines to understand and rank your content.
1.3 Establishing a Logical Structure
Organizing your blog posts helps you establish a logical structure for your website. It allows you to create a hierarchy of categories, subcategories, and tags that reflect the topics and themes covered in your blog. This logical structure not only helps readers navigate your content but also helps you as a content creator to plan and develop your future posts more efficiently.
1.4 Increasing Engagement and Time on Site
When your blog posts are well-organized, readers are more likely to engage with your content and spend more time on your site. By providing clear navigation and related posts, you encourage visitors to explore more of your content and discover new topics of interest. This increases their engagement with your blog and improves the chances of them becoming loyal followers or subscribers.
1.5 Facilitating Content Updates and Maintenance
Finally, organizing your blog posts makes it easier to update and maintain your content in the long run. As your blog grows, having a well-structured organization system allows you to quickly find and update posts, add new categories or tags, and make any necessary changes to your menus.
By regularly maintaining your blog post organization, you ensure that your content remains relevant and up to date. This not only benefits your readers but also contributes to the overall health and longevity of your blog.
Creating and Managing Categories in WordPress
Creating and managing categories in WordPress is a fundamental aspect of organizing your blog posts. Categories allow you to group similar content together, making it easier for readers to navigate your blog and find relevant posts. In this section, we will explore what categories are, why they are important, and how to create and manage them effectively.
2.1 What are Categories and Why are They Important
Categories in WordPress are a way to organize and group your blog posts based on common topics or themes. They act as a broad classification system for your content, helping readers find posts that are related to specific subjects. Categories provide a hierarchical structure to your blog, allowing you to create parent categories and subcategories.
2.2 How to Create New Categories
Creating new categories in WordPress is a straightforward process. Here’s how you can do it:
a) Go to the WordPress Dashboard: Log in to your WordPress website and navigate to the Dashboard, where you have access to all the administrative functions.
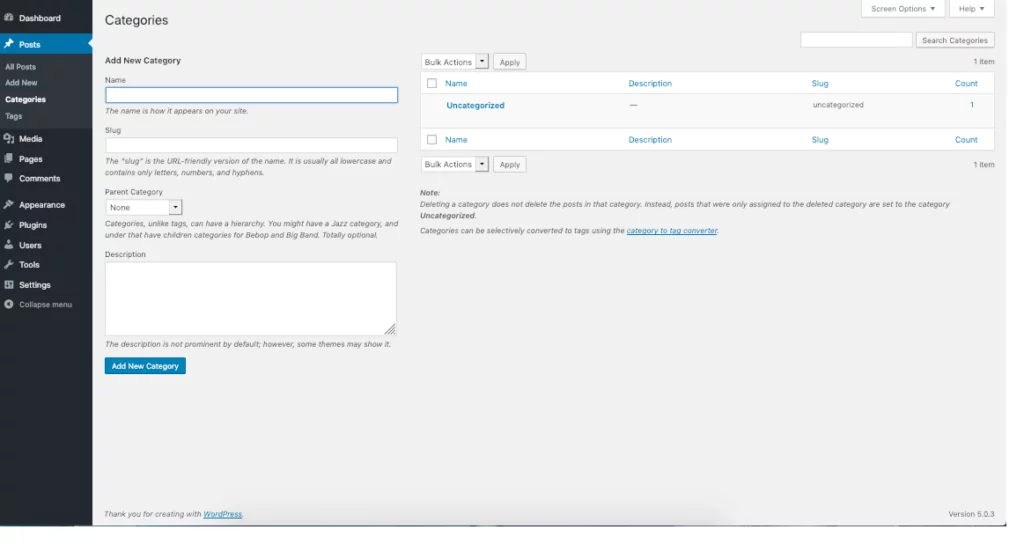
b) Click on “Posts” and “Categories”: In the left-hand sidebar of the Dashboard, hover over “Posts” and click on “Categories.” This will take you to the Categories page.
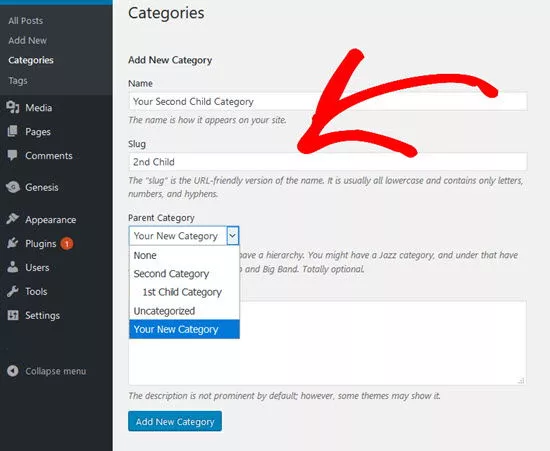
c) Add a New Category: On the Categories page, you will see an option to add a new category. Enter the name of your category in the “Name” field. You can also add a slug, which is a URL-friendly version of your category name.
d) Choose a Parent Category (Optional): If you want to create a subcategory within an existing category, you can select a parent category from the dropdown menu. This helps in creating a hierarchical structure for your categories.
e) Add a Description (Optional): You can provide a brief description of the category in the “Description” field. This can help readers understand the purpose or scope of the category.
f) Click on “Add New Category”: Once you have filled in the necessary details, click on the “Add New Category” button to create your new category.
2.3 How to Assign Posts to Categories
After creating categories, you need to assign your blog posts to the appropriate categories. Here’s how you can do it:
a) Edit an Existing Post or Create a New Post: In the WordPress Dashboard, navigate to the “Posts” section and either edit an existing post or create a new one.
b) Find the Categories Box: In the post editor, look for the “Categories” box on the right-hand side of the screen. You will see a list of your existing categories.
c) Select the Relevant Category: Check the box next to the category or categories that you want to assign to the post. If you have created subcategories, you can choose them as well.
d) Add a New Category (Optional): If the category you want to assign is not available, you can add a new category directly from the post editor. Simply click on the “Add New Category” link and follow the same steps outlined in section 2.2.
e) Update or Publish the Post: Once you have assigned the appropriate category or categories, click on the “Update” or “Publish” button to save your changes and make the post live on your blog.
2.4 Best Practices for Using Categories
To effectively use categories in WordPress, consider the following best practices:
a) Keep Categories Broad and Relevant: Create categories that encompass a broad range of related topics. Avoid creating too many narrow categories, as it can confuse readers and make navigation more cumbersome.
b) Use Descriptive and SEO-Friendly Category Names: Choose category names that accurately describe the content within them. Aim for names that are both reader-friendly and keyword-rich, as it can help with SEO.
c) Limit the Number of Categories per Post: To maintain a well-organized blog, try to assign only one or a few relevant categories to each post. Avoid assigning too many categories to a single post, as it dilutes the purpose of categories and can make navigation more complicated.
d) Review and Update Categories Regularly: As your blog evolves, periodically review your categories to ensure they still align with your content and readers’ needs. Remove or merge categories that are no longer relevant, and create new categories as needed.
e) Consider Using Category Widgets: WordPress offers widgets that allow you to display your categories in the sidebar or footer of your blog. This provides easy access for readers to explore your content by category.
Using Tags to Further Organize Your Blog Posts
Tags are an additional organizational tool in WordPress that can help you further categorize and organize your blog posts. While categories provide a broad classification system, tags offer a more specific and detailed way to label and group your content. In this section, we will explore what tags are, how they differ from categories, and how to effectively use tags to enhance the organization of your blog posts.
3.1 What are Tags and How Do They Differ from Categories
Tags in WordPress are similar to keywords or labels that you assign to your blog posts. They provide a way to describe the specific topics, themes, or attributes of your content. Unlike categories, which offer a hierarchical structure, tags are non-hierarchical and can be used more flexibly.
| Aspect | Tags | Categories |
| Specificity | More specific | Broad classification |
| Hierarchical | Non-hierarchical | Hierarchical |
| Flexibility | Highly flexible | Less flexible |
| Navigation | Typically clickable links | Part of the main navigation menu |
3.2 How to Create and Assign Tags
Creating and assigning tags in WordPress is a simple process. Here’s how you can do it:
a) Create Tags: While writing or editing a blog post, locate the “Tags” section in the right-hand sidebar of the post editor. Enter relevant keywords or phrases separated by commas in the “Tags” field. You can create new tags on-the-fly by simply typing them in.
b) Assign Tags: Check the box next to the tags you want to assign to the post. You can assign multiple tags to a single post.
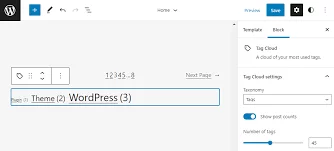
c) Tag Cloud Widget: WordPress provides a “Tag Cloud” widget that you can use to display tags in your sidebar or footer. This widget visually represents your tags, with larger font sizes for more frequently used tags. To add the Tag Cloud widget, go to the WordPress Dashboard, navigate to “Appearance” > “Widgets,” and drag the “Tag Cloud” widget to your desired widget area.
3.3 Best Practices for Using Tags
To effectively use tags in WordPress, consider the following best practices:
a) Be Consistent: Use consistent tagging conventions across your blog. For example, if you use the tag “Social Media Marketing,” consistently use this tag instead of variations like “Social Media” or “Marketing on Social Media.”
b) Use Descriptive Tags: Choose descriptive tags that accurately reflect the content of your posts. Use keywords or phrases that readers are likely to search for or be interested in.
c) Avoid Tag Overload: While tags offer flexibility, avoid overusing them. Assign only relevant and meaningful tags to your posts. Too many tags can clutter your content and dilute the purpose of tags as an organizational tool.
d) Review and Update Tags: Periodically review your tags to ensure they remain relevant and consistent with your content. Remove or merge tags that are no longer needed or are too similar to existing tags.
e) Utilize Tag Clouds: Consider using the Tag Cloud widget to display your tags in a visually appealing manner. This allows readers to explore your content by clicking on specific tags of interest.
How to Use WordPress Menus for Organizing Your Blog Posts
WordPress menus are a powerful tool that allows you to create and customize navigation menus for your website. By using menus, you can organize your blog posts and other content in a structured and user-friendly way. In this section, we will explore how to use WordPress menus effectively to organize your blog posts and enhance the navigation experience for your readers.
4.1 Understanding WordPress Menus
WordPress menus are a feature that allows you to create and manage navigation menus on your website. These menus typically appear as a list of links or buttons that help visitors navigate through your site. The menus can be placed in various locations, such as the header, footer, sidebar, or even within specific pages or posts.
WordPress menus are highly customizable and can include not only pages but also categories, custom links, and even tags. You can create multiple menus and assign them to different areas of your website, offering a flexible way to organize and present your content.
4.2 How to Create and Customize Menus
To create and customize menus in WordPress, follow these steps:
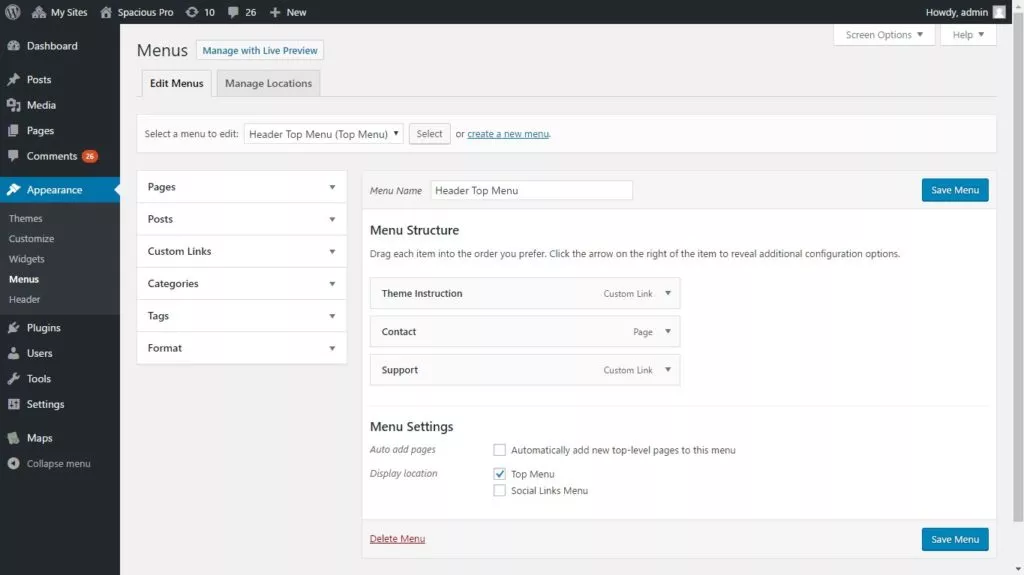
a) Access the WordPress Menu Editor: Log in to your WordPress Dashboard and navigate to “Appearance” > “Menus.” This will take you to the Menu Editor.
b) Create a New Menu: Click on the “Create a new menu” link to start creating a new menu. Give your menu a name (e.g., “Main Menu”) and click the “Create Menu” button.
c) Add Items to Your Menu: On the left-hand side of the Menu Editor, you will see various options to add items to your menu. You can add pages, posts, categories, custom links, or even tags. Simply select the items you want to add and click the “Add to Menu” button.
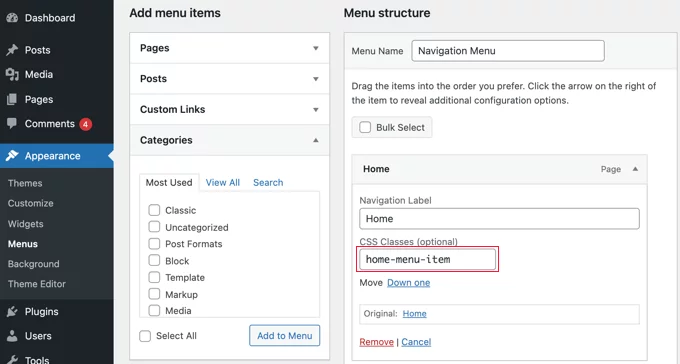
d) Arrange and Customize Menu Items: Once you have added items to your menu, you can rearrange their order by dragging and dropping them within the Menu Editor. You can also customize each menu item by expanding its settings and modifying attributes like the label, title attribute, and CSS classes.
e) Create Submenus (Optional): To create submenus or dropdown menus, simply drag a menu item below and slightly to the right of another menu item. This creates a parent-child relationship, and the submenu will appear when visitors hover over the parent menu item.
f) Assign the Menu to a Location: On the right-hand side of the Menu Editor, you will find the “Menu Settings” section. Here, you can select a menu location where the menu will be displayed on your website. The available locations may vary depending on your WordPress theme.
g) Save and Publish Your Menu: After customizing your menu, click the “Save Menu” button to save your changes. Your new menu will now be displayed on your website according to the assigned location.
4.3 Adding Categories and Tags to Your Menu
One of the powerful features of WordPress menus is the ability to add categories and tags as menu items. This allows you to easily create navigation menus based on specific topics or attributes. Here’s how you can add categories and tags to your menu:
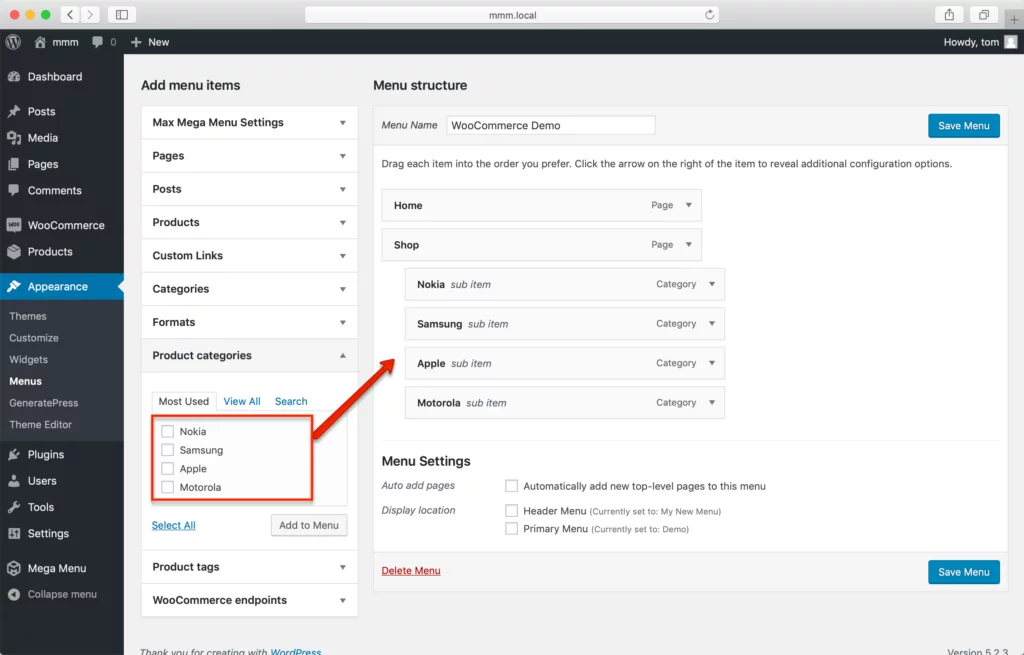
a) Navigate to the Menu Editor: Access the Menu Editor by going to “Appearance” > “Menus” in the WordPress Dashboard.
b) Expand the Categories or Tags Section: In the left-hand options panel of the Menu Editor, you will find the “Categories” and “Tags” sections. Click on the arrow next to the section name to expand it.
c) Select Categories or Tags to Add: Once expanded, you will see a list of your categories or tags. Check the boxes next to the ones you want to add to your menu.
d) Add Selected Categories or Tags: After selecting your desired categories or tags, click the “Add to Menu” button to add them to your menu. They will appear as menu items on the right-hand side of the Menu Editor.
e) Customize and Arrange Menu Items: You can customize and arrange the category or tag menu items just like any other menu item. Modify their labels, titles, CSS classes, and hierarchy as needed.
f) Save and Publish Your Menu: Once you are satisfied with your menu, click the “Save Menu” button to save your changes. The categories and tags you added will now be displayed as menu items on your website.
4.4 Best Practices for Using WordPress Menus
a) Keep Menus Simple and Intuitive: Create menus that are easy to navigate and understand. Avoid overwhelming visitors with too many menu items or complex hierarchies. Keep the menu structure logical and intuitive.
b) Use Descriptive Labels: Use clear and descriptive labels for your menu items. This helps visitors quickly understand what each menu item represents and navigate to the desired content.
c) Prioritize Important Content: Place important pages or categories higher up in your menu hierarchy to ensure they are easily accessible. Consider the most common paths visitors may take when navigating your site and optimize your menu structure accordingly.
d) Regularly Review and Update Menus: As your blog evolves, periodically review your menus to ensure they reflect your current content and priorities. Remove or update menu items that are no longer relevant and add new items as needed.
e) Test Menu Navigation: Test your menus on different devices and browsers to ensure they function correctly and provide a seamless navigation experience for all visitors. Make adjustments if necessary to optimize usability.
Using Plugins to Enhance Blog Post Organization
Plugins are a powerful way to enhance the organization of your blog posts in WordPress. They offer additional functionality and customization options that can streamline your content management process and provide advanced organizational features. In this section, we will explore different plugins that can help you organize your blog posts effectively, how to install and use them, and the pros and cons of relying on plugins for organization.
a) Advanced Custom Fields (ACF): ACF empowers you to craft custom fields for your posts, granting the flexibility to incorporate supplementary information and establish a structured content organization.
b) Custom Post Type UI: This plugin, known as Custom Post Type UI, equips you to generate custom post types that differ from standard posts, allowing them to possess distinctive attributes and taxonomies. This is particularly valuable for streamlining the organization of specialized content like portfolios, testimonials, or events.
c) Custom Taxonomy UI: Utilize the Custom Taxonomy UI plugin to establish custom taxonomies, extending the classification systems beyond conventional categories and tags. Custom taxonomies offer precise content organization based on distinct attributes or characteristics.
d) Post Types Order: Post Types Order simplifies the process of rearranging your posts within categories or custom post types. It presents a user-friendly drag-and-drop interface for customizing the post order according to your preferences.
e) Content Views: With Content Views, you can create tailored views or displays for your posts, driven by specific criteria. This plugin enables you to filter and sort posts based on categories, tags, custom fields, or any other attributes, resulting in a user-friendly presentation of your content
