
WordPress is a robust platform that lets users create and customize their websites with ease. One of the key elements of any website is the navigation menu, which helps visitors navigate through different sections and pages. While a traditional menu works well for smaller websites, a scrolling menu can be a game-changer for larger sites with extensive content. In this blog, we will take you through the process of creating such type of menu in WordPress.
Understanding WordPress Menus: A Brief Introduction
WordPress menus are an essential component of any website’s navigation system. They provide a user-friendly way for visitors to navigate through different pages and sections of your site. Understanding how WordPress menus work is crucial for creating a scrolling menu.
In WordPress, menus are managed through the WordPress dashboard. The dashboard is the control center of your website, where you can make various changes and customizations. In your dashboard, access the menus section and start creating and managing your menus.
WordPress menus are flexible and allow you to add different types of content, such as pages, posts, custom links, and categories. This makes it easy to organize your website’s content and provide a seamless navigation experience for your visitors.
When creating a menu, you have the option to choose a primary menu and assign it to a specific location on your site. The locations of menus may vary depending on your theme, but common locations include the header, footer, or sidebar. By assigning a menu to a location, you ensure that it appears in the designated area on your website.
WordPress menus also offer drag-and-drop functionality, allowing you to easily rearrange the order of menu items. This flexibility enables you to prioritize certain pages or sections, ensuring that your visitors can access the most important content quickly.
Now that we have a basic understanding of WordPress menus, let’s dive into the process of creating a menu in WordPress and adding pages to it. By mastering these fundamental steps, you will be well-prepared to transform your menu into a scrolling menu in the following sections.
The Basics of Creating a Menu in WordPress
Creating a menu in WordPress is a straightforward process that allows you to organize and structure your website’s navigation. In this section, we will explore the basic steps involved in creating a menu and adding pages to it.
Understanding the WordPress Dashboard
Before we dive into creating a menu, let’s familiarize ourselves with the WordPress dashboard. The dashboard is the central core where you can manage and customize your website. To access the dashboard, log in to your WordPress admin area using your credentials.
Once logged in, you will be greeted with the dashboard, which provides an overview of your site’s activity, including recent posts, comments, and site statistics. The dashboard also contains a sidebar menu with various options and settings.
Creating a New Menu
To create a menu in WordPress, navigate to the “Appearance” section in the sidebar menu and click on “Menus.” This will take you to the menu management screen.
On the menu management screen, you will see a “Create a new menu” option. Enter a name for your menu (e.g., “Main Menu” or “Primary Menu”) and click on the “Create Menu” button.
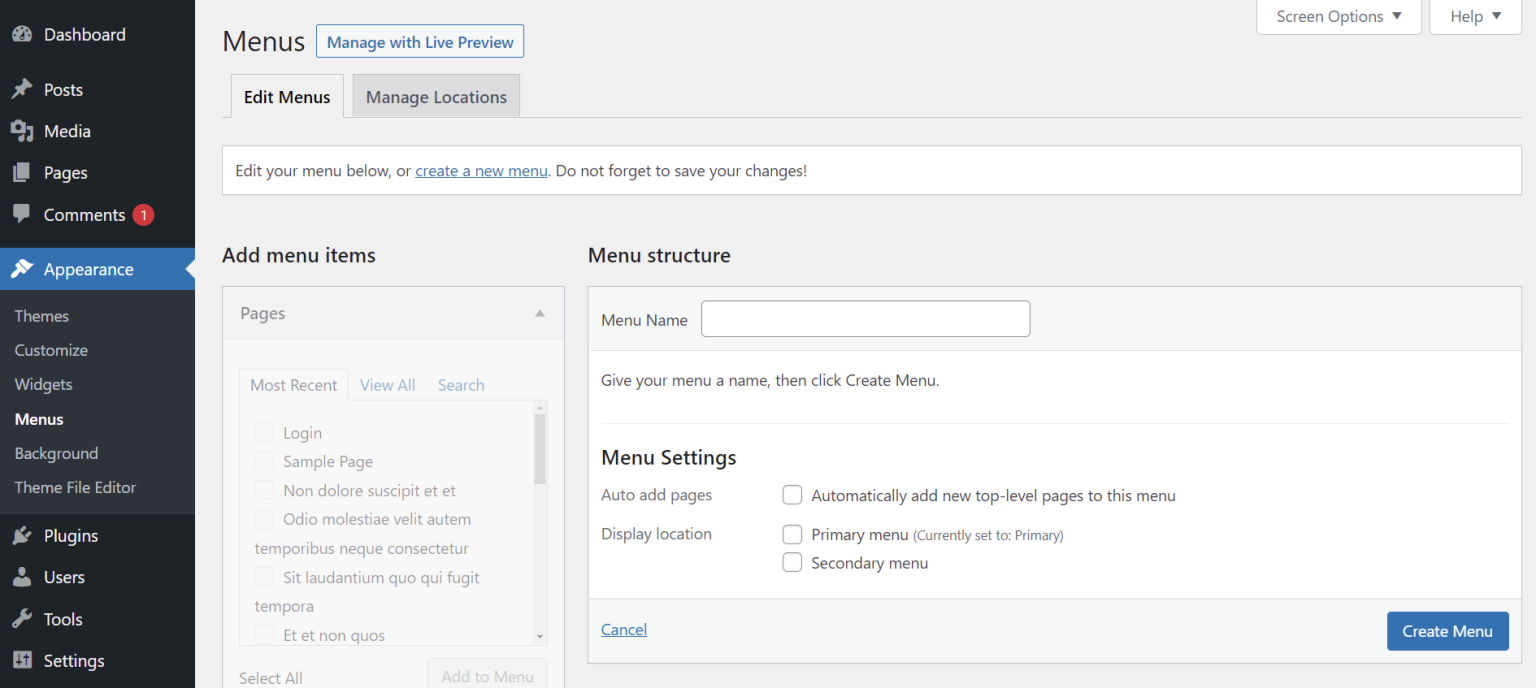
Adding Pages to Your Menu
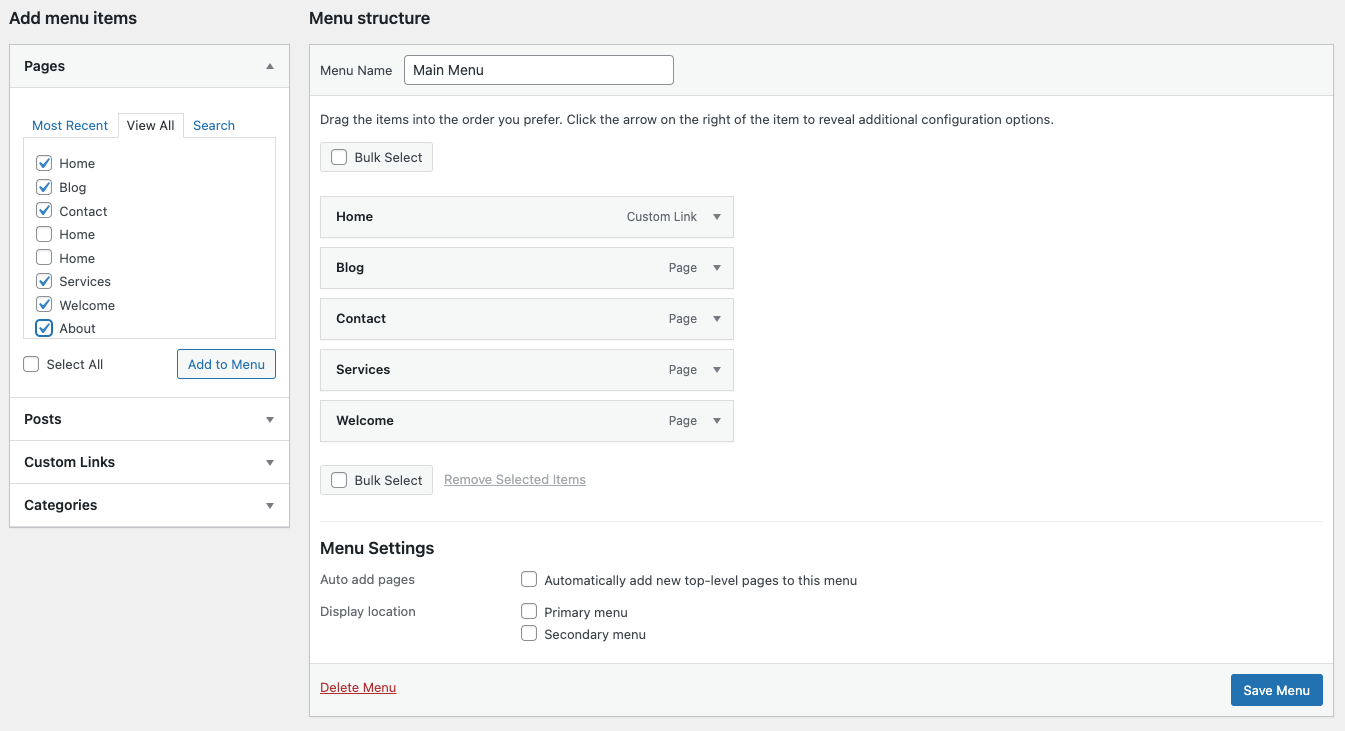
With your menu created, it’s time to add pages to it. On the menu management screen, you will find a list of available pages, posts, custom links, and categories on the left-hand side. Choose the pages you want to add to your menu by checking the respective boxes and clicking on the “Add to Menu” button.
The selected pages will now appear in the “Menu Structure” section on the right-hand side. You can reorganize the order of the menu items by using the drag-and-drop method. To create submenus or dropdown menus, simply drag a menu item slightly to the right beneath another item. This will create a hierarchical structure.
Once you have added and organized your items in the menu, the last step is to click on the “Save Menu” to save your changes.
Transforming Your Menu into a Scrolling Menu
Transforming your menu into a scrolling menu can greatly enhance the user experience, especially for websites with extensive content. In this section, we will discuss the benefits of using a scrolling menu, explore different plugins that can help achieve this functionality, and guide you through the process of setting up your scrolling menu using a plugin.
Why Use a Scrolling Menu?
A scrolling menu offers several advantages over a traditional static menu. Here are a few reasons why you might consider implementing a scrolling menu on your WordPress website:
- Improved Navigation: Scrolling menus allows visitors to easily navigate through a long list of menu items without having to scroll the entire webpage. This makes it more convenient for users to access different sections or pages of your site.
- Space Efficiency: Scrolling menus are compact and take up less space on your website’s layout. This is particularly beneficial for mobile devices or websites with limited screen real estate.
- Modern and Engaging Design: Scrolling menus can add a touch of modernity and interactivity to your website’s design. They can create a dynamic user experience and make your website stand out from the crowd.
Plugins for Creating Scrolling Menus
WordPress offers a fabulous range of plugins that can help you create a scrolling menu with ease. Here are a few popular plugins that you can consider:
- Scroll Menu: This plugin provides a simple and intuitive way to create a scrolling menu. It offers various customization options, including scroll speed, menu styles, and animations.
- Max Mega Menu: Max Mega Menu is a powerful plugin that allows you to create mega menus, which can include images, widgets, and submenus. It also offers the option to transform your menu into a scrolling menu.
- UberMenu: UberMenu is a highly customizable plugin that enables you to create beautiful and responsive menus. It supports both horizontal and vertical scrolling menus, giving you flexibility in design.
Setting Up Your Scrolling Menu Using a Plugin
Once you have chosen a suitable plugin for creating a scrolling menu, follow these general steps to set it up:
- Install and activate the chosen plugin from the WordPress plugin repository named Sticky Menu and Sticky Header.
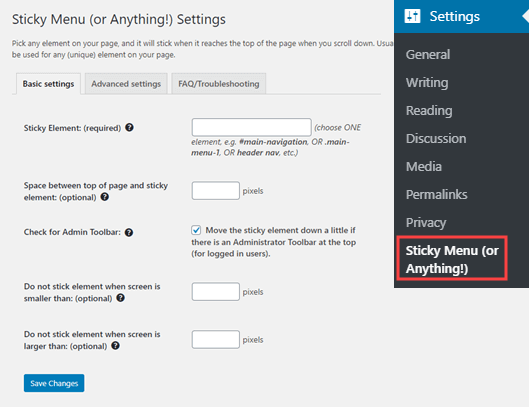
- Navigate to the plugin’s settings or configuration page, which is usually located under the “Appearance” or “Settings” section in the WordPress dashboard.
- Configure the plugin according to your preferences. This may include selecting the scrolling menu option, choosing a style or design, setting up animations, and adjusting any other relevant settings.
- Save your changes and navigate to previewing your website for the scrolling menu in action. Make any necessary adjustments to fine-tune the appearance and behavior of the menu.
By following these steps, you can transform your traditional menu into an engaging and user-friendly scrolling menu that enhances navigation on your WordPress website. In the next section, we will explore customizing your scrolling menu to match your website’s style and branding.
Customizing Your Scrolling Menu
Customizing your scrolling menu is essential to ensure it aligns with your website’s style and branding. In this section, we will explore various aspects of customizing your scrolling menu, including choosing the right style, adding custom links and categories, and arranging menu items.
Choosing the Right Style for Your Scrolling Menu
The style of your scrolling menu plays a crucial role in improving the overall visual appeal of your website. Consider the following customization options to create a scrolling menu that matches your website’s design:
- Menu Layout: Decide whether you want a horizontal or vertical scrolling menu. Horizontal menus are commonly used for desktop websites, while vertical menus are popular for mobile or responsive designs.
- Colors and Fonts: Cherry-pick colors and fonts that align with your website’s branding. Ensure that the menu text is legible and contrasts well with the background color.
- Animations and Effects: Some scrolling menu plugins offer animations and effects to make your menu more engaging. Experiment with different effects to find the one that suits your website’s style.
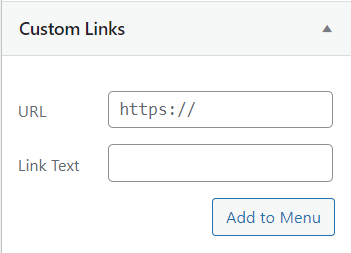
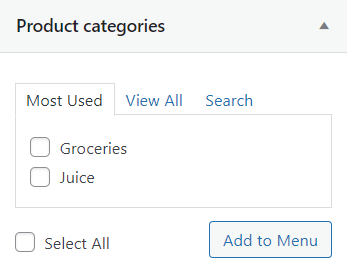
Adding Custom Links and Categories
To make your scrolling menu more comprehensive and user-friendly, consider adding custom links and categories. This allows you to include additional navigation options beyond the standard pages or posts. Here’s how you can add custom links and categories to your scrolling menu:
- Custom Links: If you want to link to an external page or a specific URL within your website, you can add custom links to your menu. Simply provide the URL and label the link accordingly.
- Categories: If you have a blog or a website with multiple sections, you can create categories and add them as menu items. This enables visitors to navigate to specific categories of content directly from the scrolling menu.
Arranging Menu Items
The arrangement of menu items can significantly impact the user experience. Consider the following tips when arranging your menu items:
- Prioritize Important Pages: Place your most important pages or sections at the beginning or top of the menu to ensure they are easily accessible to visitors.
- Logical Grouping: Group related pages or categories together to create a logical flow in your scrolling menu. This helps visitors find relevant content more intuitively.
- Submenus: If you have a large number of menu items, consider using submenus or dropdown menus to organize them into hierarchical structures. This helps keep the menu visually clean and organized.
Remember to save your changes after customizing your scrolling menu. Preview your website to ensure that the customization aligns with your desired look and feel. In the next section, we will address common troubleshooting issues that you may encounter when working with scrolling menus.
Troubleshooting Common Scrolling Menu Issues
While creating and customizing a scrolling menu in WordPress, you may encounter certain issues or challenges. In this section, we will address some common troubleshooting problems and provide solutions to help you overcome them.
Menu Does Not Scroll
If your scrolling menu is not functioning as expected or fails to scroll, consider the following troubleshooting steps:
- Check Plugin Compatibility: Ensure that the scrolling menu plugin you are using is compatible with your WordPress version and theme. Outdated or incompatible plugins may cause conflicts and prevent the menu from scrolling.
- Plugin Conflict: Disable other plugins temporarily to identify if there is a conflict. Sometimes, multiple plugins with similar functionality can interfere with each other and affect the scrolling behavior of your menu.
- Theme Compatibility: Some themes may have their own built-in menu functionality. Verify that your theme supports scrolling menus or consult the theme documentation for any specific instructions.
- CSS Issues: Inspect the CSS code of your theme and the scrolling menu plugin. Look for any conflicting styles or CSS rules that may be preventing the menu from scrolling. Adjust the CSS accordingly to resolve the issue.

Menu Items Not Displaying Properly
If you are experiencing issues with the appearance or display of your menu items, try the following troubleshooting steps:
- Clear Caches: Clear your browser cache and other caching plugins you may have installed. Caches can sometimes interfere with the rendering of menu items, causing them to display incorrectly.
- Check Menu Item Settings: Ensure that each menu item has the correct settings, such as the correct URL, label, and target. Incorrect settings can lead to menu items not displaying properly or linking to the wrong pages.
- Responsive Design Issues: If you are using a responsive design or mobile-friendly theme, test your scrolling menu on different devices and screen sizes. Adjust the CSS or responsive settings to ensure that the menu items are displayed correctly on all devices.
Fixing CSS Issues
CSS (Cascading Style Sheets) plays a vital role in analyzing the appearance and layout of your scrolling menu. If you encounter CSS-related issues, consider the following troubleshooting steps:
- Inspect Element: Use the browser’s developer tools to inspect the elements of your scrolling menu. Identify any CSS conflicts, missing styles, or overridden styles that may be affecting the menu’s appearance.
- CSS Overrides: If your scrolling menu does not match the design of your website, check if there are any CSS rules in your theme or other plugins that conflict with the menu’s CSS. Adjust or override these conflicting styles to achieve the desired appearance.
- Custom CSS: Many scrolling menu plugins provide an option to add custom CSS. Utilize this feature to add specific CSS styles and override any conflicting styles that are affecting the menu’s appearance.
By following these troubleshooting steps, you should be able to address common issues related to scrolling menus in WordPress. Remember to save your changes and test your menu thoroughly after making any adjustments.
Conclusion
As we conclude this blog post, we hope that the information provided has helped you understand the process of creating a scrolling menu in WordPress and customizing it to suit your website’s needs. Implementing a scrolling menu can greatly enhance navigation and improve user experience on your website. Enjoy exploring the possibilities of scrolling menus and take your WordPress website to new heights!
