
Ready to bring your website vision to life on WordPress? Thanks to the magic of Canva, crafting a stunning website has never been simpler. With its easy-to-use interface and endless design possibilities, Canva empowers anyone to create visually captivating websites, no design experience required.
But here’s the catch – once you’ve designed your masterpiece on Canva, the next step is getting it onto WordPress. If you’re wondering how to upload your Canva website to WordPress, don’t stress! This guide is your ultimate blueprint to seamlessly connect your creative work with your WordPress site. Whether you’re a first-time site builder or a seasoned pro looking to streamline your process, we’ve got you covered. Let’s make your website as unique and beautiful as the designs you’ve created!
Understanding the Basics: What is Canva and WordPress and Why Use Them
Canva is an incredible web-based graphic design tool that has gained immense popularity for its simplicity and versatility. It presents a wide range of design templates and tools, making it accessible to both beginners and professionals. With Canva, you can create fabulous visuals for various purposes, including social media posts, presentations, and, of course, websites.
WordPress, on the other hand, is a content management system that powers over 40% of websites on the internet. It provides a robust platform for managing your website’s content, design, and functionality. WordPress offers a user-friendly interface, elaborative customization options, and a wide ecosystem of plugins and themes, making it a top alternative for individuals and businesses alike.
Why Use Canva for Web Design?
Canva offers several benefits that make it an excellent choice for web design:
- User-Friendly Interface: Canva’s drag-and-drop interface makes it simpler for anyone to create visually stunning designs without any coding or design skills. You can customize templates, add text, images, and graphics effortlessly.
- Design Templates: Canva provides a vast library of pre-designed templates specifically tailored for web design. These templates are professionally crafted and cover a wide range of industries and design styles, giving you a head start in developing your website.
- Customization Options: Canva allows you to customize every aspect of your design, from colors and fonts to layouts and images. You can easily adjust elements to match your brand identity and create a unique and personalized website.
- Collaboration and Sharing: Canva enables collaboration among team members, making it easy to work together on website design projects. You can invite others to edit or view your designs, share feedback, and ensure a seamless workflow.
- Integration with WordPress: Canva provides features that allow you to export your designs in formats suitable for WordPress integration. This makes it convenient to transfer your Canva website to WordPress and continue managing your content within the WordPress ecosystem.
Why Use WordPress for Your Website?
WordPress offers several advantages that make it a popular choice for website creation:
- Flexibility and Customization: WordPress allows you to create highly customized websites tailored to your specific needs. With a plethora of themes and plugins available, you can easily modify the design and functionality of your website to match your vision.
- Content Management: WordPress provides a user-friendly interface for managing your website’s content. You can easily create, edit, and organize pages, blog posts, and media files, making it simple to keep your website up to date.
- SEO-Friendly: WordPress is developed with search engine optimization (SEO) in mind. It offers various SEO plugins and features that help improve your website’s visibility in search engine results, driving organic traffic to your site.
- Community and Support: WordPress has a vast and active community of users and developers. This means you can find support, tutorials, and resources to help you navigate any challenges or questions you may have while working with WordPress.
- Scalability: WordPress is highly scalable, allowing your website to grow as your business or online presence expands. Whether you’re starting with a small personal blog or building a large e-commerce site, WordPress can accommodate your needs.
Learn about the importance of images in your blogs and posts here.
The Right Way to Convert Canva Designs for WordPress Site Compatibility
1. Choosing the Correct Format for Your Design
Before exporting your Canva design, it’s essential to choose the correct format that is compatible with WordPress. Canva offers various export options, and selecting the appropriate format will ensure seamless integration.
Typically, the recommended format for WordPress site integration is a high-resolution image file, such as JPEG or PNG. These formats maintain the quality of your design while keeping the file size manageable for web usage. However, if your design includes animations or interactive elements, you may need to explore alternative formats, such as GIF or HTML5, to preserve those features.
Consider the specific requirements of your design and the capabilities of WordPress as you choose the appropriate format.
2. Exporting Your Canva Design
Once you have selected the correct format, follow these steps to export your Canva design:
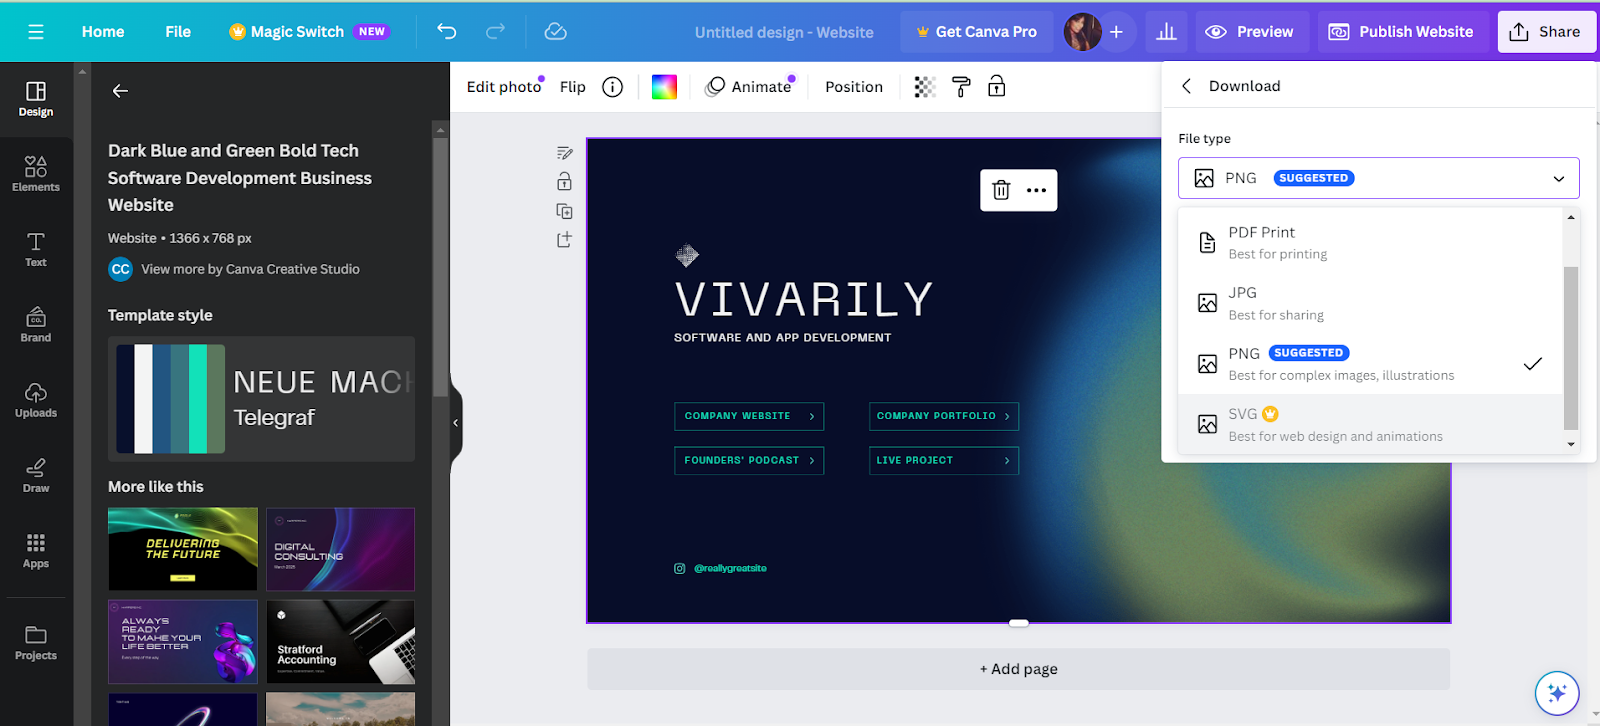
- Open your Canva design: Log in to your Canva account and navigate to the design you want to export.
- Click on the “Download” button: Locate the button “Download” in the top-right corner located on the editor page. Click on it to open the download options.
- Choose the desired format: In the download options, select the format that you have determined suitable for WordPress integration. Canva will provide a dropdown menu with various file formats to choose from.
- Adjust the export settings: Depending on the format you have chosen, Canva may offer additional settings to customize the export. For example, you may have the option to adjust the image quality or specify the dimensions of the exported file. Make any necessary adjustments based on your preferences and requirements.
- Start the export: Once you have configured the export settings, click on the “Download” or “Export” button to initiate the export process. Canva will generate the file and prepare it for download.
- Save the exported file: Once the export is complete, Canva will prompt you to save the file to your computer. Choose a location and save the file with a recognizable name for future reference.
3. Preparing Your Canva Design for WordPress
Before uploading your Canva design to WordPress site, it’s essential to make a few preparations to ensure a smooth integration:
- Rename the file: To avoid any confusion, rename the exported file to something descriptive and relevant to your website. This will make it easier to search and manage the file within the WordPress dashboard.
- Optimize the image size: Depending on the complexity of your design, the exported image file size may be larger than necessary for web usage. Use image optimization tools or plugins to reduce the file size without compromising the quality. This will help improve your website’s loading speed and performance.
- Keep a backup copy: It’s always a good practice to keep a backup of your original Canva design file. This will come in handy if you need to make any modifications or adjustments to the design in the future.
Learn about the importance of infographics here.
From Canva to WordPress: The Best File Formats for Seamless Uploads
A. Accessing Your WordPress Dashboard
To get started, you need to access your WordPress dashboard. Here’s how:
- Open your web browser and type the URL of your WordPress site along with “/wp-admin” at the end (e.g., “www.yourwebsite.com/wp-admin”).
- Enter your login details to access the WordPress dashboard.
Once you have successfully logged in, you will have access to the backend of your WordPress website, where you can manage and customize your content.
B. Importing Your Canva Design
To import your Canva design to WordPress, follow these steps:
- In the WordPress dashboard, locate and click on the “Appearance” option in the left-hand menu.
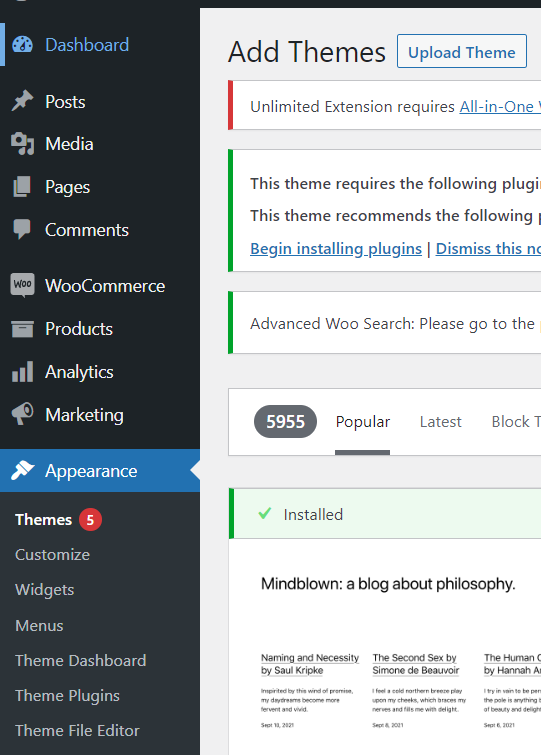
- From the submenu, click on “Themes” to access the theme management page.
- Navigate to the “Themes” page and locate the “Add New” option at the top.
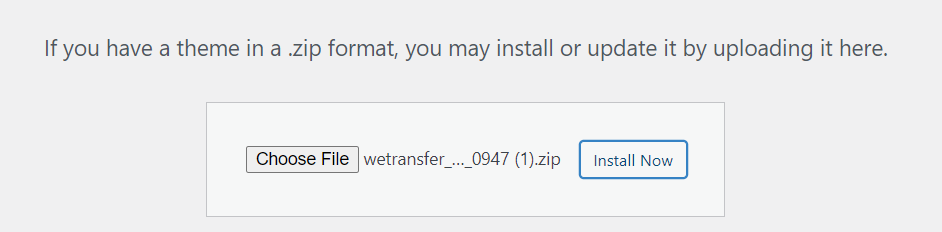
- Upon clicking, you will be directed to the “Add Themes” page. Look for the “Upload Theme” button and click on it.
- Next, search for the “Choose File” button and browse to the location where you saved your Canva design file.
- Select the Canva design file from your computer and click on the “Install Now” button.
- WordPress will upload and install the Canva design theme. Once the installation is fully complete, click on the “Activate” button to activate the theme.
Congratulations! You have successfully uploaded your Canva design to WordPress. Your website will now reflect the design elements and layout you created in Canva.
Maintaining and Updating Your Canva Design on WordPress
A. Regularly Updating Your Website
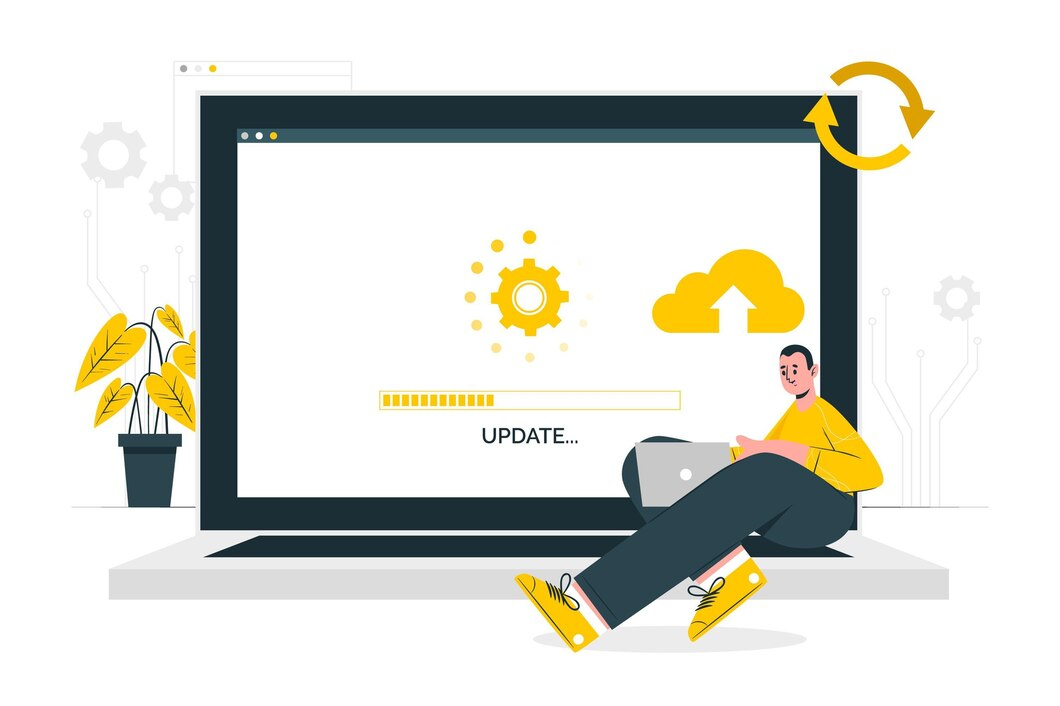
Keeping your website updated is crucial for security, performance, and user experience. Here are some essential tasks to consider:
- WordPress Updates: Stay up to date with the latest version of WordPress. Regularly check for updates in your WordPress dashboard and install them to get advantages from bug fixes, new features, and security enhancements.
- Theme Updates: If your Canva design is based on a specific WordPress theme, ensure that you keep the theme updated. Check for theme updates regularly and apply them when available to maintain compatibility and leverage new features.
- Plugin Updates: Plugins play a vital role in extending the functionality of your WordPress site. Keep all installed plugins updated to benefit from bug fixes, security patches, and new features. Regularly check for updates in the Plugins section of your WordPress dashboard.
- Content Updates: Update your website’s content regularly to keep it relevant and engaging. This includes adding new pages, blog posts, images, and videos, as well as refreshing existing content. Regularly review your website’s content to ensure accuracy, readability, and alignment with your overall business or personal objectives.
B. Implementing Changes to Your Canva Design
If you want to make changes to your Canva design after uploading it to WordPress site, follow these steps:
- Open Canva: Log in to your Canva account and locate the Canva design you want to modify.
- Make the necessary changes: Open the Canva design in the editor and make the desired modifications to the design elements, layout, or content.
- Export the updated design: Once you have completed the changes, follow the export process outlined earlier in this blog post to generate a new version of the Canva design file.
- Repeat the upload process: Return to your WordPress dashboard and repeat the process of uploading the updated Canva design file as a theme. Activate the new version of the design to apply the changes to your website.
C. Keeping Your WordPress Site Secure

Updating the security of your WordPress site is crucial to protect your data and ensure a safe browsing experience for your users. Here are some key security measures to consider:
- Strong Usernames and Passwords: Use unique and complex usernames and passwords for your WordPress login credentials. Avoid using common usernames like “admin” and choose strong passwords that are an amalgamation of letters, numbers, and special characters.
- Two-Factor Authentication (2FA): Enable two-factor authentication for an extra layer of security. This requires users to present a second form of verification, like a temporary code sent to their mobile device, in addition to their username and password.
- Regular Backups: Regularly backup your WordPress website to protect against data loss. Backup your files, database, and any other critical information using reliable backup plugins or services. Store the backups in a safe location, either locally or in the cloud.
- Security Plugins: Install and configure reputable security plugins to improvise the security of your WordPress website. These plugins can help detect and prevent malicious activities, such as brute-force attacks and malware injections.
- Update Themes and Plugins: Keep your themes and plugins updated to benefit from security patches and bug fixes. Outdated themes and plugins can pose security vulnerabilities and increase the risk of unauthorized access.
Upload Canva Designs to WordPress: Everything You Need to Know
Transforming your Canva creations into a stunning WordPress site is easier than you think. With just a few clicks, your designs can come to life, captivating your audience with every post, page, and graphic. The process is smooth, intuitive, and ensures your site shines with professional-quality visuals.
But to make sure your website performs at its best—fast, secure, and always reliable—you need a hosting solution that can keep up. That’s where Nestify Hosting comes in. Their powerful hosting options give you the foundation you need to take your site to the next level.
Ready to boost your online presence? Start with Nestify today and watch your website soar!
FAQs on Boost Your Site’s Appeal: How to Upload Canva Website to WordPress
Can I optimize Canva images for WordPress?
Yes! Before uploading Canva designs, you can optimize them for faster loading times by exporting them in smaller sizes or using tools like TinyPNG. This ensures your website remains fast and responsive.
Can I use Canva designs for eCommerce websites?
Yes! Canva can help you create product images, banners, promotional graphics, and more for your eCommerce site. Simply download the design and upload it to your WordPress eCommerce platform (like WooCommerce) to enhance your store.
