
Embarking on a digital journey, where pixels converge to craft an immersive online experience, the significance of a website’s design cannot be overstated. Within this realm, the subtle yet impactful art of a sticky header emerges as a beacon of user-friendly navigation. For WordPress users navigating the Elementor landscape, this guide unravels the steps to seamlessly infuse your web pages with the magic of a sticky header. Prepare to elevate your website’s aesthetics and functionality as we delve into the intricacies of creating a fixed, ever-present header that glides effortlessly with the scroll.
Understanding the Concept of Sticky Header
What is a Sticky Header?

A sticky header refers to a website design element, usually the header section, that remains fixed at the top of the viewport as users scroll down a page. Unlike a traditional header that scrolls out of view, a sticky header “sticks” to the top, ensuring key navigation components, such as the menu and logo, stay visible throughout the browsing experience.
2. Purpose and Functionality:
The primary purpose of a sticky header is to enhance user experience by providing consistent access to essential information. As users explore content on a webpage, the sticky header remains a constant reference point, offering quick navigation options without requiring users to scroll back to the top of the page.
3. Key Components:
A typical sticky header includes core elements like the website logo, navigation menu, and, often, additional interactive features such as search bars or call-to-action buttons. These elements collectively contribute to streamlined navigation and reinforce brand identity.
4. Responsive Design:
Sticky headers are designed to be responsive, adapting seamlessly to different screen sizes. This is especially crucial in the era of mobile browsing, where users expect an intuitive and efficient experience. On smaller screens, the sticky header ensures that vital navigation remains accessible without consuming valuable screen real estate.
5. User Engagement:
By eliminating the need for users to scroll back to the top for navigation, a sticky header encourages continuous engagement. Visitors can effortlessly explore various sections of the website, fostering a positive user experience and potentially increasing the time spent on the site.
6. Implementation:
The implementation of a sticky header often involves utilizing web design tools or content management systems. For instance, in WordPress, designers commonly employ page builders like Elementor to enable the sticky functionality and fine-tune its behavior.
7. Aesthetic Considerations:
Beyond functionality, sticky headers contribute to the aesthetic appeal of a website. They provide a smooth transition as the header transforms from a static position to a fixed one, adding a touch of elegance to the overall design.
Steps to Create a Sticky Header in Elementor
Step 1: Create Your Menu
Begin by setting up your menu, which will serve as the foundation for your header. In your WordPress dashboard, navigate to “Appearance” and select “Menus.” Edit an existing website menu or create a new one, adding the desired pages or categories to the menu structure. Assign this menu as your primary navigation menu.

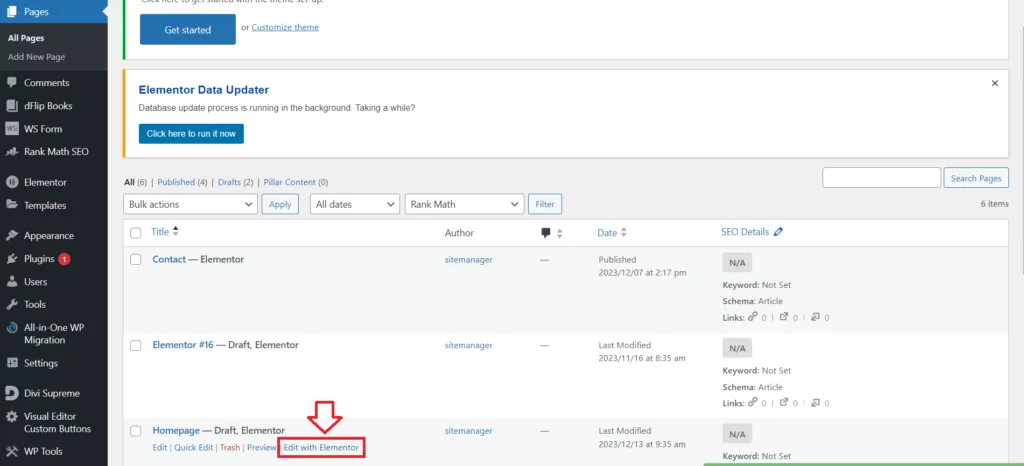
Step 2: Design Your Header Section with Elementor
Access the page you want to edit with Elementor. Click on “Edit with Elementor.” Now, design your header section using Elementor. This may include adding a logo, navigation menu widget, or any other elements you want in your header.
Step 3: Customize Your Header Section With Elementor
Once your header section is in place, customize its appearance to align with your website’s design. Adjust colors, typography, margins, and spacing according to your branding guidelines. Ensure your header looks cohesive and visually appealing.

Step 4: Access the Advanced Settings
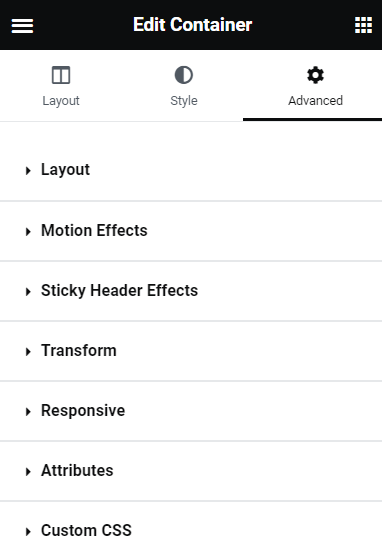
Click on the header section you’ve designed, opening the left panel. Navigate to the “Advanced” tab to access additional customization options.
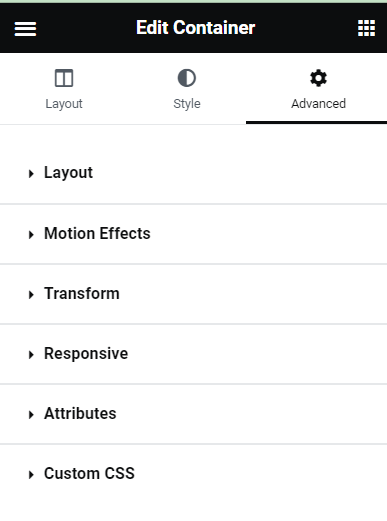
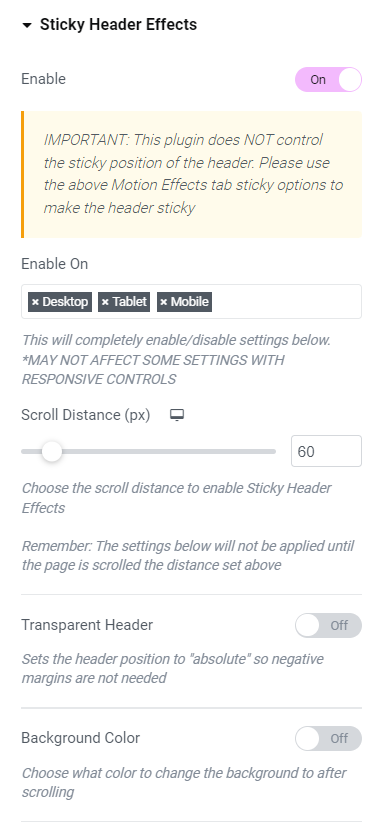
If you can’t find such an option then download Sticky Header Effects For Elementor plugin, install and activate it. An option of sticky header effects automatically pops in the page section. Click on it, enable it, and adjust the settings accordingly.
Step 5: Enable Motion Effects
Within the “Advanced” tab, locate the “Motion Effects” section. Toggle the “Sticky” option to “Yes” to activate the sticky functionality for your header.
Step 6: Configure Sticky Settings
Fine-tune the behavior of your sticky header by adjusting the “Top Offset” and “Bottom Offset” in the existing setting. The “Top Offset” determines when the header becomes sticky, while the “Bottom Offset” controls when it returns to its original position. If you are making use of the plugin setting, adjust the scroll distance, color, etc.
Step 7: Preview and Refine
Preview your page to see how your sticky header behaves as you scroll. Refine the sticky settings if needed, ensuring a seamless transition and a visually pleasing effect.
Step 8: Save Your Changes
Once satisfied with your sticky header’s design and functionality, click the “Update” button to save your changes. This ensures that your newly created sticky header is now live on your WordPress website.
Congratulations! You’ve successfully crafted a visually appealing and user-friendly sticky header using Elementor in WordPress. Your website visitors can now enjoy a seamless navigation experience as they explore your content.
Benefits of a Sticky Header
- Improved Navigation: With a sticky header, essential navigation elements such as the menu and logo remain visible as users scroll down the page. This ensures easy access to key sections of the website, enhancing overall navigation efficiency.
- Consistent Branding: A sticky header helps maintain consistent branding by keeping the logo and key design elements in view at all times. This contributes to a cohesive and professional look, reinforcing brand identity.
- Enhanced User Engagement: Users can quickly switch between pages or access the menu without scrolling back to the top. This convenience encourages users to explore more content and engage with the website for a longer duration.
- Time-Saving for Users: Visitors can efficiently navigate through the site without having to scroll up to find the navigation menu or other crucial information. This time-saving aspect contributes to a positive user experience.
- Call-to-Action Visibility: If your header contains a call-to-action (CTA) button, a sticky header ensures that this important element remains visible throughout the user’s journey, potentially increasing the likelihood of conversions.
- Scroll Progress Indicator: The sticky header can serve as a subtle scroll progress indicator. As users scroll down, the change in the header’s appearance signals progression through the content, providing a visual cue.
- Mobile Responsiveness: On smaller screens, where vertical space is limited, a sticky header can be particularly beneficial. It ensures that vital navigation options are readily accessible, mitigating the need for excessive scrolling on mobile devices.
Potential Risks of Implementing Sticky Headers

While sticky headers can enhance user experience, there are potential risks associated with their implementation. It’s essential to be aware of these risks to make informed decisions during the design and development process:
1. Visual Distraction:
- Risk: A sticky header that’s too prominent or contains distracting elements might divert attention from the main content.
- Mitigation: Keep the design clean and ensure that the sticky header complements the overall aesthetics of the website without overwhelming users.
2. Mobile Responsiveness Challenges:
- Risk: Sticky headers may pose challenges on smaller screens, potentially covering a significant portion of the viewport.
- Mitigation: Test the responsiveness of the sticky header on various devices and consider adjustments or alternative designs for mobile users.
3. Performance Impact:
- Risk: Excessive use of animations or complex elements in the sticky header can impact page loading times.
- Mitigation: Optimize images, scripts, and animations to ensure the sticky header doesn’t compromise overall website performance.
4. User Interface Clutter:
- Risk: Adding too many elements or functionalities to the sticky header can lead to clutter, diminishing its effectiveness.
- Mitigation: Prioritize essential elements, such as navigation links and brand identity, and avoid overloading the sticky header with unnecessary features.
5. Accessibility Issues:
- Risk: Sticky headers might present accessibility challenges, especially for users with certain disabilities.
- Mitigation: Ensure that the sticky header is accessible, adheres to accessibility standards, and is navigable using assistive technologies.
6. Browser Compatibility:
- Risk: Sticky headers may behave inconsistently across different browsers, leading to a disjointed user experience.
- Mitigation: Test the sticky header across major browsers to ensure consistent behavior and make adjustments as needed.
7. SEO Considerations:
- Risk: While sticky headers themselves don’t directly impact SEO, poor implementation or excessive use of scripts can affect search engine rankings.
- Mitigation: Follow best practices for web development, optimize code, and ensure that the overall SEO strategy is not compromised.
8. User Preferences:
- Risk: Some users may find sticky headers intrusive or may prefer a more minimalistic design.
- Mitigation: Consider providing an option for users to toggle the sticky header on or off based on their preferences.
Conclusion
Implementing a sticky header using Elementor in WordPress enhances user navigation and provides a polished, professional appearance to your website. By following the above-mentioned guide, you can effortlessly create a sticky header that contributes to an improved user experience. Stay updated with Elementor’s features, as the interface may evolve over time, and always check for the latest documentation for any changes or additional options.
FAQs
Are sticky headers suitable for all types of websites?
While sticky headers can benefit many websites, their appropriateness depends on factors like website design, user preferences, and the specific content structure. Consider your audience and content type before implementing one.
Do sticky headers impact website performance?
Excessive animations or complex elements in a sticky header can impact page loading times. Optimize images, scripts, and animations to maintain optimal performance.
How do I address browser compatibility issues with sticky headers?
Test the sticky header across major browsers to ensure consistent behavior. Make adjustments as needed to address any inconsistencies.
Is it possible to have multiple sticky elements on a page?
While technically possible, having multiple sticky elements can lead to visual clutter and potential usability issues. Carefully consider the design and user experience implications before implementing multiple sticky elements.
