
In this comprehensive article, we will guide you through the process of seamlessly embedding a ChatGPT chatbot into your website. By following these steps, you can leverage the power of ChatGPT, with its customizable features and the ability to utilize the latest models from OpenAI. What’s more, you have full control over the management of ChatGPT, including the choice of plugins and how the bot is trained, simply by using your own OpenAI API Key.
Once you have integrated the embedded ChatGPT bot into your website’s live chat, a world of possibilities opens up. You can customize the look and feel of the chatbot to match your website’s branding, ensuring a cohesive user experience. Additionally, you can set up human escalation, seamlessly integrating the embedded ChatGPT bot with popular communication platforms like Microsoft Teams, Slack, Zoom, and Webex. This means you can seamlessly transfer conversations to human agents when necessary, providing a smooth and efficient customer support experience.
One of the key advantages of using ChatGPT is the ability to set up keyword intents that trigger escalation to human agents. By defining specific phrases or triggers, you can ensure that complex or sensitive inquiries are promptly handled by your support team, improving customer satisfaction and response times. Furthermore, you can actively monitor ongoing chats, allowing your company to engage with website visitors at the most appropriate moment, ensuring a timely and effective response.
Here are some of the capabilities you can leverage with your embedded ChatGPT chatbot:
- Pre-qualify leads: Utilize the chatbot to gather information from potential customers, helping you identify qualified leads.
- Choose your ChatGPT model: Stay up to date with the latest advancements by selecting the desired ChatGPT model for your chatbot. (Keep an eye out for ChatGPT 4, coming soon!)
- Set up initial system messages: Customize the introductory messages that greet users when they interact with the chatbot, providing a warm and personalized experience.
- Configure human escalation triggers: Define specific phrases or keywords that automatically escalate conversations to human agents, ensuring complex issues receive the attention they require.
- Share important URLs: Seamlessly send links to relevant resources, such as product documentation or support articles, directly from the chatbot.
- Register leads: Capture and record potential leads for your services using the chatbot’s interactive capabilities, enabling efficient lead management.
- Direct visitors to website information: Guide website visitors to specific pages or sections of your website, providing them with the information they need using ChatGPT’s conversational guidance.
Now, let’s dive into the step-by-step guide to embedding ChatGPT into your website with OpenAI + Social:
Prerequisites:
- An OpenAI ChatGPT Account: Visit the OpenAI platform (https://platform.openai.com/signup) to sign up and create your account.
- A Social Intents Account: Register for an account at Social Intents (https://www.socialintents.com) to access their chatbot integration services.
High-level steps:
- Create a Live Chat app in Social Intents: Begin by setting up a Live Chat application within the Social Intents platform to establish the foundation for integrating ChatGPT into your website’s chat functionality.
- Generate your OpenAI API Key: After registering for an OpenAI ChatGPT account, obtain your unique API Key, which will serve as the gateway for accessing ChatGPT’s capabilities.
- Add your OpenAI API Key to Social Intents: Configure your Social Intents chatbot settings by incorporating your OpenAI API Key, enabling seamless communication between Social Intents and ChatGPT.
By following these steps, you’ll be well on your way to enhancing your website’s user experience with the powerful features of ChatGPT.
1. Create a Live Chat widget in Social Intents
- Register for a 14-Day Free Trial: If you don’t already have an account with Social Intents, head over to their website and sign up for a free trial. This trial period will allow you to explore and evaluate the features and benefits of their platform.
- Choose an Integration: Once you’ve signed up, you’ll be prompted to select an integration option. Social Intents offers integrations with popular communication platforms like Microsoft Teams, Slack, as well as a standalone account option. These integrations are essential for inviting Live Chat agents when you need to escalate a website chat from the chatbot to human support. With these integrations, you’ll have the flexibility to answer chats within the chosen platform, such as Microsoft Teams, Slack, Zoom, Webex, or directly in Social Intents’ web-based dashboard.
- Set up Live Chat Agents: Depending on your chosen integration, you’ll need to configure and add Live Chat agents to the respective platform (e.g., Microsoft Teams, Slack, etc.). These agents will be responsible for handling escalated chats from the chatbot, ensuring a seamless transition from automated responses to personalized human support.
- Create a Live Chat Widget: Within your Social Intents account, navigate to the Live Chat settings and create a new widget. This widget will represent the chat interface that will be embedded on your website, enabling visitors to interact with the ChatGPT bot.
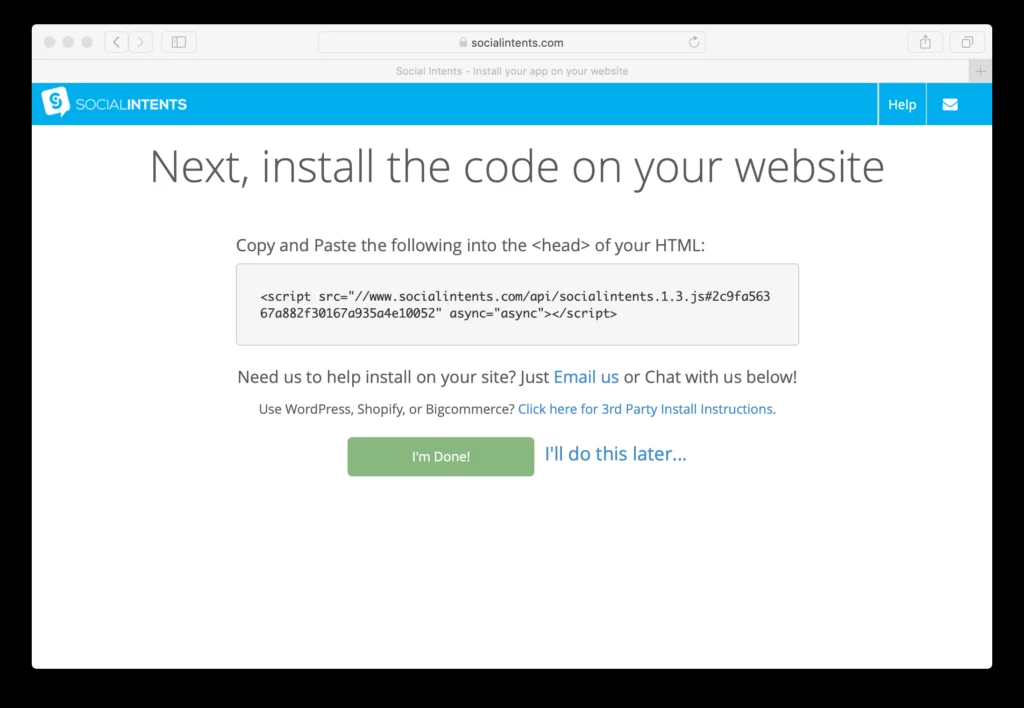
- Generate Code Snippet: Once you’ve set up your Live Chat widget, Social Intents will provide you with a code snippet. This snippet contains the necessary code to integrate the ChatGPT chatbot into your website. Copy the code snippet and proceed to the next step.
- Embed the Code Snippet on Your Website: Access the source code of your website and locate the section where you want to place the chatbot. Paste the code snippet provided by Social Intents into that section of your website’s code. This will enable the chatbot functionality and allow visitors to engage with ChatGPT directly on your site.
2. Create your OpenAI account
Before proceeding with the integration of ChatGPT into Social Intents, ensure that you have an OpenAI account. If you haven’t signed up yet, follow these steps:
- Visit the OpenAI website: Go to the OpenAI website at https://platform.openai.com/.
- Sign up for an account: Click on the “Sign up” or “Get started” button to create your OpenAI account. Follow the prompts and provide the necessary information to complete the registration process.
- Access your profile and API keys: Once you’ve successfully signed up and logged into your OpenAI account, navigate to your profile settings. This can usually be found by clicking on your profile icon or username.
- View your API keys:
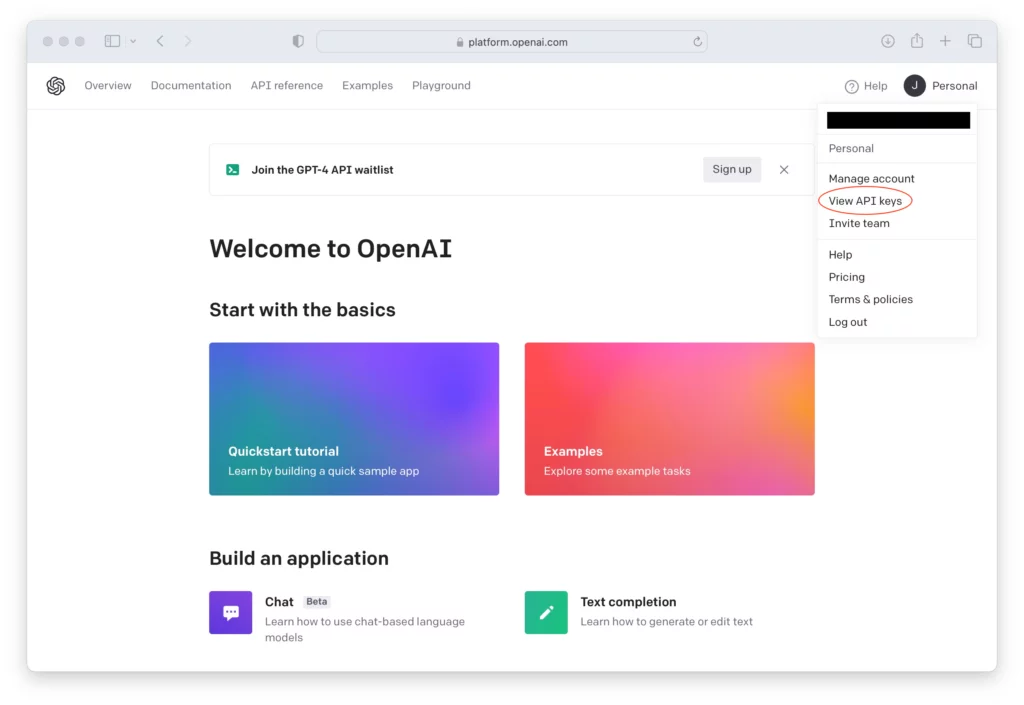
- Within your profile settings, locate the option to “View API keys.” Click on this option to access your API key management page.
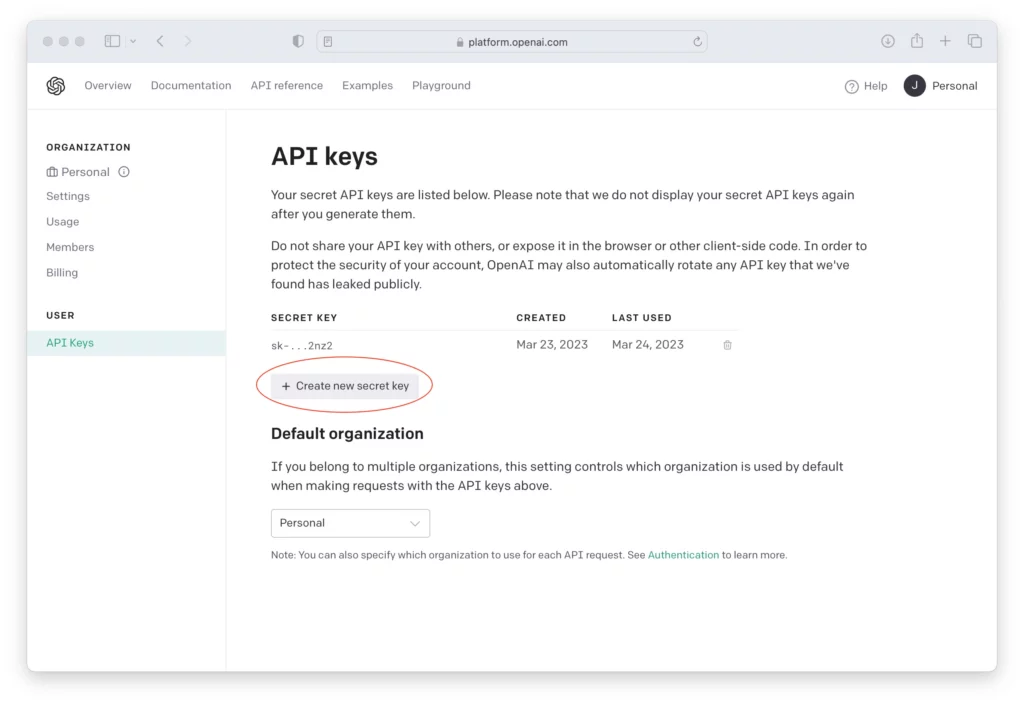
- Create a new API key: On the API keys page, you should see a list of your existing API keys or a prompt to create a new one. If you don’t have an existing API key, click on the “Create new API key” or similar button to generate a new key.
- Copy your API key: After creating a new API key, you will be provided with the key itself. Copy the API key as you will need it for the next step.
Now that you have your OpenAI API key, proceed with the integration steps in Social Intents:
Access your Social Intents account: Log in to your Social Intents account using your credentials. Navigate to Chatbot Settings: Within your Social Intents account, locate the Chatbot Settings or Integration Settings section. This is where you can configure the integration with external services.
- Configure OpenAI integration: Look for the OpenAI integration settings within the Chatbot Settings. This is where you will need to input your OpenAI API key.
- Enter your OpenAI API key: Paste the API key you obtained from OpenAI into the designated field within the Social Intents Chatbot Settings. Make sure to save your changes to apply the integration.
3. Add your OpenAI API Key to Social Intents
Once you have successfully created a Live Chat app in Social Intents, follow these steps to configure the Chatbot Settings:
- Access Chat Settings: In your Social Intents account, navigate to the Chat Settings by clicking on “My Apps” and then selecting “Edit Settings” for your desired chat widget.
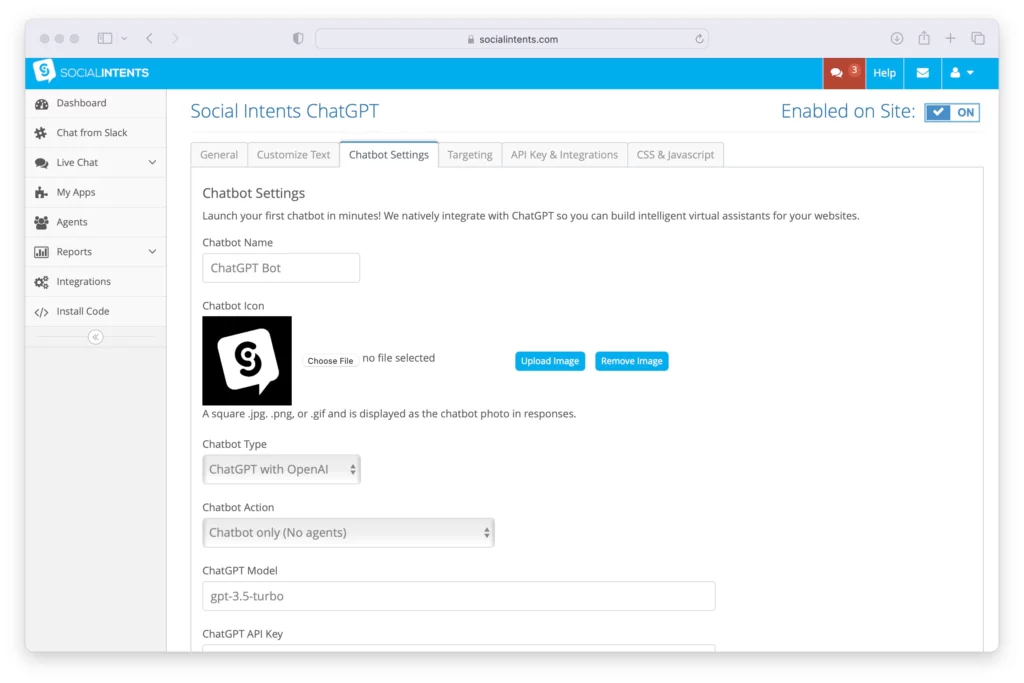
- Open Chatbot Settings: Within the Chat Settings, locate the “Chatbot Settings” tab and click on it to access the configuration options for your chatbot.
- Name and Avatar: In the Chatbot Settings, give your chatbot a name that represents its identity. You can also choose an avatar or image to visually represent the chatbot during conversations.
- Select Chatbot Type: Choose the Chatbot Type as “ChatGPT with OpenAI” from the available options. This ensures that your chatbot is powered by ChatGPT technology using the OpenAI platform.
- Determine Chatbot Invitation Behavior: Decide how you want the chatbot to be invited into conversations. You have three options: a. Chatbot Only: The chatbot handles conversations without involving live chat agents. b. Chatbot Pick Up When Agents Are Offline or Miss a Chat: The chatbot takes over when your live chat agents are unavailable or fail to respond. c. Chatbot Joins When Agents Join: The chatbot joins the conversation simultaneously when live chat agents are present.
- Choose the ChatGPT Model: OpenAI supports various models for the Chat API. You can refer to the OpenAI documentation at https://platform.openai.com/docs/guides/chat to explore the available options. For now, select the current chat model: “gpt-3.5-turbo.”
- Enter your OpenAI API Key: Copy your OpenAI API Key, which you obtained earlier, and paste it into the field labeled “ChatGPT API Key” within the Chatbot Settings. This key establishes the connection between Social Intents and the OpenAI platform.
After configuring the basic settings for your ChatGPT chatbot in Social Intents, you can further customize its behavior and interaction with users using the following features:
- Customizing Welcome Text: Personalize the initial interaction by setting a Default Welcome Response. This message will be displayed when users initiate a conversation with the chatbot. Additionally, you can include Quick Reply buttons to provide users with predefined options to guide them through the conversation.
- Human Escalation Trigger Phrases: Define specific phrases or keywords that indicate a user’s intent to connect with a live agent. When one of these trigger phrases is matched, Social Intents automatically sends Live Chat Invites to your human agents in platforms like Microsoft Teams, Slack, Zoom, or Webex. This ensures a smooth transition from the chatbot to human assistance. Once your agents respond and take over the conversation, the chatbot will no longer be actively involved.
- Customizing Instruction Phrases: Adjust the ChatGPT Instruction Phrases to align with your specific website and desired outcomes. By including relevant keywords or phrases that point to your website URLs, you can guide ChatGPT to provide more accurate and helpful responses to user queries.
By leveraging these customization options, you can enhance the user experience and optimize the effectiveness of your ChatGPT chatbot within Social Intents. Remember to tailor the welcome text, trigger phrases, and instruction phrases to align with your business objectives and the specific needs of your website visitors.

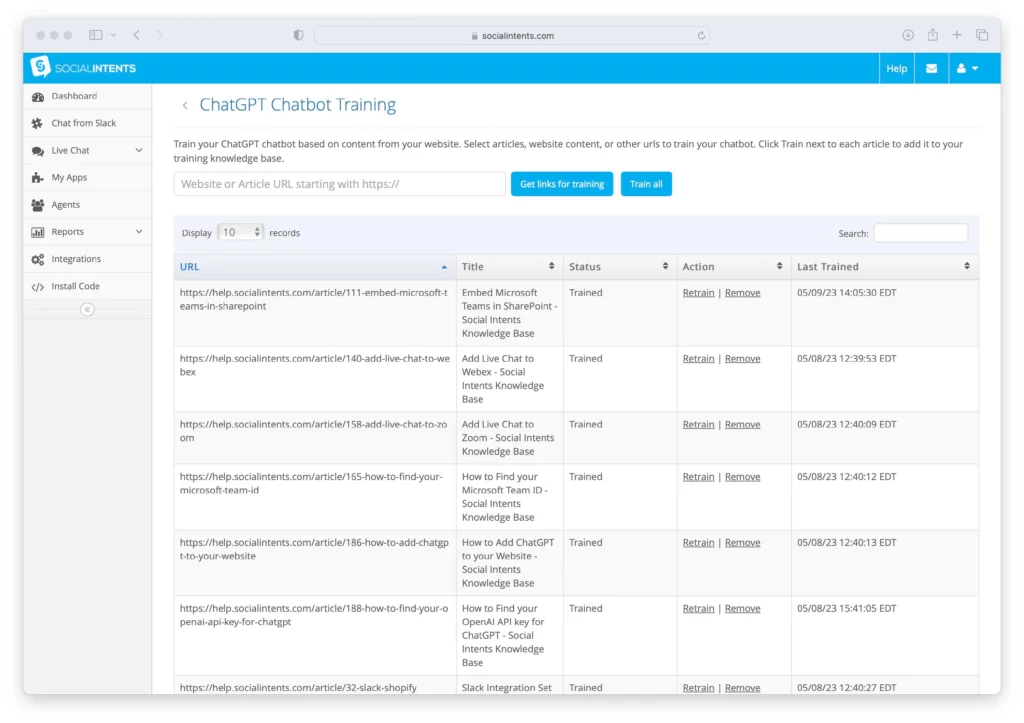
4. Train your ChatGPT Chatbot with your Website Content
Training your ChatGPT chatbot involves two essential steps. Let’s explore each step in detail:
- Utilizing Instruction Phrases: In the chatbot settings, you can leverage Instruction Phrases to send an initial System message when starting a chat. This system message provides important context to the ChatGPT bot. It allows you to convey the desired tone, specify the types of answers you expect from the bot, and provide guidance on where to direct visitors. By using Instruction Phrases, you can enhance the chatbot’s understanding and align its responses with your specific requirements.
- Training ChatGPT with Your Own Content: The exciting part is that you can train ChatGPT with your own content easily. Within the chatbot settings, click on the “Train your chatbot” button. This will take you to a dedicated page where you can list URLs that contain the content you want to use for training. You can enter a base domain or individual URLs that host the relevant information. Once you’ve specified the content sources, click on “Train All” to initiate the training process.
By following these steps, you will have a ChatGPT chatbot that is trained on your own website content and knowledge base articles. This personalized training empowers the chatbot to provide more accurate and relevant responses to user queries, based on the specific information and knowledge you have provided. It enhances the effectiveness of the chatbot and ensures a more tailored conversational experience for your website visitors.
5. Copy your Live Chat Code Snippet to your Website
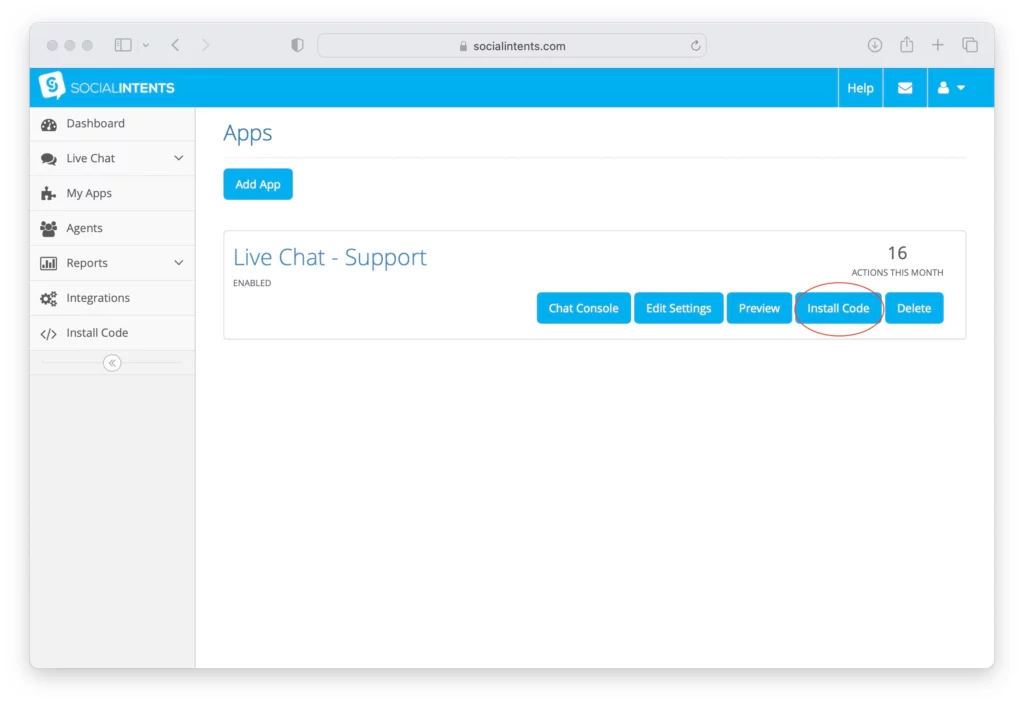
To enable the ChatGPT chat functionality on your website, simply copy the Live Chat code snippet provided by Social Intents and add it to your website’s HTML template. Follow these steps:
- Copy the Live Chat code snippet: Locate the Live Chat code snippet that Social Intents generated for you during the setup process.
- Access your HTML template: Open the HTML template file of your website in a text editor or HTML editor.
- Paste the code snippet: Find the appropriate section within your HTML template where you want to place the chat functionality. It could be in the footer, sidebar, or a dedicated chat section. Paste the copied code snippet into that section of your HTML template.
- Save and deploy changes: Save the changes to your HTML template and deploy the updated website to make the ChatGPT chatbot functional on your site.

6. That’s it! Your ChatGPT Chatbot is added on your website!
Congratulations! Your website’s chatbot, powered by ChatGPT, is now fully enabled and ready to assist your visitors with their questions.
If you encounter any errors during the implementation process, ensure that you have added your billing information to your OpenAI account. Please note that the ChatGPT API is only available on paid OpenAI plans. If you haven’t provided the necessary billing details, you may receive an error message response from the chatbot, similar to the following:

To resolve this issue, navigate to your OpenAI account and add the required billing information. Once you have a valid subscription, you’ll be able to enjoy uninterrupted access to the ChatGPT API and provide seamless conversational experiences to your website visitors.
Learn about ChatGPT plugins here.
FAQs on ChatGPT in Website:
Do I need to have coding skills to integrate ChatGPT into my website?
Yes, some coding skills are required to integrate ChatGPT into your website. You’ll need to work with backend technologies like Python, Node.js, or any other programming language that can handle API requests.
What programming languages are supported for integrating ChatGPT?
You can use any programming language that can make HTTP requests to interact with the OpenAI API. Popular choices include Python, JavaScript (with Node.js), Java, Ruby, and more.
Is there a user interface (UI) available for ChatGPT integration?
OpenAI provides an API, but it does not offer a pre-built UI. You’ll need to design and create the UI for your chatbot on your website.
How can I handle sensitive information or user data when using ChatGPT?
It’s important to be cautious when handling sensitive information. Avoid passing sensitive data directly to the API and carefully review OpenAI’s guidelines on data usage and privacy.
Can I use ChatGPT for commercial purposes on my website?
Yes, you can use ChatGPT for commercial purposes on your website, but you need to adhere to OpenAI’s terms and conditions, including appropriate attribution and compliance with usage policies.
