
Are you looking for the php.ini file in WordPress? If so, you’ve come to the right place!
The php.ini file is a critical configuration file that plays a major role in how PHP runs on your server, and by extension, how your WordPress site performs. This file can have a significant impact on your website’s speed, functionality, and overall user experience. While the process of locating and editing this file might seem a bit daunting at first, it’s actually a straightforward task when you have the right instructions and know what to look for.
In this guide, we’ll help you understand the importance of the php.ini file, show you how to find it in your WordPress setup, and explain how to make adjustments to improve your site’s performance. Whether you’re trying to optimize your website’s speed, fix errors, or increase resource limits, this file can be a powerful tool for fine-tuning your server’s behavior to meet your needs.
Why Should You Edit the php.ini File?
The php.ini file is a crucial part of managing your WordPress site’s server-side behavior. There are several situations in which adjusting the settings in the php.ini file can improve your site’s performance, resolve errors, or enhance overall functionality. Here are some key scenarios where modifying this file can make a significant difference:
1. Improving Website Performance
One of the primary reasons to edit the php.ini file is to improve your website’s performance. PHP settings within this file can be adjusted to allocate more resources to your WordPress site. By making changes such as increasing memory limits or adjusting execution times, you can enhance the speed and responsiveness of your site. This is particularly useful if your website has a lot of media, high traffic, or complex functionality.
For example, increasing the memory_limit can allow your server to process more data at once, speeding up page loads. Similarly, tweaking other parameters like max_execution_time ensures that scripts don’t time out during long-running tasks, leading to a smoother user experience.
2. Increasing PHP Limits
By default, PHP’s settings are often conservative, especially in shared hosting environments. Certain resource-intensive tasks, such as uploading large files, running heavy plugins, or processing large database queries, can be hindered by restrictive PHP settings. The php.ini file provides a way to adjust these limits to better suit your website’s needs.
For instance:
- The upload_max_filesize and post_max_size settings control the maximum file size you can upload through your site. If you frequently work with large media files, increasing these limits ensures smooth uploads without errors.
- The max_execution_time setting dictates how long a PHP script can run before it’s terminated. For complex or time-consuming tasks like importing content or running backups, extending this limit can prevent errors and ensure these operations complete successfully.
By adjusting these PHP limits, you can ensure that your WordPress site runs efficiently even when handling large amounts of data or traffic.
3. Fixing Errors
Sometimes, issues like file upload errors, plugin malfunctions, or slow site performance can be traced back to the default PHP settings. In many cases, modifying the php.ini file can resolve these errors. This file controls key aspects of PHP behavior, such as memory usage, file upload limits, and script timeouts.
- File upload errors: If you’re encountering problems with uploading media or files, you may need to adjust the
upload_max_filesize,post_max_size, andmax_input_timesettings to accommodate larger files. - Plugin incompatibilities: Some plugins require specific PHP configurations or higher limits to function correctly. If you’re seeing plugin errors, increasing the available memory or execution time might fix the issue.
- Slow performance: A slow website could be due to PHP scripts timing out or running out of memory. Increasing values like
memory_limitormax_execution_timecan help prevent such issues.
By tweaking the php.ini file, you can fix many common performance problems that hinder the functionality of your WordPress site.
4. Enabling/Disabling PHP Extensions
WordPress relies on various PHP extensions to function properly. Some plugins or themes require specific PHP extensions to run smoothly. If you’re encountering errors related to missing extensions (such as mbstring or curl), you may need to enable or install them through the php.ini file.
- Enabling extensions: To ensure that specific WordPress features or plugins work, you may need to enable certain PHP extensions in the php.ini file. This is done by uncommenting or adding the relevant extension lines in the file.
- Disabling extensions: In some cases, you might want to disable certain extensions that aren’t needed for your site to reduce server load or avoid conflicts.
If you’re unsure which extensions are required for your WordPress site, your hosting provider or plugin documentation will often list the necessary extensions, helping you configure the php.ini file correctly.
Why is Editing the WordPress php.ini File Necessary?
The php.ini file is crucial for optimizing your site’s performance and ensuring smooth functionality. Editing this file allows you to address errors and customize settings to suit your website’s needs.
For example, modifying the php.ini file enables you to increase the maximum file upload size and adjust resource limits.
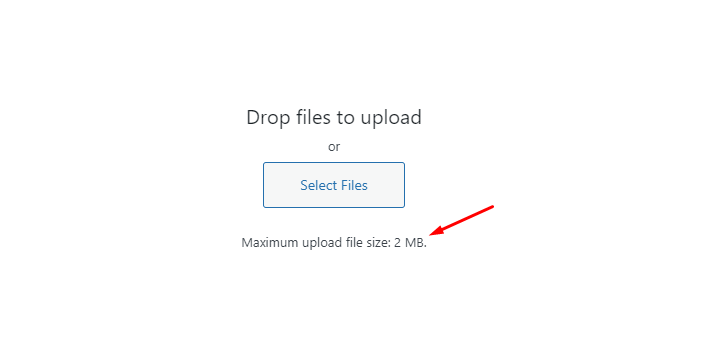
If your website deals with large media files like images and videos, you might encounter errors such as the uploaded file exceeding the ‘upload_max_filesize‘ message.
By editing the php.ini file to increase the upload size, you can resolve this issue and easily upload large media files. Additionally, you can allocate more memory to handle lengthy blog posts containing numerous images.
Furthermore, the php.ini file enables you to adjust file timeout settings. If processing a file takes less time, your site may time out and fail to fulfill the request. To prevent this, you can extend the timeout duration by modifying the php.ini file.
Lastly, you can turn file extensions in PHP on or off through the php.ini file. This is particularly helpful if you encounter errors like ‘Your PHP installation seems to be skipping the MySQL extension,’ which can hinder database connection. Editing the php.ini file can rectify such issues and ensure smooth operation of your website.
Now, let’s explore where the php.ini file is located in WordPress.
Also read: PHP 8.2: What’s New In The New PHP Version
A Walkthrough of php.ini in WordPress: Location, Editing, and Optimization
1. Access cPanel
The first step is to log into your hosting provider’s cPanel interface. You can typically access it by entering a URL such as example.com/cpanel or through a link provided by your hosting provider. Once you visit this URL, enter your username and password to log in.
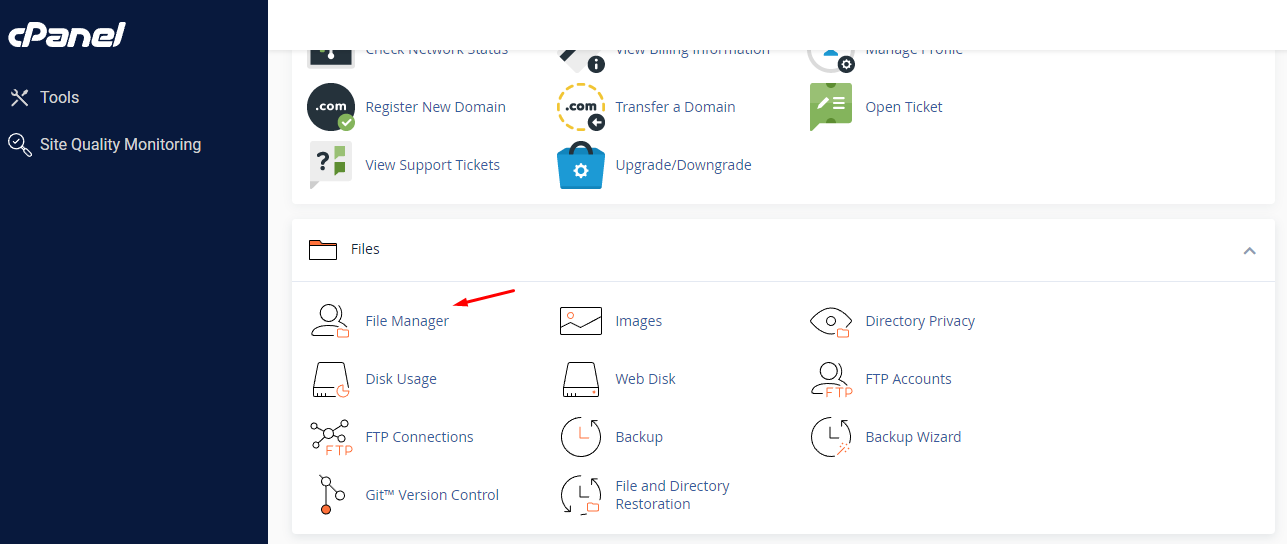
2. Navigate to File Manager
Once you are logged into cPanel, you’ll be presented with a variety of options and tools. Look for the Files section on the main dashboard, and click on the File Manager option. This will open up a file explorer interface where you can view, edit, and manage all the files associated with your WordPress site.
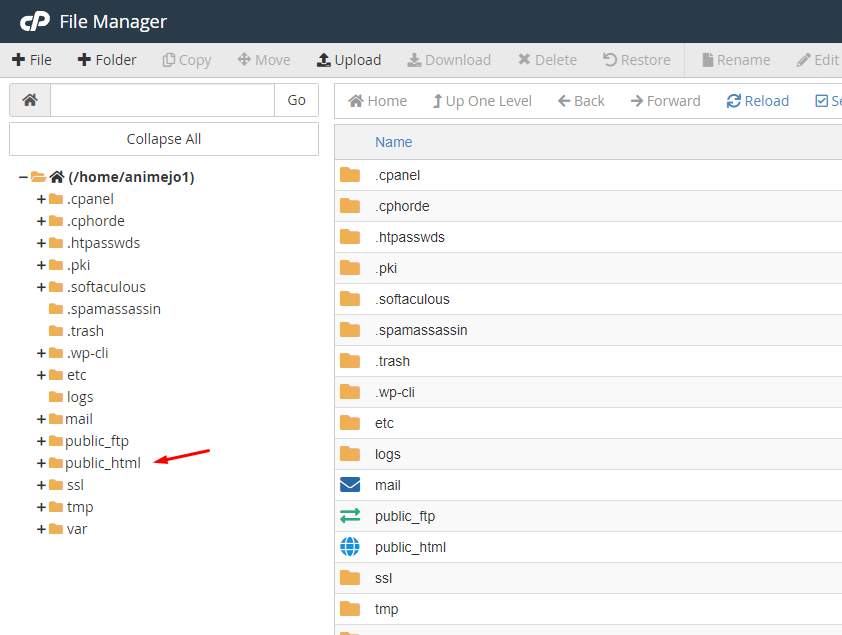
3. Open the Public Directory (public_html)
After opening the File Manager, you will see a directory structure on the left-hand side of the screen. The public_html folder is the main directory for your WordPress website’s files. Most WordPress sites store their core files in this folder. Click on public_html to open it.
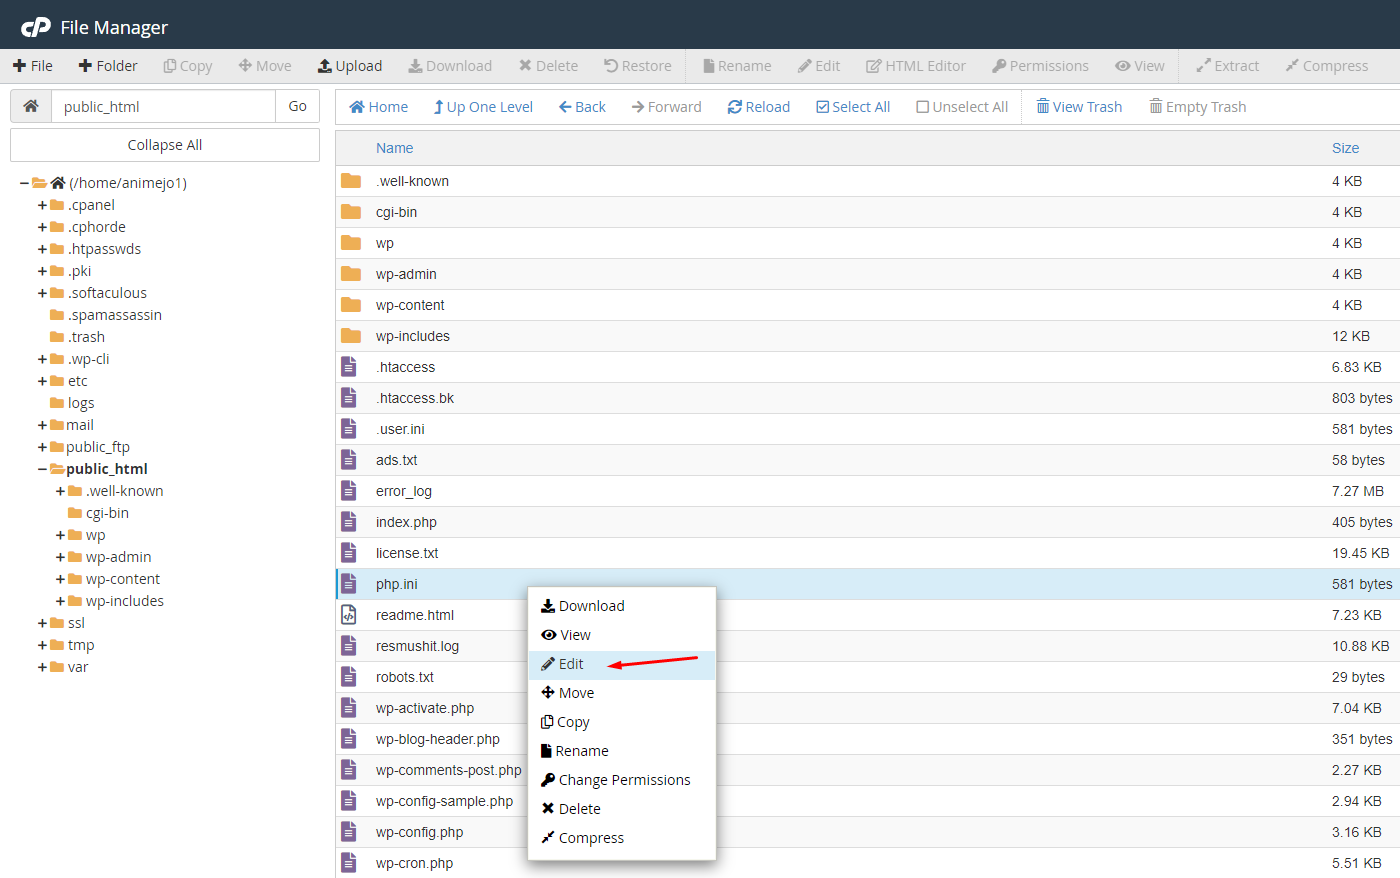
4. Locate the php.ini File
Once inside the public_html directory, you need to find the php.ini file. This file is usually located in the root folder of your WordPress installation. If you don’t see it immediately, it might be hidden or located in a subfolder depending on your hosting setup.
If you can’t find the php.ini file in the root folder, check the following locations:
- wp-admin
- wp-content
- wp-includes
Once you’ve found the php.ini file, right-click on it and select Edit from the options in the context
5. Edit the php.ini File
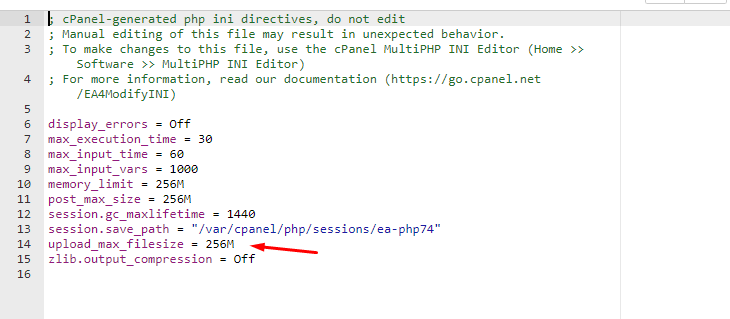
Clicking Edit will open the php.ini file in a text editor within cPanel. The file will display a series of PHP configuration settings that control how PHP runs on your server. You might see a list of settings like this:
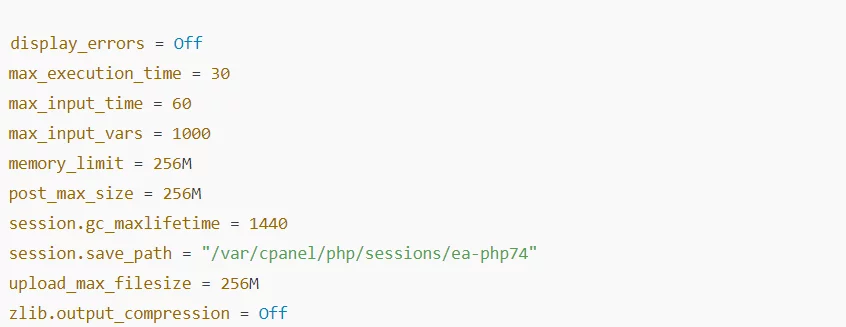
These settings define how PHP behaves on your server. For example:
- display_errors = Off: Disables error display for visitors to your site.
- max_execution_time = 30: Limits how long a PHP script can run before timing out.
- memory_limit = 256M: Specifies the maximum amount of memory PHP can use.
- upload_max_filesize = 256M: Sets the maximum file size that can be uploaded via PHP scripts.
6. Make Changes to php.ini Settings
You can modify these settings to better suit your WordPress site’s needs. For example:
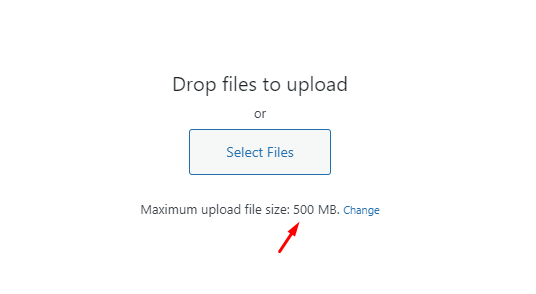
- If you’re experiencing issues with file uploads, you might want to increase the
upload_max_filesizeandpost_max_sizelimits. - If your site has resource-intensive plugins or high traffic, you may want to increase the
memory_limitormax_execution_timeto avoid errors or timeouts.
For example, if you need to increase the maximum file upload size, find the line that reads:
upload_max_filesize = 256MAnd change it to a higher value, like:
upload_max_filesize = 512M
Similarly, you can adjust other parameters. Here’s an example of what you might change:
memory_limit = 512M: Increase memory limit to ensure your site handles more resources
max_execution_time = 300: Increase execution time for longer-running tasks
7. Save Your Changes
Once you’ve made the necessary changes, it’s important to save your edits. In the cPanel editor, simply click the Save Changes button in the upper-right corner of the window. This will apply the modifications you made to the php.ini file.
8. Test Your Website
After saving the changes, it’s always a good idea to test your WordPress site to ensure that everything is working properly. This includes checking whether the modified settings are having the desired effect, such as resolving file upload issues or improving site speed.
If you encounter any problems or if changes don’t seem to take effect, you may need to clear your browser cache, restart your web server (if possible), or contact your hosting provider to verify that your changes have been applied correctly.
Mastering php.ini File: Locate and Adjust Settings for Peak Performance
Editing the php.ini file is a simple yet effective way to optimize your website’s performance and ensure smooth operation. However, it’s essential to make changes with caution to avoid any unintended issues.
For a reliable, user-friendly hosting environment that makes managing your WordPress site and configuring PHP settings easy, consider Nestify Hosting. With seamless cPanel integration, fast performance, and outstanding customer support, Nestyify provides everything you need for a smooth hosting experience.
Get started with a free trial at Nestify Hosting today and take your WordPress site to the next level with enhanced speed and top-quality service!
FAQs on php.ini File Editing
Where can I find the php.ini file in WordPress?
The php.ini file is typically located in the root directory of your web server. However, in shared hosting environments or managed WordPress hosting platforms, direct access to the php.ini file may be restricted. You may need to consult your hosting provider or server administrator to locate and edit this file.
How do I edit the php.ini file in WordPress?
You must use an FTP client or the file manager on your web server to view and change the php.ini file. Once found, you may modify a number of PHP parameters, including memory use, upload caps, and timeout configurations. To ensure that your changes take effect, remember to save them and restart your web server.
What settings can I adjust in the php.ini file?
Some common settings that you can adjust in the php.ini file include maximum file upload size, memory_limit, max_execution_time (timeout), and extension settings. These settings can impact tasks such as uploading media files, processing large amounts of data, and executing scripts on your WordPress site.
Are there any risks associated with editing the php.ini file?
It is important to exercise caution while editing the php.ini file since making mistakes might prevent your WordPress website from operating as intended. Before making any changes, it’s best to make a backup copy of the original php.ini file. You should also proceed cautiously, making sure you are aware of the repercussions of any change you make. It’s recommended to ask an experienced web developer or server administrator for advice if you’re unsure.
