
Are you fed up of waiting for your website to load? Do your visitors complain about slow loading times? Well, it’s time to take action and improve your website’s performance at 2x speed. One of the top tools available to help you do this is the Pingdom Speed Test Tool.
Pingdom Speed Test Tool is a free online tool that helps you analyze your website’s loading speed. It provides you with comprehensive information about your website’s performance, including page size, load time, and number of requests.
Most users misinterpret the data provided by the Pingdom Speed Test tool, which can lead to inadvertently sluggish performance of their website. It’s important to remember that these tools are not always 100% accurate and should be used in accordance with their guidelines to avoid any negative impact on your website’s speed or performance.
Understanding Pingdom Speed Test Tool
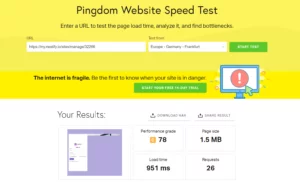
Performing a test on Pingdom using their Speed Test tool is a straightforward process. Firstly, navigate to the Pingdom website and input your URL. Then, select the testing location that is closest to your site visitors from the seven available options across five continents. With the Pingdom Speed Test tool, you have the ability to test your website’s speed and performance across the globe, with seven testing locations available across five continents:
Asia – Japan – Tokyo
Europe – Germany – Frankfurt
Europe – United Kingdom – London
North America – USA – Washington D.C.
North America – USA – San Francisco
Pacific – Australia – Sydney
South America – Brazil – São Paulo
It is worth noting that the best Pingdom website speed test location to use will vary depending on the geographical location of your site’s visitors. If your website attracts visitors from around the world, it is recommended that you perform tests on multiple locations to ensure optimal website performance and take the necessary steps to improve speed and performance.
Parameters to Check
To begin the test, click the “Start Test” button after inputting your website’s URL and the relevant location.
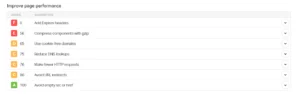
Pingdom highlights important factors after you have the test results. The following are the parameters to focus on:
Website Performance
Using the results from the Pingdom Speed Test Tool, you can take measures to boost your site’s performance. Pingdom takes just a few seconds to create a report on your website’s speed and availability. Your website’s load time, page size, and server requests will all be displayed in the report.
1. Expire Headers
When a first-time visitor accesses a WordPress website, each file is loaded individually, causing an increase in website load time due to the requests generated between the web browser and server. However, by utilizing browser caching, website files can be saved to the visitor’s computer, allowing for faster load times upon subsequent visits as and when the website loads from the browser cache instead of the server.
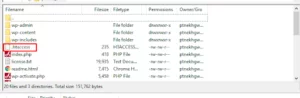
To add expiration headers to web pages, you can follow the below steps:
Open the .htaccess file on your server: The .htaccess file is a standard configuration file that controls how web servers respond to requests. You can find this file in the root directory of your website.
Add the following lines of code to the .htaccess file:

The Expires module is activated by this code, which also sets a default expiration period of one month for all files.
Change the time of expiration: By including extra code in the .htaccess file, you can modify the expiration time for particular file types. For instance, you may add the following code to photos to establish a longer expiration time:

This code sets the expiration time for PNG, GIF, and JPEG images to one year.
Save and upload the modified .htaccess file to your server: Once you’ve made your changes to the .htaccess file, save the file and upload it to your server. The changes should take effect immediately, and your web pages should now have expiration headers that tell browsers to cache content for a certain period of time.
2. Utilize GZIP to Condense Components
GZIP is a compression technology that shrinks data files to hasten download times. Upon receiving compressed data, modern browsers automatically unzip the files. GZIP is supported by contemporary browsers, server software, and top-rated WordPress hosts. Employing GZIP can decrease file sizes by as much as 70%. Here are recommended plugins for the GZIP:
- GZIP with WP Rocket
- GZIP with WP Super Cache
- GZIP with W3 Total Cache
3. Cookie-free Domains
A cookie-free domain is a domain that fails to serve any cookies, which are small text files that are typically used to store information about a user’s preferences or activity on a website. Using cookie-free domains can improve website performance, reduce server load, and improve privacy for users.
Here are the steps to use cookie-free domains:
- Create a subdomain: You must create a subdomain for the static content from your website’s dashboard in order for it to be rendered from a cookie-free domain. Static content includes images, CSS files, and JavaScript files.

- Set up the subdomain: After creating the subdomain, set it up to provide static content devoid of cookies. You can accomplish this by changing the web server’s configuration files. You can include the following lines in your .htaccess file, for instance, if you’re using Apache:
<IfModule mod_headers.c>
SetEnvIf Origin “http(s)?://(www\.)?(example\.com)$” AccessControlAllowOrigin=$0$1
Header add Access-Control-Allow-Origin %{AccessControlAllowOrigin}e env=AccessControlAllowOrigin
Header set Access-Control-Allow-Credentials true
</IfModule>
Without the prerequisite of cookies, this setup enables cross-domain requests to your static content.
- After configuring the subdomain, you may start rendering static content from the cookie-free domain, such as photos, CSS files, and JavaScript scripts. Simply use the subdomain you have created to reference the static content.
You can enhance the functionality of your website and lessen server load considerably by employing cookie-free domains. This proves advantageous since you can increase the privacy of your users by not serving cookies on the subdomain.
4. DNS Lookups
Every time a user visits your website, their device needs to perform a DNS lookup to assign the domain name to an IP address. This can culminate latency or delay in the loading of the website. By reducing the number of DNS lookups, you can reduce this latency and make your website load faster. Here are some ways to reduce DNS lookups:
- Use a CDN: A Content Delivery Network (CDN) distributes your website’s content across multiple servers around the world, diminishing the distance between the user and the server. This not only helps in faster content delivery, but also reduces the number of DNS lookups.
- Use Caching: When a DNS lookup is performed, the result is stored in the cache of the user’s device. This cache can be used to speed up subsequent DNS lookups. You can increase the Time to Live (TTL) value of your DNS records to ensure that they stay in the cache for longer periods of time.
- Minimize the Number of Domains: Each domain name requires a separate DNS lookup. So, reducing the number of domains can reduce the number of DNS lookups. You can consolidate your resources, such as images, CSS, and JavaScript files, into a single domain to reduce the number of DNS lookups.
- Use DNS Prefetching: Use DNS Prefetching to resolve domain names before you actually need them. DNS lookup can considerably decrease the perceived latency of your website.
- Use a Faster DNS Provider: DNS lookups can take a while, depending on the DNS provider. To speed up DNS lookups, you can utilize a quicker DNS service like OpenDNS or Google Public DNS.
5. HTTP Requests
Each time a visitor comes to your website, their browser offers a request to the server to retrieve all the necessary files to display your website. These files include HTML, CSS, JavaScript, and images. The more files your website has, the longer it takes to load.
To minimize HTTP requests, you can reduce the number of files your website needs to load. You can do this by following the steps:
- Eliminate plugins that don’t provide any value to your site, as plugins often come with their own CSS and JavaScript.
- Merge multiple CSS files into a single file to minimize the number of requests made by the browser.
- Swap out heavy plugins for lightweight alternatives.
- While images enhance the attractiveness and value of your website, get rid of unnecessary images and always utilize optimized ones. Tools like ShortPixel and WP Compress can be used to optimize your images.
- Use lazy loading for videos and images to further improve your website’s performance.
6. Redirects
To optimize your website’s performance, it is recommended to decrease the number of redirects like HTTP redirects. Occurrence of redirect takes place when one webpage triggers the loading of another webpage, such as when switching from HTTP to HTTPS, from www to non-www, or when the URL of a post is updated.
To avoid excessive redirects, consider the following:
- Avoid linking to pages that already have a redirect, as this may cause multiple redirects.
- Delete any deactivated or unused plugins that may result in unnecessary redirects.
- When creating links on your site, use the correct prefix (HTTP or HTTPS) and verify whether the URL includes www or non-www.
7. Empty Src or Href
Attributes in HTML that have no value assigned to them (i.e., there is nothing between the quotation marks) are referred to as “empty” attributes. In particular, the empty attributes of the ‘src’ and ‘href’ properties instruct the browser to make a connection even if there is no Uniform Resource Identifier (URI) value specified.
Here’s an example of an empty source (src) tag and an empty link (href) tag in HTML:
Empty Source (src) tag:

The img tag’s src attribute is empty, signifying that the image source is not mentioned in the above example. This is frequently employed as a stand-in image that can subsequently be changed to an authentic image source.
Empty Link (href) tag:

The href attribute of the link tag in this illustration is empty, indicating that the stylesheet source is not mentioned. When the CSS is generated dynamically or loaded later on the page, this is frequently employed.
Response Codes
The Response Codes section in the Pingdom speed test tool, also known as HTTP status codes, provides information about the resources loading on your page. Generally, codes within the 200s to 300s range are considered normal, while codes between 400 and 500 are considered errors that require attention.

Content Size and Requests by Content Type

By utilizing tables that contain information about the distribution of your content and requests, you can gain a comprehensive insight into the resources of your web page. One advantageous aspect of this data is the ability to view the size of your website’s assets grouped by content type. Analyzing this information can assist in identifying errors and areas where the content size by content type exceeds expectations. By addressing these issues, you can improve the overall performance of your website subsequently.
Content Size and Requests by Domain
The section under “Content size and requests by domain” gives details on the size and quantity of requests made by both internal and external services, as well as the median sizes of such requests. Additionally, the requests made by each domain are shown in this section. Limiting external queries is advised because each external service introduces its own latency.
In general, it is advised to host assets in a single location, such as on your CDN or web server, to reduce the number of queries. Instead of linking to external scripts like FontAwesome for Bootstrap, it is possible to host them locally by downloading and delivering the scripts directly.
Conclusion
Using the Pingdom Speed Test Tool can help you recognize the areas of your website that need improvement. By optimizing your images, minimizing HTTP requests, using a CDN, and enabling browser caching, you can significantly improve your website’s performance and provide a better user experience for your visitors.
FAQs
How can I interpret the Pingdom Speed Test Tool report’s results?
A lot of data about your website’s performance, including page load time, page size, number of requests, and more, is provided in the Pingdom Speed Test Tool report. The length of time it takes for specific page components to load, such as graphics, scripts, and stylesheets, is also included.
How reliable are the Pingdom Speed Test Tool’s results?
Although the Pingdom Speed Test Tool is intended to deliver accurate and trustworthy results, there are a number of variables that may affect the results’ accuracy, including network congestion and server load. Running numerous tests from various locations is always a good idea to better understand the performance of your website.
Is it free to use the Pingdom Speed Test Tool?
The speed test tool from Pingdom is available in both free and premium editions. While the paid version of the tool offers additional features and enables testing from multiple locations worldwide, the free version only allows you to test the speed and functionality of your website from one location.
What advantages does using the Pingdom Speed Test Tool offer?
You can diagnose performance issues with your website and make it more user-friendly by using the Pingdom Speed Test Tool. Both your search engine rankings and the user experience for your visitors can benefit from this.
Can any website use the Pingdom Speed Test Tool?
Yes, any website can utilize the Pingdom Speed Test Tool, regardless of the platform or content management system that was used to create it.
