
In the contemporary, swiftly evolving digital landscape, the rate at which webpage loads can profoundly impact the search engine rankings, user experience and the success of your website. Optimizing page load speed has become a crucial aspect of web development and online presence.
Imagine waiting for a page to load—it feels like an eternity, right? Well, visitors to your website feel the same way. That’s why speeding up your page load time is like rolling out the red carpet for your audience—ensuring they stay engaged and satisfied with their online experience.
Page load speed signifies the time it takes for a web page to showcase its content fully. Slow-loading pages can frustrate users, leading to increased bounce rates and reduced user engagement. However, a swift-loading page can work wonders, keeping visitors glued to your content and eager to explore more.
Various factors contribute to page load speed, such as large image sizes, excessive scripts, bulky code, server response times, and inefficient caching. Optimizing these elements can significantly enhance your page load speed, providing visitors with a seamless and enjoyable browsing experience.
Top 10 Page Load Techniques of 2024
1. Check the Site Speed
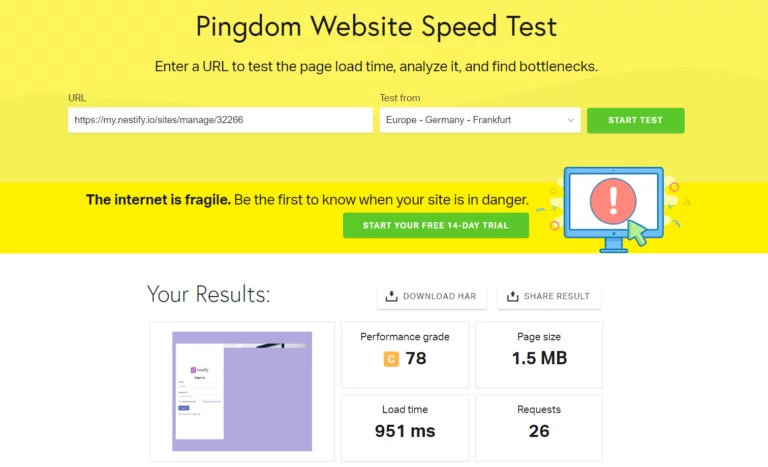
Analyzing your website’s speed is a critical step in ensuring optimal performance. By regularly monitoring this metric, you can keep track of any improvements and ensure that modifications positively influence your page load times. There are several free tools specifically designed to assess your website’s loading duration:
- Pingdom: This tool offers a user-friendly site speed test that simulates a page load in a web browser. It provides comprehensive insights into various elements affecting loading times.
- Page Speed: As an open-source Firefox add-on, Page Speed is invaluable for assessing performance and offering detailed suggestions for enhancements. It specifically targets areas where improvements can be made to boost speed.
- Web Page Test: This tool is a comprehensive platform that showcases your website’s speed and performance across different browsers. It offers a detailed breakdown of loading times and performance metrics across various conditions.
2. Optimize Images

Optimizing images for your website involves more than just resizing. Understanding the right file format for different image types is crucial to reducing file sizes without compromising quality, ultimately impacting page load times and overall website performance.
- GIF (Graphics Interchange Format): Ideal for images with limited colors, such as logos, icons, or simple graphics. GIFs support transparency and animation, making them perfect for these visuals. Their smaller file sizes, resulting from a limited color palette and compression techniques, contribute to quicker load times. Tools like TinyPNG can assist in optimizing GIFs for web use by reducing file sizes without sacrificing quality.
- JPEG (Joint Photographic Experts Group): Best suited for images with rich colors and intricate details, especially photographs. JPEGs use ‘lossy’ compression, discarding some data to reduce file size. While this might slightly impact image quality, the difference is often negligible to the human eye. Tools like JPEG Optimizer can help adjust compression levels to strike a balance between image quality and smaller file sizes.
- PNG (Portable Network Graphics): The preferred format for images requiring high quality and transparency. It supports various colors and maintains image integrity even after multiple saves. PNGs work well for images needing transparency, such as logos or graphics meant to blend seamlessly into different backgrounds. Although PNGs retain more image detail due to their lossless compression method, resulting in larger file sizes, tools like OptiPNG can optimize PNG files to reduce their size while maintaining quality.
Also Read: Top 11 Image Optimization Tools And Plugins For Digital Quality
3. Avoid Scaling Down of Images

Scaling down images using HTML attributes may seem convenient, but it’s not the most efficient practice for optimizing website performance. When you employ a larger image than required and adjust its display size using HTML attributes like width and height, you’re essentially loading a larger file than necessary. This leads to increased page load times, negatively affecting user experience, especially for individuals on slower internet connections or mobile devices.
Consider this scenario: Suppose your webpage necessitates a 100x100px image, but you use a 700x700px image and define the display size using HTML attributes. In such a case, the browser still loads the entire 700x700px image, even though it’s displayed at the specified 100x100px size. Consequently, unnecessary data is transmitted, elevating both bandwidth usage and load times.
A more efficient approach involves using specialized tools or plugins to resize images before uploading them to your website. Tools like Photoshop or web-based image editors offer resizing options to match images to the required dimensions prior to uploading. This resizing reduces the file size to align with the intended display size, minimizing the data that needs to load when visitors access your webpage. As a result, it enhances load times and significantly improves user experience.
Resizing images to their required dimensions before uploading ensures that only essential data is transmitted, alleviating bandwidth strain and expediting the page load process. It’s a proactive strategy for optimizing your website’s performance and ensuring efficient content delivery to your users. Additionally, using plugins like Smush for WordPress or Optimole can automate image optimization, further enhancing your site’s performance.
4. HTTP Compression
Optimizing website content through compression techniques is crucial for significantly reducing page load times. One powerful tool for this purpose is HTTP compression, which plays a pivotal role in streamlining data transmission. Instead of sending numerous individual files, HTTP compression consolidates web page data into a single, smaller file. This compressed file drastically reduces the volume of data transferred between the server and the user’s browser, resulting in accelerated load times.
Implementing HTTP compression significantly enhances website performance by efficiently delivering content. It employs algorithms to compress textual content like HTML, CSS, JavaScript, and other web resources. This compression reduces the file sizes of these resources, allowing browsers to swiftly retrieve and render content, leading to a smoother user experience.
For deeper insights into HTTP compression and its technical aspects, you can explore the dedicated Wikipedia article on this topic. It provides a comprehensive overview of how HTTP compression functions and its benefits in optimizing website performance.
Additionally, optimizing JavaScript and CSS files involves more than just compression. Strategies like combining multiple JavaScript or CSS files into a single file and minifying the source code further enhance load times. File combining reduces the number of server requests needed to fetch resources, while minification involves getting rid of unnecessary characters and spaces from the source code. This results in smaller file sizes without affecting functionality, facilitating quicker downloads and rendering of web content.
For implementing these optimization techniques, tools and plugins like WP Rocket for WordPress sites or Gzip Ninja Speed Compression specifically for enabling GZIP compression in WordPress can simplify these processes and significantly boost website performance. These tools automate optimization tasks, making it easier to enhance page load speed and provide a better browsing experience for users.
5. Stylesheet Optimization

Positioning your stylesheet references within the <head> section of your HTML document strategically contributes to a perceived faster page load experience. This practice allows your web pages to progressively render styles, providing users with a sense of quicker load times and a smoother browsing encounter.
The <head> section in an HTML document houses metadata and essential resources necessary for the initial rendering of a webpage. Among these elements are CSS files, which are pivotal in defining the visual layout and styling of the page. Placing style references at the top of this section enables browsers to commence loading and applying stylesheets early in the rendering process.
Also Read: Text Formatting In HTML And CSS: A 5 Step Tutorial
This proactive approach ensures expedited fetching and application of styles, enabling the webpage’s initial content to appear styled and formatted more rapidly. Consequently, users witness a visually coherent structure while additional resources continue loading in the background, fostering the perception of faster page load.
Following the W3C (World Wide Web Consortium) standard by situating stylesheet references in the <head> section is considered a best practice. This adherence not only contributes to a more organized and structured code but also ensures compatibility across various browsers and devices.
- Autoptimize: This WordPress plugin is a powerful tool designed to optimize your website’s performance by optimizing CSS, JavaScript, and HTML. Autoptimize simplifies the process of optimizing your site’s code by aggregating, minifying, and caching scripts and stylesheets. It also allows you to defer the loading of JavaScript files to improve page load times. The plugin offers easy-to-use settings that enable you to customize optimization options according to your site’s specific needs. With Autoptimize, you can achieve significant improvements in load times and overall performance without extensive technical knowledge.
- Asset CleanUp: Another valuable plugin for WordPress, Asset CleanUp, focuses on optimizing your site’s performance by controlling the loading of CSS and JavaScript files. It presents a user-friendly interface that permits you to selectively disable unnecessary CSS and JavaScript files on specific pages or posts.
By eliminating unused or redundant scripts and stylesheets, Asset CleanUp reduces HTTP requests and improves page load times. Additionally, it offers the ability to defer or async load scripts, further enhancing website performance.
6. Place Script References at the Bottom
Shifting script references towards the top of your HTML document can hinder page load speed due to browser limitations. Browsers have a restriction wherein they can only download two components per hostname simultaneously. Placing scripts at the top can block other resources from loading, creating a perception of slower page loading.
To overcome this limitation and ensure smoother page loads, a best practice is to position script references as close to the bottom of the HTML document as feasible, ideally just before the closing </body> tag. This strategic placement allows other essential page elements to load without hindrance, contributing to a faster-perceived loading time and a more seamless user experience.
For simplifying the management and optimization of script placement, plugins and tools like WP Rocket for WordPress or Autoptimize can assist in controlling the positioning and optimization of scripts. These tools offer functionalities to defer or asynchronously load scripts, enabling efficient handling of script resources and contributing to improved website performance.
7. Store CSS and Javascript separately

Including JavaScript and CSS directly within your HTML document results in their download every time a request is made for the HTML file. This practice bypasses the benefit of browser caching, leading to larger HTML documents and slower loading times. A recommended approach is to always house your CSS and JavaScript in external files, as it not only aligns with best practices but also streamlines the maintenance and updating processes for your site.
By separating CSS and JavaScript into external files, you enable browser caching mechanisms to function optimally. When users visit subsequent pages on your site, the browser can cache these external files, reducing the need for repeated downloads. This caching significantly enhances loading speeds and overall site performance by leveraging stored files, minimizing network requests, and expediting content delivery.
Moreover, placing CSS and JavaScript in external files promotes a more organized and efficient development workflow. It allows for modularization, enabling easier management, debugging, and updates to specific components without altering the entire HTML structure. This practice simplifies collaboration among developers and facilitates scalability as your website evolves.
8. Minimize HTTP requests

Minimizing HTTP requests is crucial for speeding up webpage loading times. When a user accesses a webpage, a significant chunk of the loading process involves fetching various components like images, stylesheets, and scripts. Reducing the number of individual requests a webpage makes to retrieve these resources significantly enhances its loading speed.
In addition, optimizing images play a vital role in reducing HTTP requests. Image optimization plugins like Smush for WordPress or standalone tools such as ImageOptim specialize in compressing and optimizing images. This process reduces the file size of images without compromising quality, thereby cutting down on the number of individual image requests and speeding up page loading.
Moreover, techniques like CSS sprites prove beneficial by consolidating multiple images into a single image file. By using CSS to display specific parts of this combined image as needed, CSS sprites effectively minimize the number of image requests, further enhancing loading times.
9. Caching
Optimizing a website managed via a dynamic content management system (CMS) involves leveraging caching for web pages and database queries. This technique plays a pivotal role in reducing server load and accelerating page rendering times. The implementation of static caching mechanisms significantly eases the strain on server infrastructure while notably boosting the speed at which web pages are portrayed to users.
Dynamic CMS platforms, while versatile in generating personalized content, often impose substantial demands on server resources as they regenerate pages for each user request. Caching mitigates this issue by creating and storing static versions of web pages. Rather than continuously recreating page content and executing complex database queries, cached versions are swiftly delivered to users. This not only alleviates server load but also dramatically improves page load times.
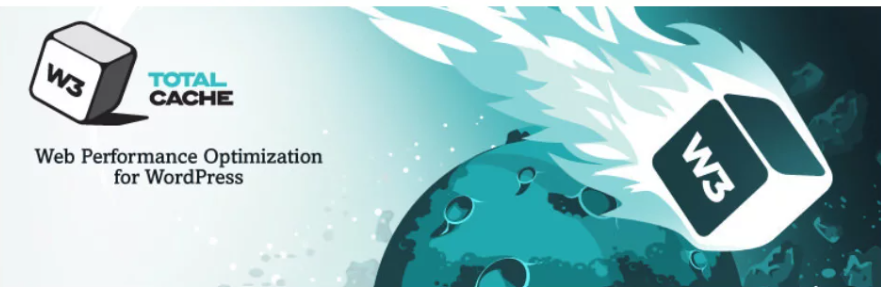
For WordPress users, robust caching plugins like WP Super Cache and W3 Total Cache offer potent solutions. These plugins generate static HTML files from dynamically generated WordPress pages, significantly reducing server load and enhancing overall performance. Additionally, they feature various optimization capabilities such as browser caching, minification, and integration with content delivery networks (CDNs), further amplifying page load speeds.
Besides caching plugins, adhering to optimization practices outlined in the WordPress codex proves beneficial. This resource provides invaluable insights and guidelines for optimizing and caching WordPress websites, ensuring more efficient resource utilization and a smoother user experience. Applying these strategies and leveraging caching plugins contribute significantly to improving site performance and user satisfaction.
10. Implement 301 Redirects

Implementing 301 redirects, while sometimes necessary for site organization or SEO purposes, adds an extra step in the browser’s journey to access the intended web page. Each 301 redirect directs the browser from one URL to another permanently. While serving its purpose, this redirection inevitably contributes a fraction of the time to the page-loading process.
When a browser encounters a 301 redirect, it triggers a new request to the redirected URL, leading to an additional round-trip to the server. This extra step introduces latency, affecting the overall loading time of the page. While seemingly minor individually, multiple 301 redirects within a website can cumulatively extend page-loading times, impacting user experience.
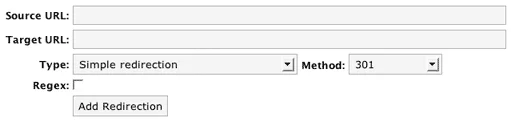
Minimizing the reliance on 301 redirects is a strategic approach to streamline page-loading processes. This involves revisiting website structures, URL configurations, and navigation paths to reduce or eliminate unnecessary redirections. Tools such as Redirection or Simple 301 Redirects for WordPress facilitate managing and implementing redirects efficiently.
Conclusion
Optimizing your website’s page load speed is not just a technical endeavor but a critical step toward enhancing user experience and overall performance. By employing the techniques discussed in this blog, you can effectively cut down load times and elevate your website’s efficiency. Remember, the two-second rule is not just a benchmark; it’s a user expectation. As you delve into the realm of accelerated website speed, keep experimenting, stay updated with evolving technologies, and monitor performance metrics. Embrace the commitment to a faster, more responsive website, and your users will thank you with increased engagement and satisfaction. May your website load swiftly and leave a lasting positive impression on every visitor.
