
Are you tired of recreating the same content over and over again in your WordPress posts? Do you want to save time and increase your efficiency in managing your website? Look no further than WordPress Reusable Blocks.
In this blog, we will explore the idea of WordPress Reusable Blocks and how they can revolutionize the way you craft and manage your content. We will delve into why you should use this type, how to create them, and how to effectively utilize them in your posts.
What are WordPress Reusable Blocks?
These blocks are chunks of content that you can create and save for later use. They function as templates that can be inserted into posts, pages, or even custom post types. These blocks can include any combination of text, images, videos, or any other content elements that you want to reuse.
Also Read: A Comprehensive Guide To WordPress Block Templates
Why should you use WordPress Reusable Blocks?
There are several compelling reasons to use these blocks:
- Time-saving: Instead of recreating the same content every time you need it, you can simply insert a reusable block with a few clicks. This saves you time and effort, especially if you frequently use the same content across your website.
- Consistency: These blocks ensure consistency in your content. By using the same block, you can maintain a uniform style and format throughout your website. This is especially useful for elements like call-to-action buttons, testimonials, or author bios.
- Efficiency: With these blocks, you can make updates to a block once, and the changes will automatically reflect wherever that block is used on your website. This eradicates the need to manually update multiple instances of the same content, improving your efficiency and reducing the chance of errors.
- Flexibility: These blocks can be easily customized and modified within individual posts or pages, allowing you to adapt the content to specific contexts while still benefiting from the time-saving aspect of reusability.
- Collaboration: If you’re working with a team or multiple content creators, these blocks can streamline your collaboration process. You can create standardized content blocks that everyone can use, ensuring a consistent voice and brand identity across your website.
Now that you understand the various benefits of using these blocks, let’s dive into how to create them and leverage their power to enhance your content creation workflow.
How to Create a WordPress Reusable Block
Creating a WordPress Reusable Block is a simple process that can be done directly from your WordPress editor. Follow these steps to create your own reusable block:
Choosing the Content for Your Block
Before you create this type of block, it’s important to determine what type of content you want to include. This could be a text paragraph, an image gallery, a button, or even a combination of different elements. Consider the purpose of the block and how it will be used across your website.
Once you have a clear idea of the content, you’re ready to create these blocks.
The Process of Creating a Reusable Block
- In the WordPress editor, create a new post or page or navigate to an existing one where you want to create the reusable block.
- Add the content elements that you want to include in the reusable block. This can be text, images, videos, or any other content elements available in the editor.
- Once you have added the desired content, select and highlight all the elements that you want to include in the reusable block. You can do this by clicking and dragging the cursor over the content or by using the keyboard shortcuts (e.g., Ctrl+A on Windows or Command+A on Mac to select all).
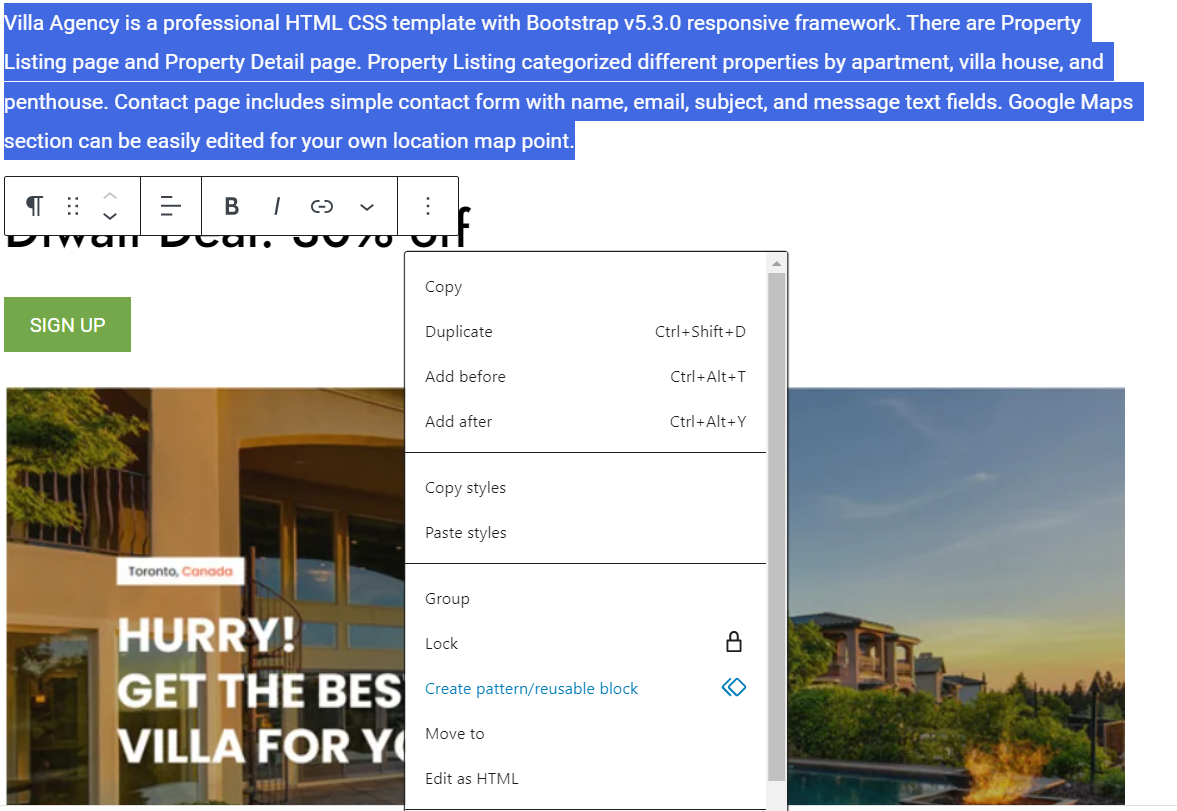
- With the content selected, click on the “Block” button in the editor toolbar. A menu will appear with various options. Scroll down and click on the “Create pattern/Reusable Blocks” option.
- A popup window will emerge, asking you to enter a name for your block. Choose a descriptive name that will help you easily identify and locate the block in the future.

- Once you’ve entered the name, click on the “Save” or “Add” button. The content elements you selected will now be saved as a reusable block.
Managing Your WordPress Reusable Blocks
Once you’ve created such blocks, it’s important to know how to manage them effectively. In this section, we will explore how to access, edit, and update your blocks.
Accessing Your Reusable Blocks
To access these blocks, follow these steps:
- Open the WordPress editor by creating a new post or page or by editing an existing one.
- Click on the “+” button to add a new block.
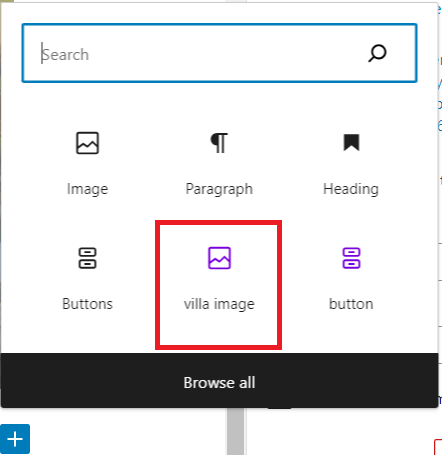
- In the block inserter, scroll down to the “Reusable” section. Here, you will find all your saved Reusable Blocks.
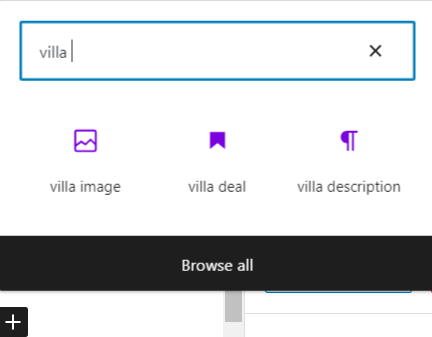
- Click on the desired Reusable Block to insert it into your post or page.
Editing and Updating These Blocks
To make changes to these blocks, follow these steps:
- Insert the Reusable Block into your post or page by following the accessing steps mentioned above.
- Once the block is inserted, you can make edits directly within the block. Simply click on the block and modify the content or formatting as needed.
- Any changes made to this block within the post or page will not affect the original block. This allows you to customize the content for specific instances while still maintaining overall consistency.
- If you want to update the original block itself, you can do so by following these steps:
a. Navigate to the Reusable Blocks section in the WordPress editor by adding a new block and scrolling down to the “Reusable” section.
b. Locate the Reusable Block you want to update and click on it.
c. Make the necessary changes to the block’s content or formatting.
d. Once you’ve made the updates, click on the “Save” button to save the changes.
e. All instances of that block across your website will be updated with the new content.
By effectively managing your blocks, you can ensure consistency in your content while still having the flexibility to make customizations when needed. In the next section, we will explore how to utilize these blocks within your posts to enhance your content creation process.
Advanced Techniques for WordPress Reusable Blocks
Once you have a good grasp of these blocks, you can explore advanced techniques to further enhance your workflow. In this section, we will cover two key advanced techniques: converting such block into a regular block and exporting and importing Reusable Blocks.
Converting a Reusable Block into a Regular Block
Sometimes, you may want to convert these blocks back into a regular block to have more flexibility in editing and customizing the content. Follow these steps to convert a Reusable Block into a regular block:
- Open the post or page where this block is inserted.
- Select the Reusable Block by clicking on it.
- In the block toolbar, click on the ellipsis icon (three vertical dots) to access the block options.
- From the options, select “Detach Pattern.”
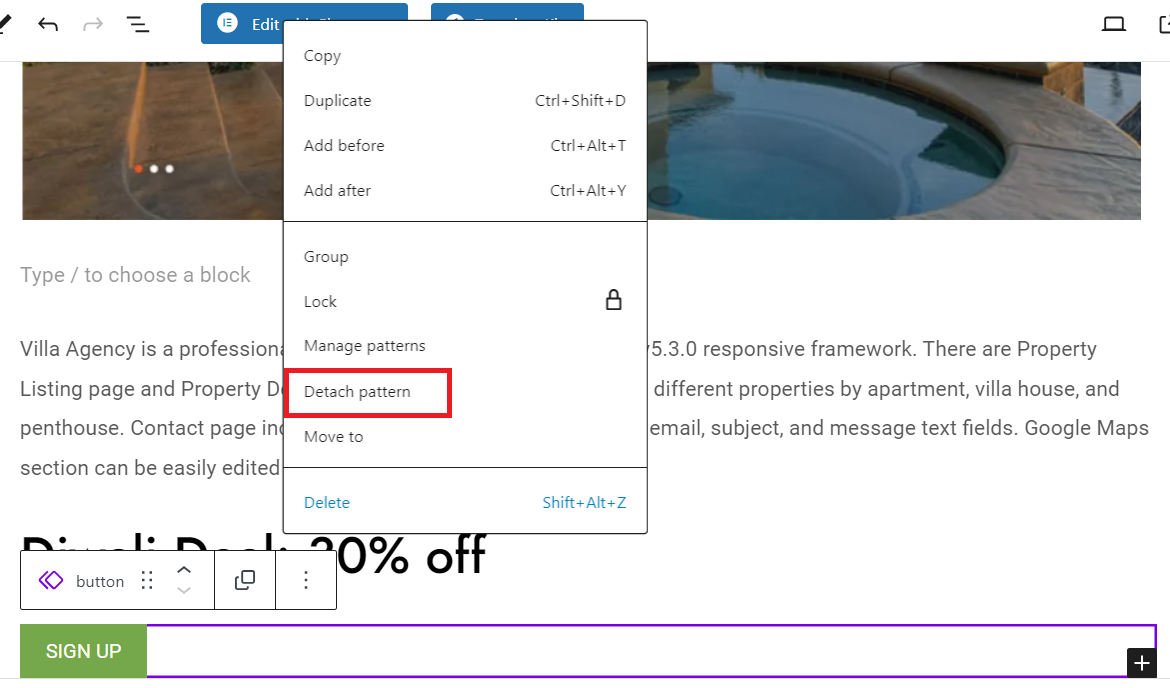
These blocks will now be converted into a regular block, allowing you to modify it freely without affecting other instances of the block.
Exporting and Importing Reusable Blocks
Exporting and importing these blocks can be useful if you want to share your blocks across different WordPress installations or collaborate with others. Here’s how you can export and import these blocks:
Exporting Reusable Blocks
- In the WordPress editor, navigate to the Reusable Blocks section by adding a new block and scrolling down to the “Reusable” section.
- Locate the Reusable Block you want to export and click on it.
- In the block options, click on the ellipsis icon (three vertical dots) to access the block menu.
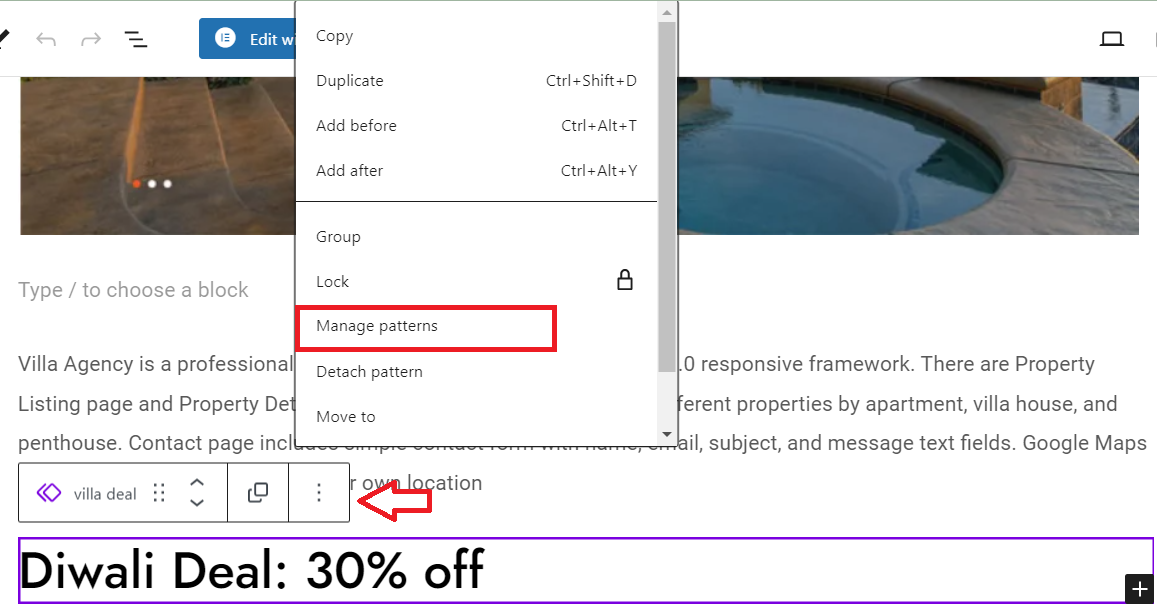
- You will find an option for “Manage Patterns”. Click on it and it will direct you to the “Pattern” page, where you can see the list of such blocks created by you.

- Under every block created, select the option “Export as JSON.”

- These will be downloaded as a JSON file to your computer.
Importing Reusable Blocks
- On the same Pattern Page, locate “Import from JSON” at the top.
- Click on the “Import from JSON” option.
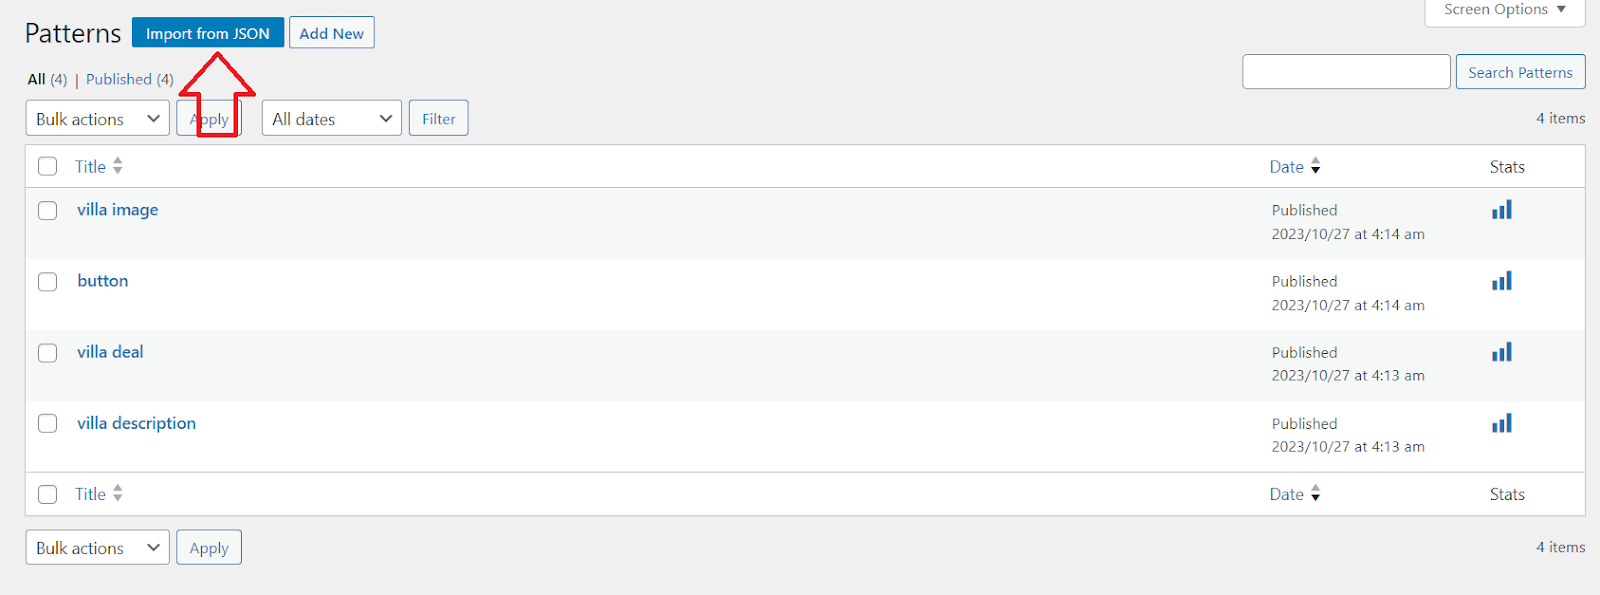
- Select the JSON file containing the block you want to import from your computer.
- Once the file is uploaded, the block will be imported and available for use in your WordPress editor.
By utilizing advanced techniques like converting these blocks into regular blocks and exporting/importing blocks, you can take your efficiency and flexibility to the next level. In the final section, we will summarize the key points and highlight the benefits of using these blocks.
Conclusion: Boosting Your WordPress Efficiency with Reusable Blocks
WordPress Reusable Blocks are a powerful tool that can significantly enhance your productivity in content creation. By understanding and utilizing Reusable Blocks effectively, you can save time, maintain consistency, and streamline your workflow. Throughout this blog, we have explored the concept of WordPress Reusable Blocks, their benefits, and how to create and manage them. We have also discussed how to use Reusable Blocks in your posts and explored advanced techniques such as converting them into regular blocks and exporting/importing them.
