
WordPress is a top choice for content management systems (CMS), helping millions of people quickly build and manage websites and blogs. One of its best features is the ability to easily create and handle image galleries using the Gutenberg Image Gallery Block.
This tool is especially popular with photographers, artists, businesses, and bloggers for its convenience. However, even though it’s straightforward to use, many people don’t fully explore what the Gallery Block can do.
If you’re looking to boost your website’s visual appeal or enhance your blog with sleek, professional image galleries, this guide is for you. We’ll cover everything you need to know—from setting up the Gutenberg block to advanced customization and troubleshooting. With these insights, you’ll be able to create eye-catching, high-performance galleries that take your website’s design and functionality to the next level.
What is the WordPress Gallery Block?
The WordPress Gallery Block is a built-in feature of the Gutenberg block editor, which is the default editor for WordPress since version 5.0. This editor allows users to create visually striking image galleries without needing any coding experience.
Whether showcasing a photography portfolio, organizing product images, or simply creating a gallery for a blog post, the Gallery Block provides a streamlined way to display multiple images in a cohesive layout.
This powerful tool eliminates the need for third-party plugins or complex code, making it accessible to users of all skill levels. Even if you’re new to WordPress, the Gallery Block offers an intuitive interface that empowers you to create professional-looking galleries with ease.
Why Use the Gutenberg Image Gallery Block?
1. User-Friendly Design
The Gutenberg image block features an intuitive drag-and-drop interface that makes uploading, arranging, and editing images a breeze. You can easily drag your photos into place, adjust their order, and make edits all within the block editor.
This simplicity lets you concentrate on curating a visually appealing gallery without worrying about complicated technical aspects.
2. Customizable Layouts
The custom image gallery block offers a variety of layout options to showcase your images effectively in your WordPress themes. Whether you prefer the classic grid, the dynamic carousel, or the stylish tiled layout, you can select the one that best fits your site’s design.
You also have the flexibility to adjust column sizes, image alignment, and spacing, allowing you to create a gallery that complements your overall site aesthetic and enhances user engagement.
3. Fully Responsive Galleries
In an era where mobile browsing is inevitable, responsive design is crucial. The Gutenberg image gallery ensures your galleries automatically adjust to look great on any device, whether a desktop, tablet, or smartphone.
This built-in responsiveness means your images will be displayed beautifully and consistently across different screen sizes, providing a seamless experience for all visitors.
4. No Need for External Plugins
Integrated directly into WordPress, the Gutenberg image block eliminates the need for external plugins. This simplifies the process of creating and managing gallery layouts and reduces the risk of security vulnerabilities and compatibility issues that can come with third-party tools. It ensures that your galleries are fully compatible with WordPress updates and features, providing a smooth and reliable experience.
5. Enhanced Performance
The Gallery Block is optimized for performance, ensuring your galleries load quickly and efficiently. Handling image optimization and compression internally helps maintain your website’s speed and responsiveness.
This optimization is key to improving user experience and keeping visitors engaged with your content.
6. Built-In Editing Tools
With Gutenberg, you can access essential image editing tools within the block editor. You can crop, rotate, and adjust images without external software. This feature streamlines your workflow and allows for more immediate adjustments and refinements.
7. SEO and Accessibility Features
Adding captions and alt text to the images is clear with the Gallery Block. This improves your website’s SEO (Search Engine Optimization) by making your content more discoverable and enhances accessibility for users who depend on screen readers. This ensures that your galleries are both search-engine friendly and inclusive.
8. Seamless Integration with Other Blocks
The Gallery Block integrates smoothly with other Gutenberg blocks. You can combine it with text blocks, buttons, or other media blocks to create rich, engaging content layouts. This flexibility allows you to build comprehensive, visually appealing pages that convey your message effectively.
9. Regular Updates and Support
Being a core feature of WordPress, the Gutenberg custom image block benefits from regular updates and support from the WordPress development team.
This ongoing maintenance ensures that the block stays compatible with the latest WordPress versions and continues to function smoothly, providing a reliable tool for your image gallery needs.
Your Step-by-Step Guide to Add the Gallery Block in WordPress
To add a gallery to the WordPress site, follow these detailed steps:
1. Access the Block Editor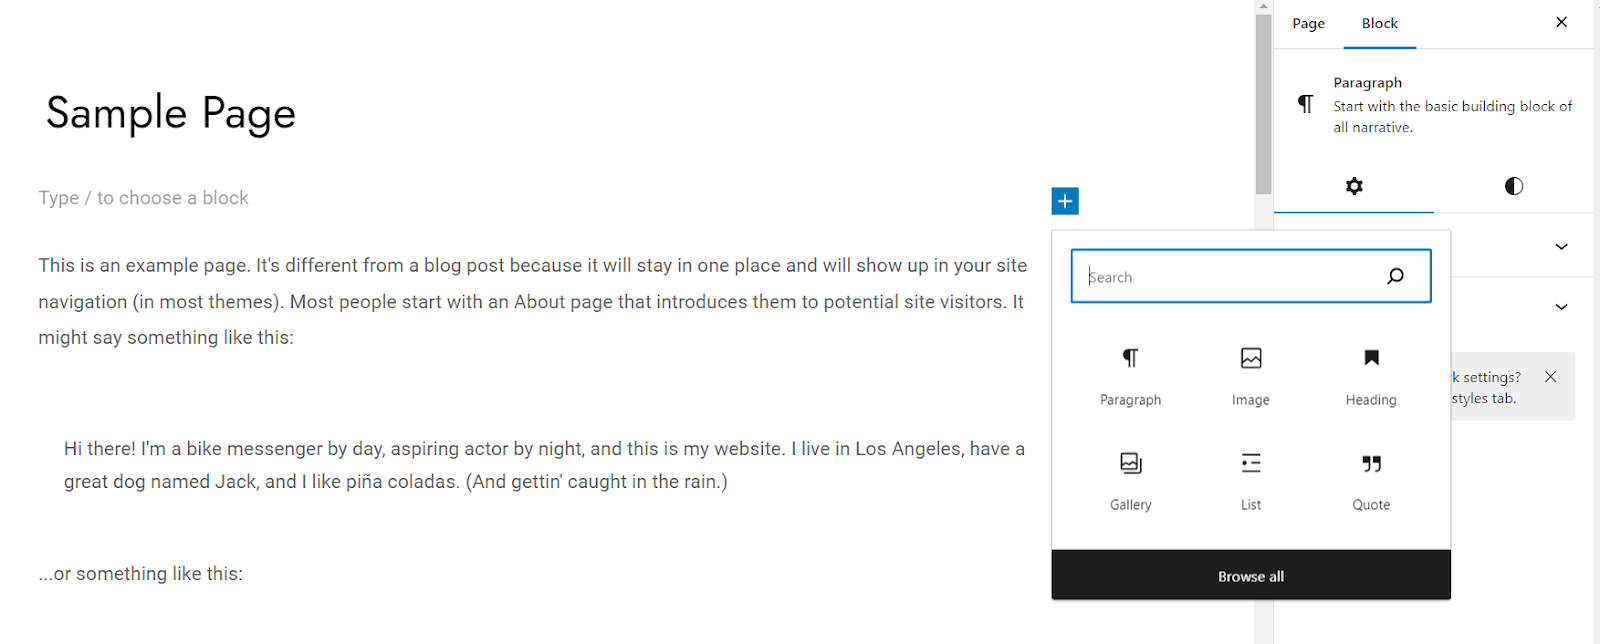
- Navigate to the WordPress Dashboard and choose the page or post where you want to add your gallery. You’ll see a “+” button at the editor’s top or within the block editor’s content area.
- Click this button to open the block selection menu. You can type “Gallery” into the search bar to quickly locate the Gallery Block or scroll through the list of blocks until you find it.
- Click on the Gallery Block to insert it into your content area.
2. Upload or Select Images
After inserting the Gallery Block, you will be prompted to upload images or select them from the existing Media Library. If you want to upload new images, click the “Upload” button to open a file explorer window. Next, choose the images you wish to include in the gallery layout from your computer.
To streamline the process, you can select multiple images by holding down the Ctrl (Cmd) key while clicking on each file in the WordPress image gallery.
Alternatively, if you prefer to use images already on your WordPress site, click the “Media Library” button. This will allow you to browse through your previously uploaded media files and select multiple images by holding down the Ctrl (Cmd) key as you select it.
Additionally, you can drag and drop images directly into the Gallery Block area from your file explorer, which will automatically upload the images and add them to your gallery.
3. Customize Your Gallery Layout
Once your images are uploaded or selected, you can customize your Gutenberg gallery’s appearance. Use the Gutenberg gallery block settings on the right side of the editor to adjust the number of columns, which controls how your images are arranged horizontally.
The available options usually range from 1 to 6 columns, allowing you to choose the layout that best fits your design needs.
Additionally, you can resize individual images or the entire image gallery by using the image editing tools provided in the Gutenberg gallery block settings. Explore various layout styles, such as grid or masonry, to find the one that complements your site’s aesthetic.
Some themes or plugins may offer additional customization options for more advanced layout adjustments.
4. Add Captions and Alt Text
To enhance your gallery, click on each image within the image gallery block to open its settings. Here, you can add captions and alt text for the custom gallery layout. Enter a caption in the designated field to provide context and additional information about the image, which can engage your audience more effectively.
Captions appear directly below the images and can be used to convey important details. For SEO and accessibility, also include descriptive alt text in the “Alt Text” field. Alt text helps search engines comprehend what the image is about and is crucial for users who rely on screen readers to access your content.
5. Preview and Publish
Before finalizing your WordPress image gallery, use the “Preview” button to see how it will look on different devices, including desktops, tablets, and smartphones. This step is essential for ensuring your gallery is responsive and visually appealing across various screen sizes.
Review the Gutenberg image gallery’s appearance and functionality in preview mode, and make any necessary adjustments based on your observations. Once you are satisfied with how everything looks, click the “Publish” button to make your page or post live.
Your gallery will now be visible to visitors on your site. You can also make use of the Gutenberg plugins for an effortless experience.
Essential Fixes for Gutenberg Image Gallery Glitches
1. Addressing Issues with “Images Not Displaying Correctly” in the Gutenberg Gallery Block by Checking File Sizes and Formats
If all the images in your gallery aren’t showing up as expected, this can often be attributed to file size, format, or media settings in the WordPress websites. Here’s how to address these issues:
- Check File Sizes: Large image files can tremendously slow down your website, and in some cases, they might fail to load altogether. Make sure your image files are manageable. Aim for sizes under 1MB, especially for galleries with multiple images.
- Verify Image Formats: Use supported image formats, such as JPEG, PNG, or GIF. WordPress handles these formats well, but non-standard formats like TIFF or BMP may display incorrectly.
- Review Media Settings: Head to the WordPress Dashboard > Settings > Media to confirm your media settings are properly configured. If you’ve set restrictive size limits or display settings, this could impact how your gallery images are shown.
- Clear Caches: If you’ve recently updated your images and they aren’t displaying correctly, browser or site caches might be at fault. Clear your browser cache and any caching plugin (like WP Super Cache) to ensure updated images are loading properly.
2. Optimizing Your Gutenberg Gallery Block for Faster Loading Times and Improved User Experience
If your gallery loads slowly, this can negatively affect the user experience, especially for visitors on slower internet connections. To optimize load times:
- Compress Your Images: Large image files can significantly slow down your website. Compress your images before uploading them. Gallery plugins like TinyPNG or JPEGmini help reduce file sizes without sacrificing quality.
- Use Image Optimization Plugins: Plugins like Smush or EWWW Image Optimizer can automatically compress and optimize images as you upload them. These tools also help optimize previously uploaded images across your site, improving loading speeds.
- Lazy Loading: If you’re dealing with galleries containing many images, consider enabling lazy loading. This feature ensures that images are only loaded as the user scrolls down the page rather than all at once. You can enable lazy loading via plugins like Lazy Load by WP Rocket.
- Limit Image Count: Be mindful of the number of images in a single gallery. Large galleries with high-resolution images can slow down page load times. To improve performance, split large galleries across multiple pages or sections.
3. Fixing Mobile Responsiveness Issues in the WordPress Gallery Block to Ensure Proper Display on Smartphones and Tablets
With most users accessing websites via mobile devices, ensuring that your Gutenberg image gallery is fully responsive is crucial. If your preferred gallery layout isn’t displaying correctly on mobile devices, follow these steps:
- Check Responsive Settings: Ensure you’ve set up a responsive layout for your gallery. WordPress’s default settings usually handle this automatically, but custom CSS or theme-specific adjustments may interfere. Visit Appearance > Customize to tweak your theme’s mobile settings if necessary.
- Preview on Multiple Devices: WordPress offers a built-in preview tool to see how your gallery will appear on various screen sizes, including mobile and tablet. This feature identifies any layout or sizing issues before publishing your gallery. To access this, click the “Preview” button at the editor’s top and select the mobile or tablet icon.
- Adjust Column Settings: Mobile screens often don’t accommodate multiple-column galleries. When viewed on smaller screens, you may need to reduce the number of columns in your gallery. WordPress allows you to set different numbers of columns for desktop, tablet, and mobile layouts.
- Use a Responsive Theme: Ensure that your WordPress theme is mobile-friendly. Many themes are built with responsive design, but some older or custom themes may adapt poorly to different screen sizes. Switching to a fully responsive theme can solve most mobile display issues.
4. Dealing with Image Alignment and Spacing Problems in the Gutenberg Image Gallery by Adjusting Layout Settings and Custom CSS
If the images in your gallery don’t seem aligned correctly or the spacing looks off, this could be a result of improper layout settings or conflicting custom styles:
- Adjust Gallery Settings: Within the gallery block, you can control image alignment, spacing, and margins. Ensure you’ve selected the correct alignment options and set reasonable spacing between images. Reduce margins for tighter grids while increasing padding for a more spaced-out look.
- Check for CSS Conflicts: Custom CSS or theme styling might override default gallery settings. Inspect your site’s CSS code to see if any conflicting styles affect image alignment or spacing. If you’re unfamiliar with CSS, plugins like Simple Custom CSS can help you make quick adjustments without coding expertise.
- Test Different Browsers: Sometimes, browser-specific issues can affect your gallery’s appearance. Test your gallery across different browsers (Chrome, Firefox, Safari, Edge) to ensure consistency. If the gallery looks fine in one browser but not another, this could indicate a browser compatibility issue, and you may need to adjust your CSS accordingly.
Gutenberg Image Gallery: Techniques and Tips for Expert Mastery
Transforming your WordPress website into a visual masterpiece is as simple as mastering the WordPress Gallery Block. With its sleek design, responsive features, and endless customization options, the Gutenberg image gallery turns your images into a captivating experience for your audience.
Whether you’re showcasing a dazzling portfolio, highlighting standout products, or sharing cherished personal photos, this tool helps you craft galleries that mesmerize and engage.
But even the most stunning galleries need a solid foundation. That’s where Nestify comes in. Imagine your galleries loading in the blink of an eye, backed by top-notch security and performance that scales with your needs.
With Nestify’s optimized WordPress hosting, your images will not only shine but also provide a seamless experience that keeps visitors coming back for more. Dive into the world of extraordinary galleries with the perfect hosting partner by your side. Sign up for Nestify’s free trial today!
FAQ to Maximize the Potential of the Gallery Block
Can I rearrange images in my WordPress gallery after I’ve added them?
Yes, you can easily rearrange the images in your gallery. Simply click on the gallery block and drag and drop the images into your preferred order. You can also delete/add new images at any time.
Is it possible to add a link to each image in the gallery?
Yes, WordPress allows you to add custom links to each image. Depending on your needs, you can link images to a media file, attachment page, or custom URL.
Can I use the WordPress Gallery Block without any plugins?
Absolutely! The Gallery Block is a built-in feature of WordPress and doesn’t require any third-party plugins. However, you can explore gallery-related plugins if you need additional functionality like advanced layouts or lightbox effects.
How can I make sure my gallery is responsive on all devices?
WordPress automatically optimizes galleries for mobile devices. However, you can always preview how your gallery will look on different devices using the preview feature before publishing.
