
At times, when attempting to upload an image to your WordPress site’s media library, you may encounter an unexpected obstacle – the dreaded “HTTP Error.” These two words alone can leave you perplexed, as the exact cause of the problem remains elusive. However, rest assured that you are not alone in this predicament, as countless users have faced the same issue without a clear explanation.
The “HTTP Error” message occurs when your image fails to successfully upload to the media library in WordPress. Multiple factors could be responsible for triggering this error. In this guide, we endeavor to address and resolve the WordPress image upload HTTP error by presenting 17 effective solutions. These solutions are arranged in order of simplicity, from the quickest fixes to more intricate ones.
Prior to commencing, it is essential to emphasize our progressive approach, starting with simpler solutions and advancing to more intricate options. Should your issue be resolved with the initial straightforward remedy that is most favorable?
However, in the event that a more advanced alternative becomes necessary, we strongly advise you to create a backup of your website as a precautionary measure. This proactive step can prevent considerable frustration in the event of unforeseen complications.
We sincerely hope that the issue can be resolved during the initial stages, as we have made every effort to maintain simplicity in our troubleshooting methods, making it feasible to implement even the most sophisticated solutions with ease.
Let us commence the process.
1. Wait and Refresh

Occasionally, circumstances are not as fixed as they appear, and this principle extends to errors as well. The HTTP error you’re encountering may be a transitory occurrence. Factors like a surge in website traffic or increased server resource consumption can be unpredictable.
The recommended course of action is to exercise patience. Give it some time and attempt to upload your image again after refreshing the page.
Suppose the error vanishes; fantastic! You can take a moment to congratulate yourself, as the issue was indeed temporary. Whew! That certainly spared you from unnecessary inconvenience.
2. Resize the File

The most frequently suggested solution by users to resolve the upload error is image resizing. It’s important to note that there is no strict guideline regarding the specific size reduction required. However, generally, resizing the image to a smaller dimension often proves effective in preventing this error.
To offer some perspective, one WordPress user shared her experience of successfully uploading a small-sized image (96KB) without encountering any errors. Conversely, difficulties arose when attempting to upload a larger image (480KB).
It’s conceivable that the issue lies with the image’s file size. Consider utilizing online tools to resize the image and subsequently attempt the upload once more. If this resolves the problem, excellent; otherwise, proceed to explore the additional troubleshooting methods outlined below.
3. Rename the File
An additional frequent issue pertaining to image files is the presence of unconventional or excessively lengthy file names. These peculiarities might include special characters or, in some cases, even something as common as an apostrophe in the image name, which can lead to errors.
To mitigate this concern, it is advisable to maintain concise and straightforward image file names. By keeping your image names short and devoid of special characters, you can reduce the likelihood of encountering errors during the uploading process.
4. Clear Browser Cache
In the event that the previously mentioned straightforward solutions prove ineffective, consider this alternative. It’s worth investigating whether clearing your browser cache can rectify the error. If you’re unfamiliar with the concept of browser cache or require guidance on how to clear it, we recommend referring to the following resource:
“How To Clear Browser Cache In The Latest Versions Of All Major Browsers.”
Clearing your browser cache allows you to determine if the issue is indeed related to the cache. If this action successfully resolves the error, you can proceed with your tasks. If not, it’s advisable to continue exploring other potential solutions.
5. Switch Browser
Occasionally, the issue might be linked to your current web browser. In such cases, transitioning to a different browser could be a straightforward solution to circumvent the error. It’s advisable to give this uncomplicated fix a try before delving into more complex alternatives.
6. Deactivate Plugins
The inability to upload images to your media library could be attributed to a specific plugin you have installed. It’s a known occurrence that certain plugins can interfere with the uploading process.
The recommended approach is to temporarily deactivate your plugins and attempt the image upload. If the upload succeeds, it confirms that one of your plugins is responsible for the issue. You can then proceed to reactivate your plugins one at a time, reattempt the image upload, and pinpoint the plugin causing the error.
Once you identify the problematic plugin, you can take the necessary actions to address the issue.
7. Disable Image Optimization

In case you’re utilizing an image optimization tool and still encountering the HTTP error, consider disabling the image optimization process. Test whether you can successfully upload images when this optimization step is bypassed. If this resolves the issue, your problem is resolved!
If the problem persists, proceed to explore further solutions.
8. Change Theme

We’ve made an attempt to deactivate the plugins, but it may not have resolved the issue. The next potential culprit could be your WordPress theme. It’s possible that a WordPress theme might be causing hindrances when uploading certain images. To ensure you don’t lose any content, create a backup of your website and then switch to the default theme.
Changing the theme has been known to resolve the issue in some instances. Although there’s no absolute assurance that this solution will work, there’s no harm in giving it a try, either.
Try changing your theme and observe whether this error vanishes for you.
9. Use the “Add from Server” Plugin
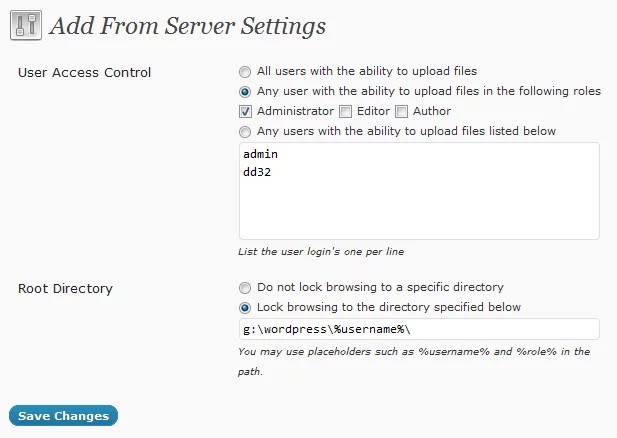
A plugin by the name of “Add from Server” plays a crucial role in addressing specific issues related to HTTP errors during image uploads. This plugin has garnered a substantial user base, with more than 100,000 active installations. It’s vital to emphasize, however, that this plugin has not undergone testing with the three most recent major WordPress releases. Consequently, there may be compatibility concerns when using it with the latest WordPress version.
But what exactly is the core function of this plugin?
– Its primary objective is to streamline the process of importing individual, sizable files that couldn’t be uploaded through the standard admin interface.
– Additionally, it offers users the capability to upload a collection of files via FTP and subsequently import these files directly from the web server into the WordPress platform.
It’s essential to recognize that this plugin should not be regarded as a replacement for the default media uploader.
10. Reach out to your Web Host

If the aforementioned steps prove ineffective, it’s time to turn to your hosting provider. You’re investing in hosting services, and it’s your right to have your issues addressed by your web host.
The subsequent remedies are best handled by your web host, and they should be able to assist you. At this juncture, your host will, at the very least, provide insights into the root cause of the problem or, ideally, offer a solution.
Many users have reported that reaching out to their web hosts led to a successful resolution of their issues. Instead of investing time in complex solutions, consider leveraging the expertise of your web host to rectify the error.
In the unlikely event that your web host fails to resolve the issue, it may be an indicator that it’s time to consider switching to an alternative hosting provider. A managed WordPress hosting solution like Nestify can be a promising alternative.
While contemplating a change in your hosting provider, there are still a few steps you can take to address the HTTP error. Keep reading for further insights.
11. Increase WordPress Memory Limit
A commonly suggested solution to tackle the HTTP error, as widely available on the internet, is to enhance the WordPress memory limit.
To implement this, simply insert the following code into your wp-config.php file:
define( ‘WP_MEMORY_LIMIT’, ‘256M’ );
This adjustment elevates the default memory allocation to 256MB, which is effective in resolving the issue in many instances. Nevertheless, it’s advisable to consult your hosting provider to ensure compatibility and confirm whether you have the capability to override this setting.
12. Switch to GD Library
WordPress uses two different PHP modules for image processing: Imagick and GD Library.
Imagick can exhaust the available memory and cause the HTTP error. Therefore, you should make the GD Library your default editor.
How can you do that?
Just add the following code to your theme’s functions.php file.
function wpb_image_editor_default_to_gd( $editors ) {
$gd_editor = ‘WP_Image_Editor_GD’;
$editors = array_diff( $editors, array( $gd_editor ) );
array_unshift( $editors, $gd_editor );
return $editors;
}
add_filter( ‘wp_image_editors’, ‘wpb_image_editor_default_to_gd’ );
Save your changes and try uploading the image.
13. Limit Imagick to a single thread
The main problem with Imagick is its resource-exhaustiveness. If you can set a limit to that, then it might help in resolving the HTTP error. Here, we are trying to curb the super-fast processing of Imagick so that it does not exhaust the WordPress memory.
How do you do that?
Just add the following line of code to the top of your .htaccess file.
SetEnv MAGICK_THREAD_LIMIT 1
This limits the Imagick processor to a single thread. This should resolve the error in most cases.
14. Upgrade PHP Version
Frequently, you may encounter unusual errors when your web hosting service doesn’t utilize the most recent PHP version. Given that WordPress operates on PHP, keeping your PHP version up-to-date can significantly enhance performance, resulting in fewer errors and expanded functionality.
In case your current web host does not offer support for the latest PHP version, it’s worth contemplating a transition to a swifter hosting provider like Nestify, known for its compatibility with the latest PHP versions.
15. Remove Media Library Path
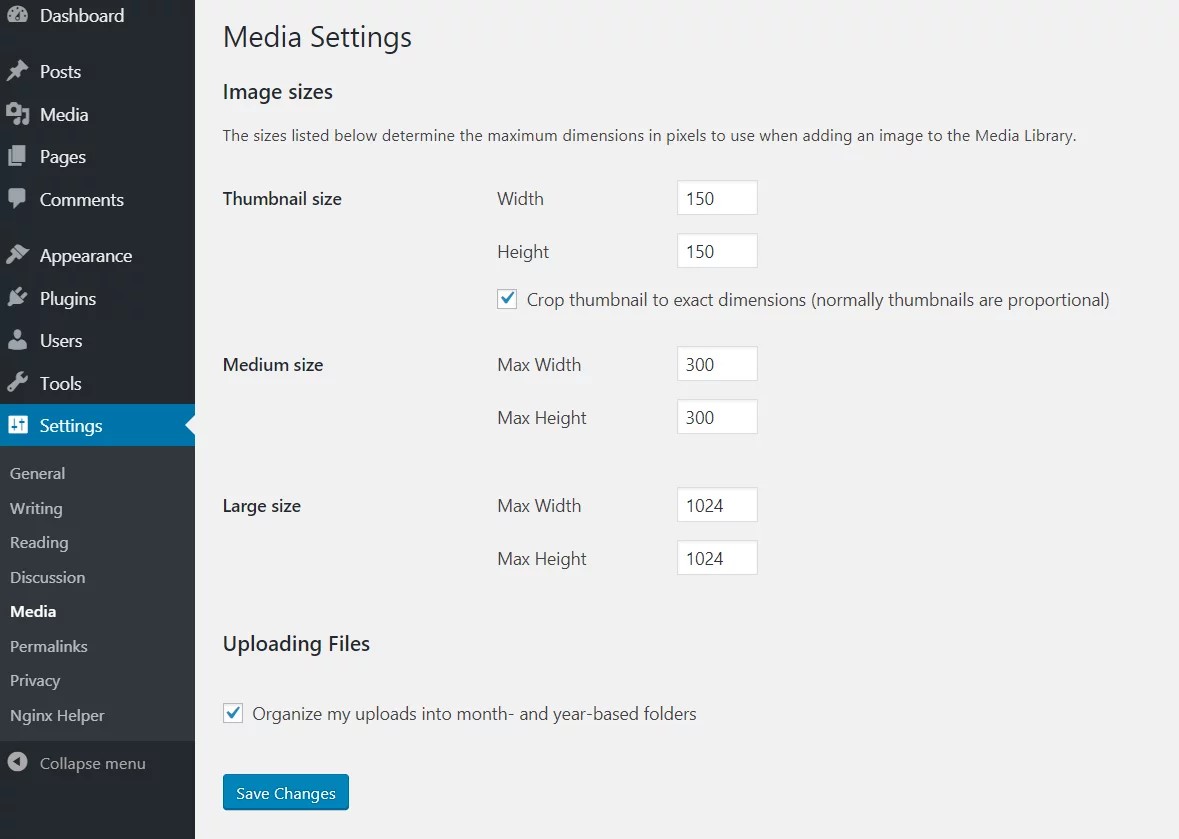
When transitioning from a staging to a production environment, the media library path may remain unaltered, potentially leading to HTTP errors.
To rectify this situation, follow these steps in your WordPress dashboard:
1. Go to the “Settings” and click on the “Media” tab.
2. Look for the “Media Path” setting.
3. If the “Media Path” field is empty, your configuration is ideal.
4. However, if a file path is present in the “Media Path” field, delete it and then click “Save changes.”
5. After making these adjustments, check if the HTTP error has been resolved. If the issue persists, there are additional troubleshooting options to consider.
16. Tweak Mod Security
Mod security is a popular and open-source cross-platform web application firewall (WAF). It provides real-time web application monitoring, logging, and access control.
Your web host might be running Mod security, which may cause an HTTP Error.
You can get this checked with your web host. If your web host cannot disable the Mod Security for you, then you might have to take matters into your own hands.
If your web host is using the Apache server, that’s when you can add the following code to your .htaccess file to disable Mod Security.
SecFilterEngine Off
SecFilterScanPOST Off
17. Change Upload Folder Permissions
If you’re still facing persistent issues, the final step in your troubleshooting process involves modifying the permissions of your upload folders. Here is a complete guide on how to proceed:
1. Start by initiating an FTP connection to your website using an FTP client.
2. Navigate to your WordPress site’s root directory.
3. Select all the folders present in the root directory, then right-click and choose the option that says “File Permissions.”
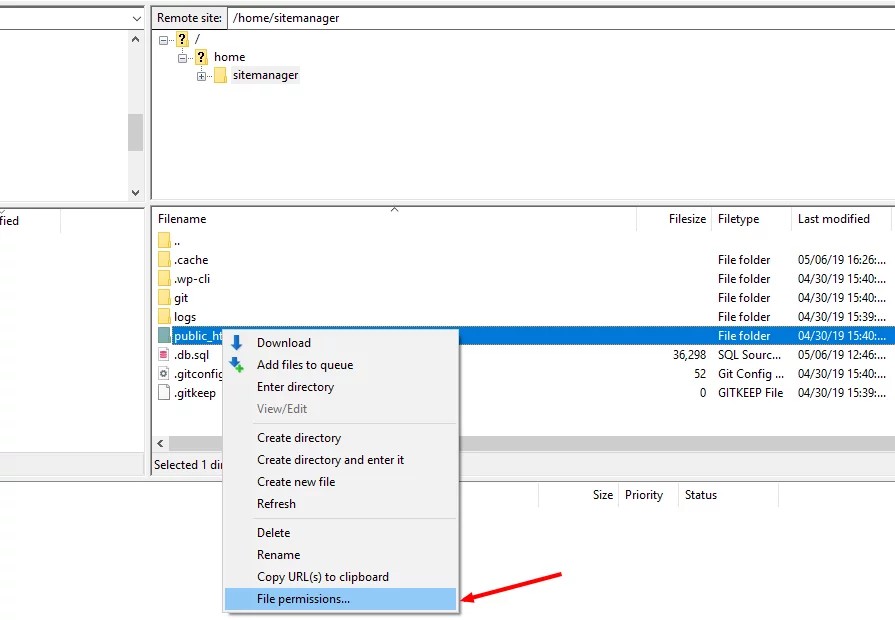
4. This action will open the “File Permissions” dialog box. Enter the value 755 in the “Numeric Value” field.
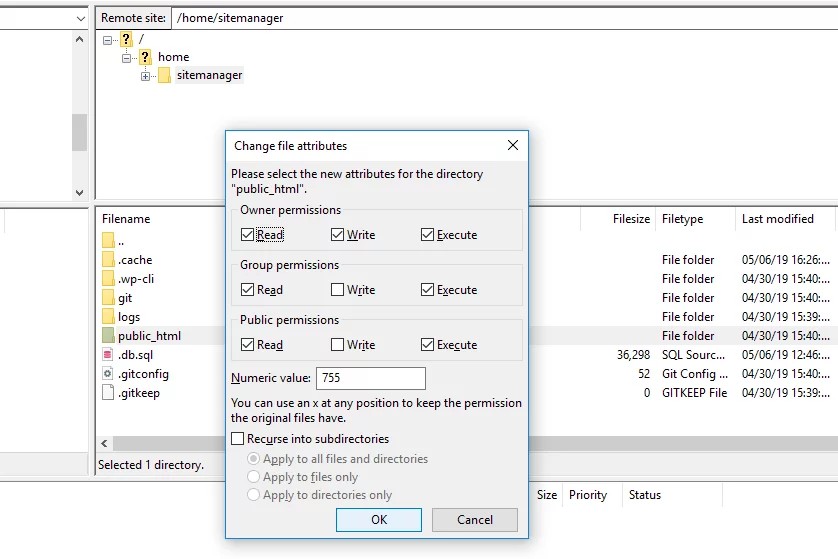
5. Ensure that you’ve marked the checkbox labeled “Recurse into subdirectories.”
6. Opt for the “Apply to directories only” option, and then click “OK.”
By carefully following these steps, you can potentially address any lingering issues by modifying the permissions of your upload folders.
Conclusion
At this point, we anticipate that the issue has been rectified, assuming you’ve explored all available troubleshooting options. Your ultimate recourse in this situation is to reach out to your web hosting provider. If your web host proves unable to resolve the error, it may be advisable to consider migrating to a more dependable host.
Nestify provides managed WordPress hosting renowned for its adept support and dependable tailored solutions for its clientele. We trust that this article has succinctly outlined all potential HTTP error resolutions for your benefit. Should you have any additional insights to contribute, you may kindly share your thoughts in the comments section.
FAQS
What is the WordPress Image Upload HTTP Error, and why does it occur?
The WordPress Image Upload HTTP Error is a frequent issue that occurs when users try to upload images to their WordPress websites. It’s typically caused by server configurations, resource limitations, or conflicts with plugins or themes.
Can a corrupted image file cause the HTTP Error?
Yes, a corrupted or damaged image file can sometimes trigger the HTTP Error during the upload process. To resolve this, ensure that your image files are not corrupted and try re-uploading them.
Are there any WordPress plugins that can help prevent the Image Upload HTTP Error?
Yes, there are plugins available, such as “WP Smush” for image optimization and “Disable Real MIME Check” to bypass certain file type checks. However, it’s important to use plugins judiciously, as too many can lead to conflicts and performance issues. Always keep your plugins up to date for the best results.
