
Encountering database errors in WordPress can be stressful—especially when your website suddenly displays a message like “Error establishing a database connection.” Whether it’s caused by corrupted tables, missing data, or an unstable connection between WordPress and your MySQL server, these issues can often be traced back to a malfunctioning database.
Thankfully, WordPress provides a built-in tool to help diagnose and resolve these issues: the WP_ALLOW_REPAIR constant.
How to Know When Your WordPress Database Needs Repair
WordPress websites can sometimes experience unexpected issues—sluggish performance, missing content, or even full-blown site outages. While many problems stem from themes, plugins, or server-side errors, one of the most overlooked culprits is the database.
The WordPress database is responsible for storing all your site’s content, configuration, user data, and more. When something goes wrong here—whether due to corrupted tables, failed updates, or excessive queries—it can bring your entire website to a halt.
So, how can you tell if your WordPress database is in trouble?
Here are the most common warning signs to look out for:
1. “Error Establishing a Database Connection
This is by far the most common and glaring indication of database failure. It means WordPress is unable to communicate with the MySQL database.
Possible causes:
- Incorrect database credentials (DB_HOST, DB_USER, DB_PASSWORD)
- Corrupted or missing database tables
- The database server is down or overloaded
- Hosting misconfiguration
When you see this message, your website won’t load—no dashboard, no content—just a white screen with an error. Immediate action is required.
2. Missing Images or Media Files
Have your image galleries or blog post thumbnails stopped showing? This may not be a media library issue—it could be due to broken references in your database.
What happens:
- WordPress stores media paths and relationships in the database.
- If the media table gets corrupted or some entries are deleted, the media won’t load, even if the file physically exists in
/wp-content/uploads/.
This can especially happen after failed imports, plugin conflicts, or server crashes.
3. Disappearing Posts, Pages, or Navigation Menus
Content that mysteriously disappears from the frontend or backend is often due to missing or damaged database records.
Common symptoms:
- Posts that were visible yesterday are now gone
- Pages show a 404 error or cannot be found in the admin panel
- Navigation menus are empty or display only partial links
This typically indicates corruption in tables like wp_posts, wp_postmeta, or wp_terms.
4. Error: “No Update Required – Your WordPress Database Is Already Up-to-Date”
This confusing error sometimes appears when trying to upgrade WordPress core or plugins. It generally means the system attempted a database update but failed halfway.
Underlying issues may include:
- Incomplete updates due to timeouts
- Locked database tables
- Mismatched version numbers between
wp_optionsand actual site data
This message can prevent further updates from being applied correctly and may block access to the dashboard.
5. Slow Performance or Page Timeouts
Is your website taking too long to load—or crashing under minimal traffic?
This might signal:
- Fragmented or bloated database tables
- Excessive transient data clogging the
wp_optionstable - Missing indexes in large tables like
wp_postsorwp_usermeta - Poorly optimized queries from plugins
In shared hosting environments, even moderate database strain can cause performance bottlenecks and “504 Gateway Timeout” errors.
Learn about database optimization here.
How to Use WP_ALLOW_Repair
WordPress provides a simple way to Repair a corrupted database using the WP_ALLOW_Repair feature. You can do this without needing advanced technical skills.
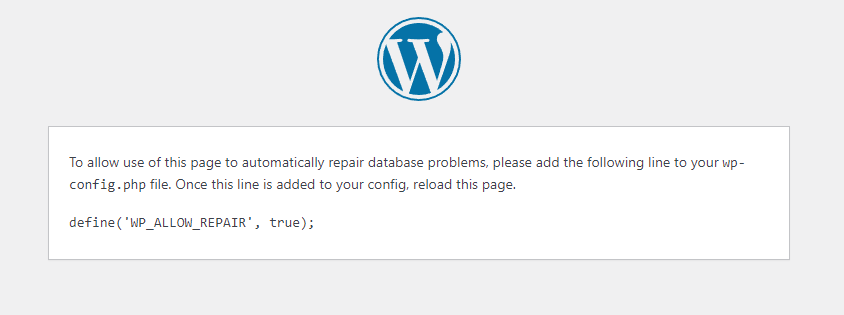
If you did not add the wp-config.php file then define(‘WP_ALLOW_Repair’, true) error will occurr.
Follow these steps:
- Connect to your website via FTP and download the wp-config.php file located in the root folder of your WordPress installation.
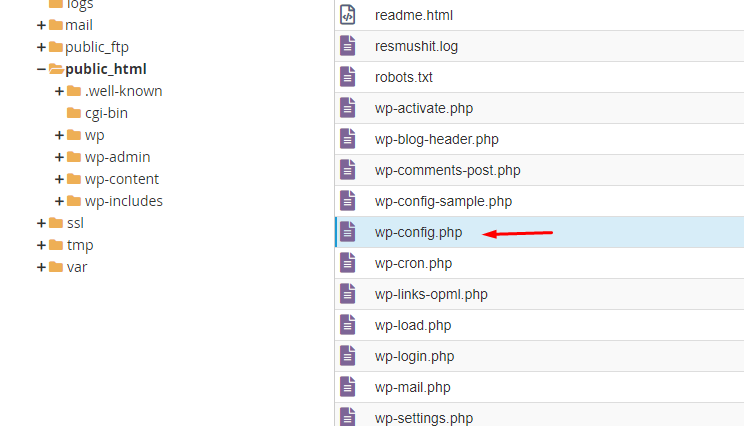
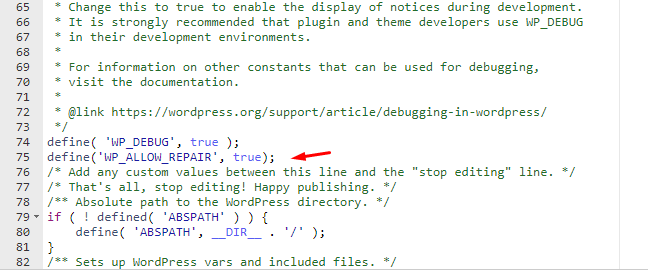
- Open the wp-config.php file using a text editor. Add the following line at the end of the file, just before the line that says if ( !defined(‘ABSPATH’) ):
define(‘WP_ALLOW_Repair’, true);
- Ensure that you only modify any other content in the wp-config.php file if you’re confident in what you’re doing.
- Save your edits, then send the updated file back to your server to replace the previous version.
In your web browser, go to the URL https://yoursite.com/wp-admin/maint/Repair.php. Remember to replace “yoursite.com” with your actual website URL.
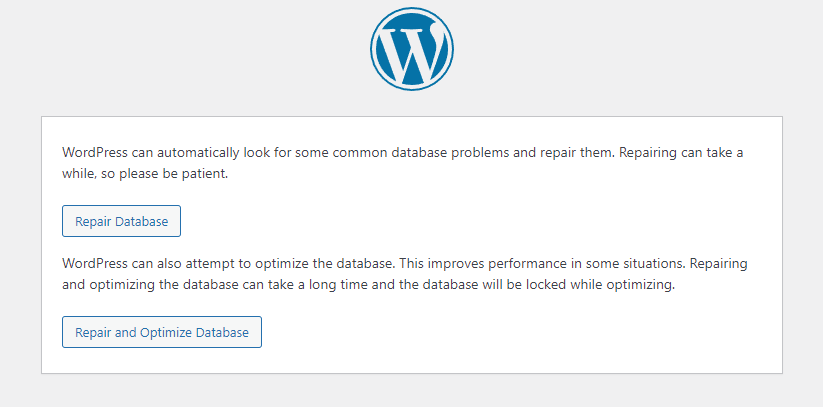
After enabling the Repair feature, you’ll be presented with two buttons: “Repair Database” and “Repair and Optimize Database.” Both options fix your database, but we recommend choosing “Repair and Optimize Database” because it also optimizes your database for better performance.
After selecting your option, a page with a lot of code will show up. There’s a note at the bottom that reads, “Repairs complete.” To prevent unauthorized users from using this page, please delete the following line from wp-config.php.” And that’s it! Now, your database has been fixed.
Check your website to see if it’s working, and try logging in to ensure everything is functioning as expected.
Finally, remove the “WP_ALLOW_Repair” line from your “wp-config.php” file and upload the modified file back to your server. This step ensures that unauthorized users can’t access the Repair page.
Use phpMyAdmin to Repair WordPress
To Repair your WordPress database via the control panel:
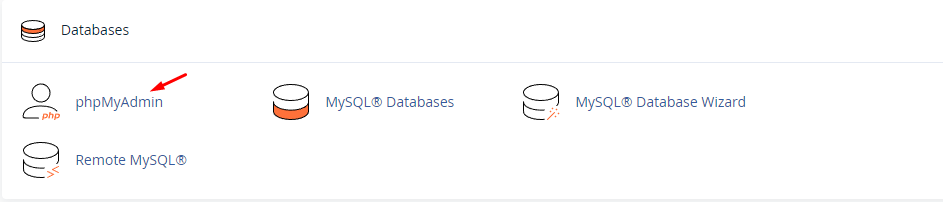
- Enter your login credentials and click the control panel(cPanel) for your hosting account.
- Navigate to “phpMyAdmin,” typically found under the ‘Databases’ section.
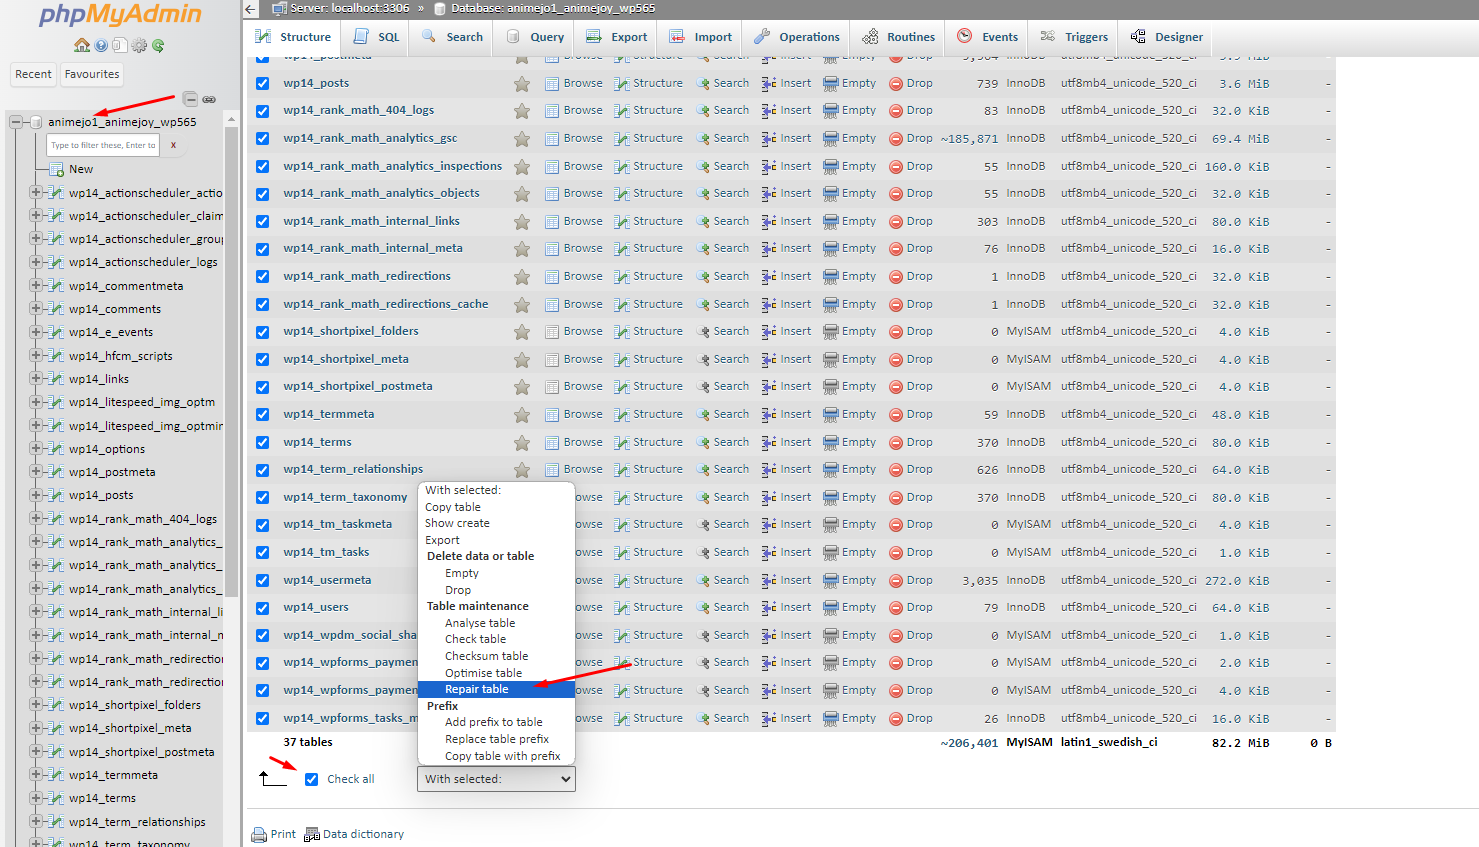
- Select the appropriate WordPress database, ensuring it starts with ‘wp_’.
- Scroll down, check the ‘Check all’ box, and choose ‘Repair table’ from the dropdown.
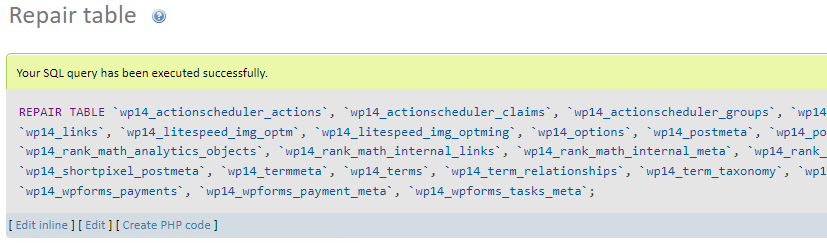
- Verify the Repair’s success on the results screen.
The screen with the Repair results will now appear. If the Repair was successful, it will be indicated by the messages shown below. You need to see the following message at the top:
Best Practices for Using WP_ALLOW_REPAIR in WordPress
The WP_ALLOW_REPAIR function in WordPress is a built-in troubleshooting tool that allows you to repair and optimize your website’s database. While it’s effective for resolving specific database issues, it should be used carefully to avoid unintended consequences. Below are the best practices to follow for a safe and efficient repair process.
1. Use WP_ALLOW_REPAIR Only When It’s Truly Needed
This feature is designed to resolve critical issues like a corrupted database or failure to establish a database connection. It should only be activated when you’re facing clear signs of database malfunction—such as missing content, slow-loading pages, or error messages related to your database.
Avoid enabling this feature as part of your routine maintenance. It’s meant to be a recovery tool, not a daily-use option.
2. Understand Its Purpose and Limitations
WP_ALLOW_REPAIR is not a full-fledged repair system or LMS. It’s a basic repair utility that can fix common corruption issues and perform basic optimizations. It cannot recover deleted data or resolve complex plugin-related problems. For deeper issues, you may need to consult a developer or use more advanced database tools.
3. Access the Repair Interface Securely and Promptly
Once enabled, the repair interface becomes publicly accessible through a specific URL on your website. This page does not require user login credentials, meaning anyone with the link can access it. Therefore, it’s important to visit the page promptly, perform the necessary actions, and then disable the feature immediately afterward.
Leaving this interface open for too long can expose your site to potential security risks.
4. Always Backup Your Website First
Before performing any database repair—no matter how small—it’s crucial to create a full backup of your website. This includes both the database and the site files. Backups act as a safety net in case something goes wrong during the repair process.
You can use a trusted WordPress backup plugin or rely on your hosting provider’s backup tools to create a restore point before making any changes.
5. Remove WP_ALLOW_REPAIR Immediately After Use
Once you’ve repaired or optimized the database, promptly disable the repair feature to close public access to the repair page. Leaving it active even for a short time can pose a security threat, especially on high-traffic or commercial websites.
Disabling it once you’re done ensures that your site remains secure and prevents unauthorized access to sensitive backend tools.
6. Don’t Depend on It for Ongoing Optimization
While WP_ALLOW_REPAIR can improve performance temporarily by fixing database tables, it is not a substitute for long-term maintenance practices. For routine database optimization, consider using specialized WordPress plugins that are designed to clean up database clutter, remove spam comments, and optimize performance regularly.
It’s best to reserve WP_ALLOW_REPAIR for emergency fixes, not for ongoing performance improvements.
7. Test on a Staging Site Before Running Repairs on Live Sites
If your website is highly complex or mission-critical—such as an online store or LMS (Learning Management System)—it’s a smart idea to test any repair actions in a staging environment first. A staging site is a duplicate of your live site where you can safely test updates, changes, and repairs without affecting your real audience.
Most premium hosting services, including Nestify, offer easy-to-use staging environments that can be set up in just a few clicks.
8. Choose Reliable Hosting That Minimizes the Need for Repairs
Frequent database errors may be a sign of deeper problems such as poor hosting, outdated software, or plugin conflicts. If you find yourself using WP_ALLOW_REPAIR often, it may be time to consider a more stable and secure hosting provider.
Managed WordPress hosting platforms like Nestify come with automated monitoring, daily backups, performance optimization, and built-in support that help prevent these issues before they even occur.
Safely Repair Your WordPress Database
The WP_ALLOW_REPAIR constant in WordPress offers a simple yet powerful solution for fixing database-related issues without needing advanced technical skills. Whether you’re dealing with the dreaded “Error establishing a database connection” or unexpected missing content, this built-in tool can help restore your site’s health quickly.
By enabling this feature, WordPress grants temporary access to an automatic repair and optimization script—no login required. However, it’s critical to use it with caution: always remember to remove the WP_ALLOW_REPAIR line from your wp-config.php file immediately after completing the repair to protect your site from unauthorized access.
🚀 Try Nestify: Fast, Secure, and Built for WordPres
Want a hosting provider that takes care of WordPress maintenance, security, and performance optimization so you don’t have to?
✨ With Nestify, you get:
- Blazing-fast, fully optimized WordPress hosting
- Automatic daily backups and malware scans
- Built-in performance tools and staging environments
- Instant support for database repair, optimization, and crash recovery
- 👉 Click here to activate your free Nestify trial and eliminate the stress of managing database issues on your own.
Frequently Asked Questions (FAQs) About WP_ALLOW_REPAIR
Why should I use WP_ALLOW_REPAIR to fix my WordPress database?
WP_ALLOW_REPAIR is a core WordPress feature that makes it easy to fix common database issues—even for non-technical users. It helps resolve problems like database connection errors, corrupted tables, and slow-loading pages by repairing and optimizing your database tables.
Is WP_ALLOW_REPAIR safe to use?
Yes, but it must be used responsibly. The repair tool is accessible without login authentication, so only enable it temporarily. Once you’re done repairing, immediately remove the code from wp-config.php to prevent unauthorized access.
Can I use WP_ALLOW_REPAIR on a multisite or multiple installations?
Yes, but you must apply it carefully. Only add the WP_ALLOW_REPAIR line to the wp-config.php of the affected site. Then identify and repair the corresponding database via the repair page or a database management tool like phpMyAdmin.
