WordPress Maintenance Mode is a valuable feature that allows website owners to perform updates, make changes, or perform maintenance tasks without interrupting the user experience. Managing a WordPress website encompasses various tasks, ranging from minor adjustments such as updating plugins, addressing broken links, and managing spam comments, which can be done without interrupting site functionality using maintenance mode.
However, more significant changes like website redesigns or server migrations necessitate scheduled downtime to implement effectively. In this guide, we’ll explore how to enable, disable, and troubleshoot WordPress Maintenance Mode to ensure a seamless website management experience.
Why is it needed to put your site into Maintenance mode?
Putting WordPress into Maintenance Mode is typically necessary when making changes or updates to the site that could potentially disrupt its functionality for visitors. Here’s when and why you might consider activating this mode:
- Performing Updates: When updating WordPress core, themes, or plugins, especially major updates, it’s advisable to put the site into this mode to prevent users from encountering errors or inconsistencies during the update process. This ensures that visitors don’t experience broken links or security vulnerabilities.
- Making Structural Changes: If you’re redesigning your website, restructuring navigation menus, or making significant changes to the site’s layout or functionality, this mode can prevent visitors from accessing an incomplete or inconsistent version of the site while changes are being made.
- Fixing Technical Issues: In situations where you need to troubleshoot technical issues or resolve bugs on the live site, activating this mode can prevent users from encountering these issues and provide you with a controlled environment for diagnostics and fixes.
- Migrating Servers or Hosting Providers: When migrating your WordPress site to a new server or hosting provider, you’ll likely need to temporarily put the site into mode to guarantee a smooth transition and avoid data loss or inconsistencies during the migration process.
- Performing Database Maintenance: If you’re performing database maintenance tasks such as optimizing database tables, clearing up unused data, or performing backups, activating this mode can prevent users from accessing the site while these potentially disruptive tasks are underway.
Ways to Enable Maintenance Mode
- Using a Plugin
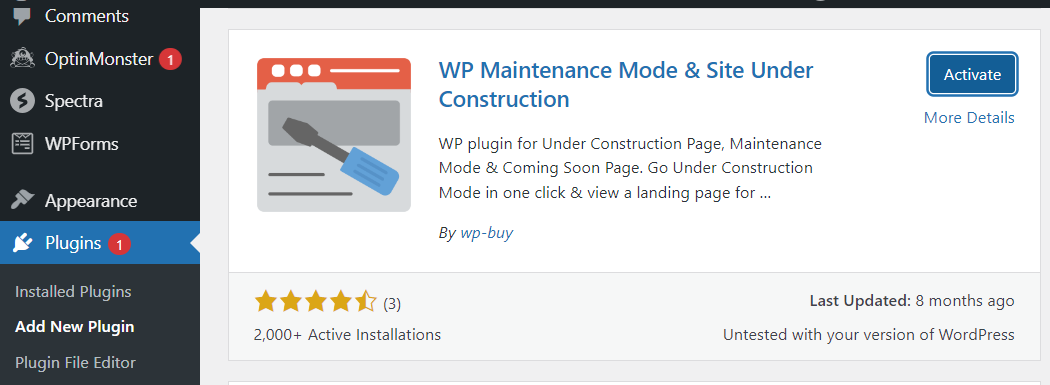
The simplest way to enable this mode is by using a WordPress plugin like “WP Maintenance Mode.”
- Navigate to “Settings” and select “WP Maintenance Mode” to access the plugin settings.
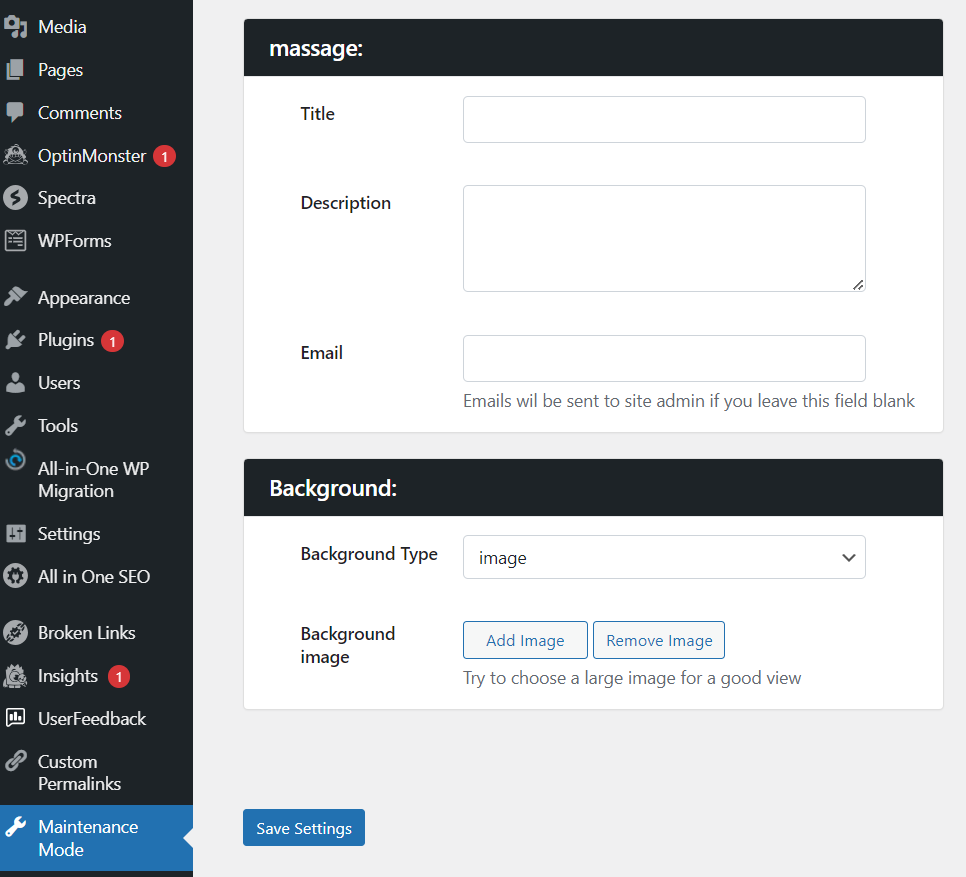
- Once in the plugin settings, customize the maintenance mode page that visitors will see when your site is under maintenance. Make your desired adjustments and save changes.
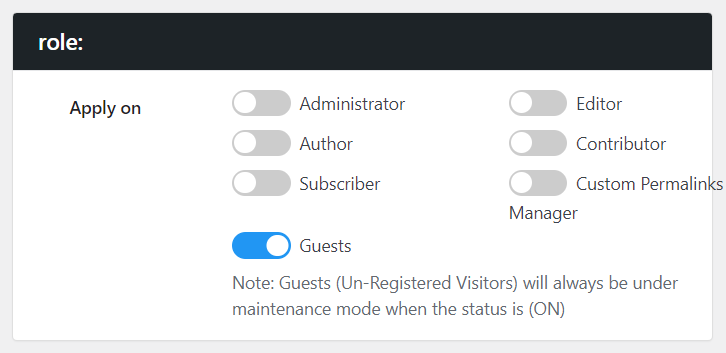
- Next, move to the “Roles” tab to select the audience who you wish to show your maintenance mode page. After making your selections, save your settings.
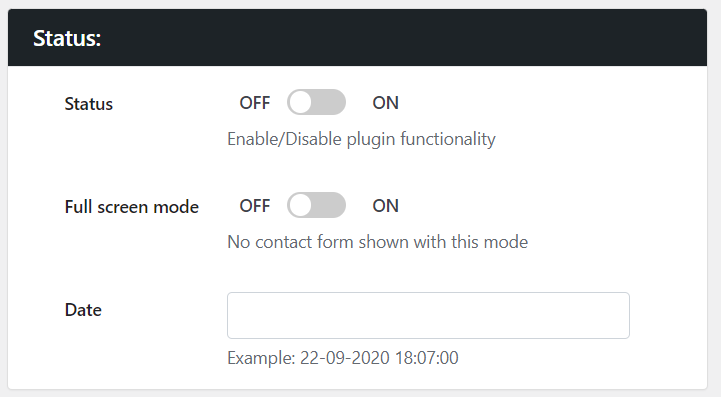
- If you wish to set the time and date of the existence of maintenance mode, navigate to the “Status” tab, respectively. Make any necessary configurations and save your settings.
- Finally, when you’re prepared to activate maintenance mode, head back to the “General” tab and toggle the status to “Activated.” Remember to save your settings.
2. Manually via functions.php
If you’re adept at handling technical tasks and feel comfortable editing theme files, you can manually enable maintenance mode on your WordPress site. Here’s how to do it:
For brief periods of downtime, such as less than an hour, setting up a custom maintenance page might seem unnecessary. In such cases, you can utilize WordPress’s default maintenance mode page to inform visitors of your temporary absence.
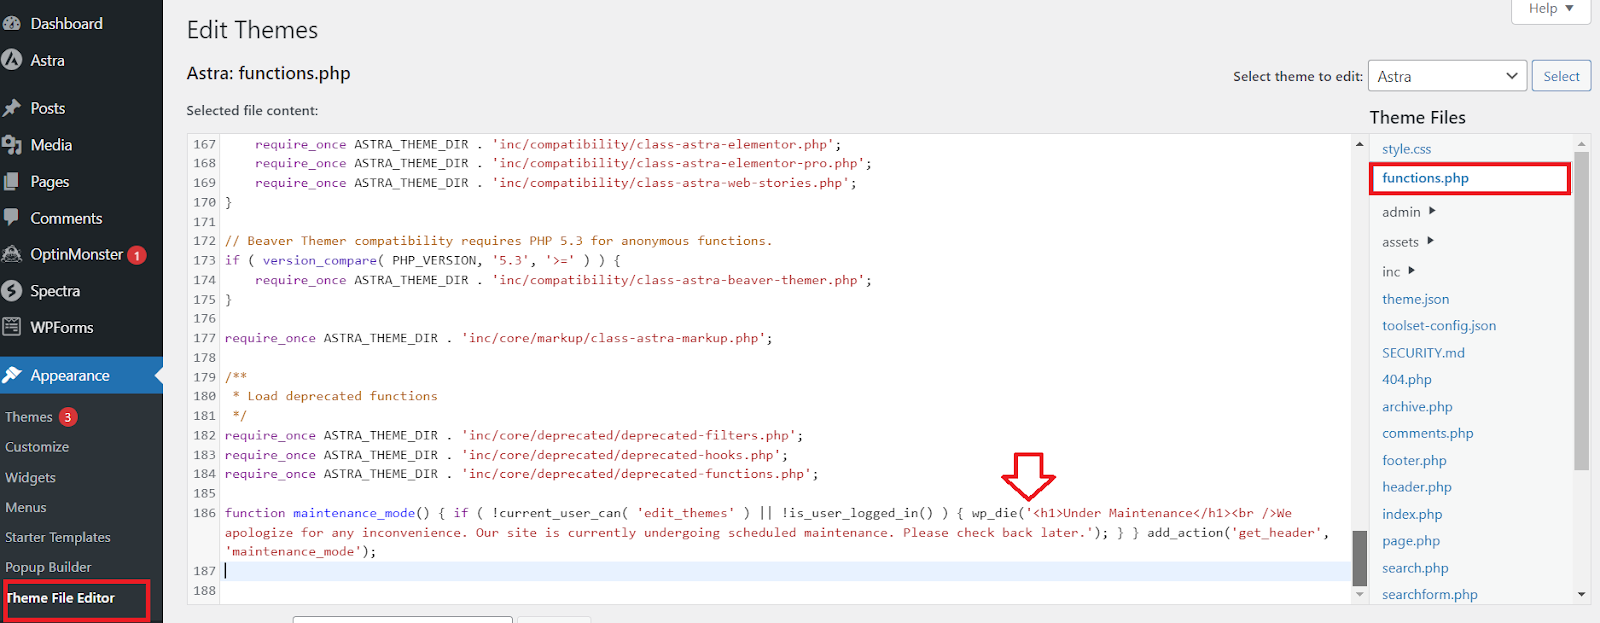
- Sign in to your WordPress account for accessing the panel and click on “Appearance” > “Theme Editor” in the dashboard.
- Locate and click on the “Theme Functions” or “functions.php” file.
- Before making any changes, it’s crucial to create a backup of the existing file. Copy all the code within the file, paste it into a new document, and save it to your desktop.
- Within the theme editor, navigate to the end of the functions.php file and insert the following code snippet:
function maintenance_mode() { if ( !current_user_can( ‘edit_themes’ ) || !is_user_logged_in() ) { wp_die(‘<h1>Under Maintenance</h1><br />We apologize for any inconvenience. Our site is currently undergoing scheduled maintenance. Please check back later.’); } } add_action(‘get_header’, ‘maintenance_mode’);
This code snippet will display a simple message indicating that your site is undergoing maintenance whenever someone tries to access it. Only users with the capability to edit themes or logged-in users will be exempt from seeing this message.
Remember to save your changes after inserting the code. Once you’ve completed your maintenance tasks, you can remove this code snippet or revert to the backup of your functions.php file to disable this mode and restore normal site functionality.
Disable Maintenance Mode:
If this mode was enabled using a plugin, you can disable it by accessing the same plugin settings from the WordPress dashboard and toggling the Maintenance Mode off.
Ways to Troubleshoot Maintenance Mode:
- Stuck in Maintenance Mode: Sometimes, a website may get stuck in this mode, preventing access to both the front end and the back end. To resolve this, access your website files via FTP or file manager, locate the .maintenance file in the WordPress root directory, and delete it. This will force WordPress to exit this Mode.
- 503 Service Unavailable Error: If visitors encounter a “503 Service Unavailable” error while this mode is active, it could indicate an issue with the server configuration. Check server logs for any errors, ensure there’s enough disk space, and verify server resources.
- Conflicts with Plugins or Themes: Certain plugins or themes may not be compatible with Maintenance Mode, causing conflicts or unexpected behavior. Disable plugins or operate on a default theme temporarily to troubleshoot and identify the conflicting element.
Conclusion:
WordPress Maintenance Mode is a useful tool for website owners to perform updates and maintenance tasks seamlessly. By understanding how to enable, disable, and troubleshoot Maintenance Mode, you can ensure a smooth website management experience and minimize disruptions for your visitors. Whether you opt for a plugin or manual method, implementing Maintenance Mode effectively is key to maintaining a healthy and secure WordPress website.
FAQs
Can I customize the Maintenance Mode page?
Yes, most Maintenance Mode plugins allow for customization of the maintenance page’s design, content, and additional features such as countdown timers, email opt-in forms, and social media links. You can tailor the page to align with your brand and provide relevant information to visitors.
Will enabling Maintenance Mode affect my SEO?
Temporary downtime due to Maintenance Mode typically has minimal impact on SEO, especially if the duration is short. However, it’s essential to use best practices such as setting appropriate HTTP status codes and informing search engines of the temporary nature of the maintenance to minimize any potential negative effects.
How can I inform visitors about scheduled maintenance?
In addition to displaying a maintenance page, it’s a good practice to communicate scheduled maintenance to your audience via other channels such as email newsletters, social media, or website banners. Providing advance notice helps manage user expectations and reduces frustration.
Can I still access the WordPress admin dashboard during Maintenance Mode?
Yes, administrators and users with appropriate permissions can typically access the WordPress admin dashboard even when Maintenance Mode is enabled. This allows for ongoing management and monitoring of the site during maintenance periods.
