
WordPress is an excellent CMS, and it is easy to construct a WordPress website. However, it can get frustrating for a person to fix errors in WordPress. There is no one solution to all the problems. So, to fix the problem, you’ll need to troubleshoot to find out what the real cause is in the blog below.
What is the “Installation Failed: Could Not Create Directory” Error in WordPress?
It is a problem with file permissions caused by inappropriate site configurations and settings. If your file permissions are incorrect, WordPress will be unable to create a folder/directory for your plugin or theme.

Occasionally the issue happens while you are updating your plugin or theme or when you are uploading picture files. The error message will then read: update failed: could not create directory. Nonetheless, the root cause is always the same, and it may be resolved using the same troubleshooting techniques.
Why Does the “Installation Failed: Could Not Create Directory” Error in WordPress Occur?
There are two causes for the could not create directory error in WordPress.
-
You Lack the Required Permission
Your hosting provider may configure security permissions to prevent unwanted modifications to the server and website directories. This could prevent you from modifying your server or website’s structure.
During the installation process, a new plugin or theme generates a directory (named after the plugin or theme) in the wp-content folder. Setting up a file structure requires the correct permissions. Likewise, the plugin or theme needs the authorization to add a new version and remove obsolete ones throughout the update process.
The permission mode is separated into three sections: write, read, and execute, each with its own numeric value defining the authorization for the user, the group, and the world.
-
Insufficient Disk Space
Occasionally, you may experience this problem owing to a lack of available disc space and high memory consumption. It is always advised that you host your websites on a dedicated cloud hosting platform, where the server size may be increased with a few clicks.
How to Fix “Installation Failed: Could Not Create Directory” Error in WordPress
The error in WordPress can be resolved by the following steps:
1. Create a Backup
Create a backup of your entire website so that if anything goes wrong throughout the process, you can simply restore it to its previous state. You can use a plugin like All in One Migration or manually back up your website files and database.
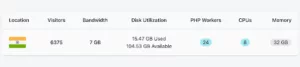
2. Disk Usage Optimization
As previously stated, you may occasionally experience this error due to low storage space. Thus, you must monitor the specifications of your server and check the memory section. If your server’s memory is full, you can increase the size of your server or conduct a disc optimization that will assist you in removing unwanted files and folders. This makes room for plugin and theme installation.
If your server has sufficient memory, but you are still unable to create a directory, you need to continue troubleshooting.
3. Resetting File and Folder Permissions
The permissions on files and folders can be directly controlled from the Nestify Management Panel.
Nestify Dashboard > Manage Sites > Settings > Site Settings > Reset File Permissions
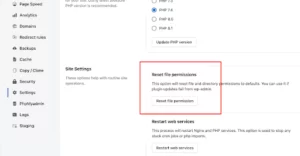
If this option is not accessible on your current hosting, you can skip this step and proceed to the next, where file permissions are configured using an FTP client such as FileZilla.
Once you click on the reset button, the directories permission will be reset to 755 and the file’s permission to 644.
4. Setting File Permissions via an FTP Client
This step will demonstrate how to modify file and folder permissions using an FTP client such as FileZilla. Here is the download link if you haven’t already installed the FileZilla FTP client.
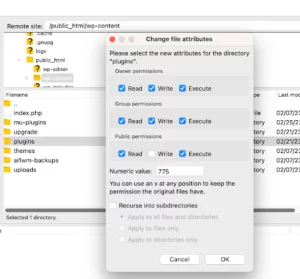
To connect remotely, you must first run FileZilla and submit your server’s access credentials. Go to the public_html folder, then right-click and select File Permissions.
Set 755 in the numeric value, select recurse into subdirectories, select apply to directories only, then click ok.
Follow the same steps for file permission and enter 644 in the numeric value field > select recurse into subdirectories > apply to files only and click ok.
After setting the file and folder permissions, clear your cache and retry installing or upgrading your plugin or theme.
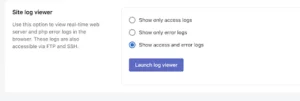
5. Monitor Application Logs
Maintaining a regular viewing and monitoring schedule for your application’s access and error logs is recommended for the error in WordPress to not arise. You may view the process information for each request and error that is currently running. At Nestify, you can access Log Viewer from Nestify Dashboard > Manage Sites > Site > Log Viewer.
Conclusion
In summary, the “Installation Failed: Could Not Create Directory” error in WordPress is usually caused by incorrect file permissions or incorrect ownership of the files and directories. By fixing the file permissions and ownership, you can resolve this error in WordPress and complete the installation process. We hope this article has helped you resolve the error. Do let us know your queries and suggestions in the comment box below.
