
In the modern digital era, it is essential to have a well-optimized website to magnetize organic traffic and ensure easy discovery and indexing of your content by search engines. An extremely effective method to accomplish this is by generating a sitemap, which is a structured file containing a list of all the important pages, posts, and other information on your website.
In this easy guide, we will take you through the process of creating a sitemap in WordPress using the widely used Yoast SEO plugin. By following these step-by-step instructions, you can improve the visibility of your website, improve its search engine rankings, and provide a superior user experience for your visitors. So, let’s delve into the detailed process of creating a sitemap in WordPress.
Need to Create A Sitemap in WordPress
A WordPress sitemap is a useful tool for quickly indexing a website. Instead of search engine bots having to crawl through each individual link, they can simply refer to the URLs listed in the sitemap and index them accordingly. This process allows them to gather important information about web pages, such as the last update timestamp and page importance.
While sitemaps themselves don’t directly impact a site’s search engine results page (SERP) ranking, they are crucial for ensuring that your site is included in search engine results. Especially for new websites without many backlinks, achieving SERP rankings can be challenging without the support of a sitemap.
Some reasons worth considering:
- Sitemaps allow search engine bots to index a website quickly and efficiently.
- Instead of crawling through individual links, bots can refer to the URLs listed in the sitemap for indexing.
- Sitemaps provide essential information about web pages, such as the last update timestamp and page importance.
- Sitemaps are crucial for ensuring that your site is included in search engine results.
- New websites without many backlinks can benefit from sitemaps to improve their chances of achieving SERP rankings.
- Updating the sitemap with any changes to your website’s structure helps search engines stay informed.
- Changes made to the sitemap may only become visible in the SERP after the next visit from search engine bots.
- Utilizing a reliable and secure WordPress hosting service can contribute to better ranking on the SERPs.
Creating a Sitemap in WordPress Using Plugins
With the aid of plugins, making an XML sitemap for your WordPress website is simple. In this method, the plugins handle the entire process, generating an updated XML file that can be deployed on your site. There are three recommended WordPress Sitemap plugins that we will discuss:
- Yoast SEO
- All in One SEO Pack
- XML Sitemaps
Let’s take a closer look at each plugin and understand how to create a sitemap in WordPress using them.
Yoast SEO
Yoast SEO stands out as an excellent plugin for optimizing your website for search engines. It simplifies the process by automatically enabling XML sitemap in WordPress site.
To get started on Nestify, follow these steps to install and activate the plugin:
- Enter your WordPress dashboard and go to the Plugin section → Add New.
- Go to the search bar found at the top right corner, enter “Yoast SEO” (the name of the plugin).

Once you locate the Yoast SEO plugin, click on the install button. After the installation, activate the plugin.
With Yoast SEO now installed and activated, you can enable XML sitemaps in WordPress by following these steps:
- In the WordPress dashboard, go to Yoast SEO.
- Click on the Settings tab.
- Locate the XML sitemaps option and enable it.

- Save the changes.
Congratulations! XML sitemaps are now enabled on your WordPress site through the Yoast SEO plugin. The plugin will regularly update the XML sitemap for you. If you wish to view your WordPress sitemap, click on the question mark tooltip icon for further guidance.
All in One SEO
Creating a sitemap in WordPress is effortless with the All in One SEO plugin. With this plugin, you won’t need to hire an SEO expert or developer to appropriately set up WordPress SEO.
- To begin, install the All in One SEO plugin on your WordPress website using the same installation process discussed earlier.

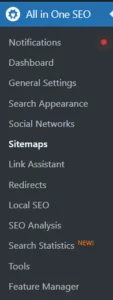
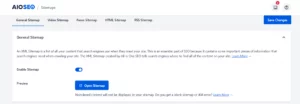
- Once installed, navigate to All in One SEO → Sitemaps in your WordPress dashboard. By default, All in One SEO will enable the Sitemap feature on your website.
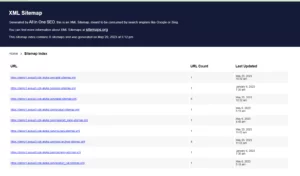
- To preview your sitemap, simply click on the Open Sitemap button. Alternatively, you can add “sitemap.xml” at the end of your website URL (e.g., www.example.com/sitemap.xml) to access it.
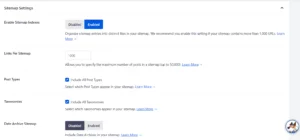
- Furthermore, you can customize the sitemap settings by managing sitemap indexes and selecting which post types and taxonomies to include or exclude.
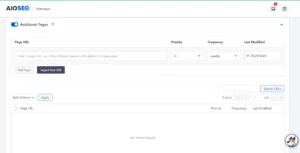
- If your site includes stand-alone external pages, you can also add them to your sitemap using the Additional Pages section.
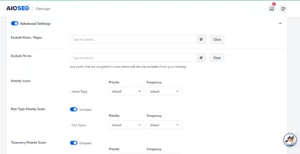
The All in One SEO plugin also offers advanced settings. You can exclude specific posts or pages, exclude terms, set priority scores for posts, post types, and taxonomies, as well as exclude images.
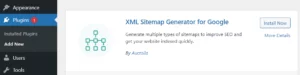
Google XML Sitemaps
The Google XML Sitemaps plugin provides a convenient way to manage your sitemap settings and easily submit them to search engines. To begin with the process, follow the usual steps of installing and activating the plugin.
Go to the Settings menu and select XML-Sitemap.
Once the plugin is activated, it will on its own generate a sitemap for your WordPress website. You can locate the URL to your sitemap index file prominently displayed on the settings page.

If you wish to use additional features provided by the plugin, just scroll down on the XML-Sitemap page. In the Basic Options section, you can enable notifications to inform search engines about any updates to your site.
Submit an XML sitemap to Google
To submit an XML sitemap to Google, follow these steps:
- Go to the Google Search Console website (previously known as Google Webmaster Tools)
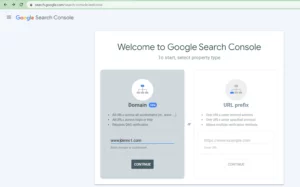
- If you don’t have a Google account, create one and sign in to the Search Console.
- Once you’re signed in, click on the “Add a property” button located on the top right corner.
- Select the “Domain” option and enter your domain name (e.g., example.com) in the provided field.
- Click the “Continue” button to proceed.
- Google will make a TXT record available to you. You will need this record for adding it to your DNS server to verify your domain ownership. Access your domain’s DNS settings through your domain registrar or hosting provider.
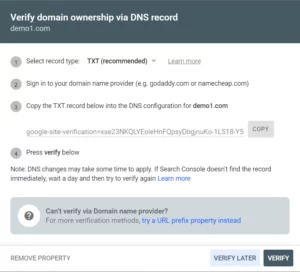
- Add the TXT record provided by Google to your DNS settings.
- Wait for the DNS changes to proceed, which can take some time (up to 24-48 hours).
- Once the domain ownership is verified, go back to the Google Search Console Dashboard.
- From the left-side menu bar, click on “Sitemaps” under the “Index” section and click on the “Add a new sitemap” button.
- Enter the URL of your XML sitemap in the provided field where https://example.com/sitemap.xml is faintly written.
- Click the “Submit” button that simply submits your sitemap to Google.
Google will start crawling and indexing your website depending on the information provided in the sitemap.
That’s it! Now you have successfully submitted your XML sitemap to Google using the Google Search Console. Remember to regularly update your sitemap whenever you make significant changes to your website’s structure or content.
Conclusion
Creating a sitemap in WordPress is an essential step in optimizing your WordPress website for search engines. With the Yoast SEO plugin, generating and customizing a sitemap in WordPress becomes a breeze. By following this step-by-step guide on sitemap in WordPress, you can ensure that search engines easily discover and index your content, ultimately improving your website’s visibility and organic traffic.
FAQs
Do I need to manually update my sitemap in WordPress whenever I make new additions to the content on my WordPress site?
No, you don’t have to manually update your sitemap in WordPress every time you add new content. The Yoast SEO plugin automatically adds new pages, posts, and other content to your sitemap. It dynamically generates the sitemap whenever there is a change in your website’s structure or content. This saves you ample time and ensures that your sitemap remains up to date.
How can I submit my sitemap in WordPress to search engines?
Once you have generated your sitemap in WordPress using Yoast SEO or any other plugin, you need to submit it to search engines for indexing. The most common method is to use webmaster tools offered by search engines like Google Search Console and Bing Webmaster Tools. These tools allow you to submit your sitemap URL, monitor indexing status, and gain insights into your website’s performance in search engine results.
Can I customize the sitemap in WordPress generated by Yoast SEO?
Yes, you can customize the sitemap in WordPress generated by Yoast SEO. The plugin offers options to exclude specific content types, such as categories or tags, from the sitemap. You can alter the appearance of the sitemap by adjusting settings within the Yoast SEO plugin’s configuration. These customization options permits you to tailor your sitemap to best reflect the structure and content of your WordPress website.
