
WordPress is a reputable content management system that permits users to develop and manage their own websites with ease. One of the best features of WordPress is the versatility to add a featured image to each post, which can enhance the overall appearance of the content. However, there may be instances where you want to hide the featured image in a WordPress single post.
Let’s explore the reasons why we think you should hide the featured image in a WordPress single post and provide you with a step-by-step guide on how to do it. Whether you want to avoid image repetition, improve page load speed, or achieve a minimalist post design, we’ve got you covered.
Understanding WordPress Posts and Featured Images

WordPress posts are the core elements of any WordPress website. They allow you to craft and publish content in a structured manner. Each post can contain various elements such as text, images, videos, and more.
One important aspect of WordPress posts is the featured image. A featured image is an image that signifies the content of the post and is displayed prominently, often at the top of the post or on archive pages. It serves as a visual representation of the post and can greatly enhance the overall appearance and engagement of your content.
The featured image can be set for each post individually, allowing you to choose an image that best represents the topic or theme of the post. It is typically displayed on the post itself, as well as in various other areas of your website, such as the homepage, category pages, and search results.
Understanding how WordPress posts and featured images work together is important when considering hiding the featured image. By default, WordPress themes are designed to display the featured image, but there may be instances where you want to hide it for various reasons, which we will explore in the next section.
Control Your Post Layout: Hide Featured Images in WordPress for Better Design

1. Avoiding Repetition of Images
In some cases, you may have already included the same image within the post content itself. Displaying the featured image alongside the post can result in redundant visuals, which may not be desirable. By hiding the featured image, you can prevent the repetition of images and create a cleaner, more streamlined appearance for your post.
2. Enhancing Page Load Speed
Large or high-resolution images can significantly impact the loading time of your website. If the featured image is particularly large or if you have multiple featured images on a single page, it can significantly slow down the loading speed of your WordPress website, resulting in a poor user experience. By hiding the featured image, you can improve the page load speed and provide a smoother browsing experience for your visitors.
3. Creating a Minimalist Post Design
Sometimes, you may prefer a minimalist design for your posts, where the focus is solely on the content itself without any distracting elements. Hiding the featured image can help you achieve this minimalistic aesthetic, allowing readers to concentrate on the text and other essential elements of your post.
4. Customizing the Post Display
Every website has its unique design and layout requirements. You may find that the default placement or styling of the featured image does not align with your specific design goals. By hiding the featured image, you gain more flexibility and control over the visual presentation of your posts, enabling you to customize the post display to better suit your website’s overall look and feel.
Pre-Hiding Checklist: What to Consider Before Removing Featured Images in WordPress
Before you can proceed with hiding the featured image in a WordPress post, there are a few prerequisites that you need to fulfill. Let’s go through each of these prerequisites in detail:
1. Accessing the WordPress Admin Panel
To make any changes to your WordPress website, including hiding the featured image, you need to access the WordPress admin panel. This is where you can administer all aspects of your website, such as posts, pages, plugins, and themes. You can access the admin panel by appending “/wp-admin” to your website’s URL (e.g., www.yourwebsite.com/wp-admin).
2. Identifying the Featured Image
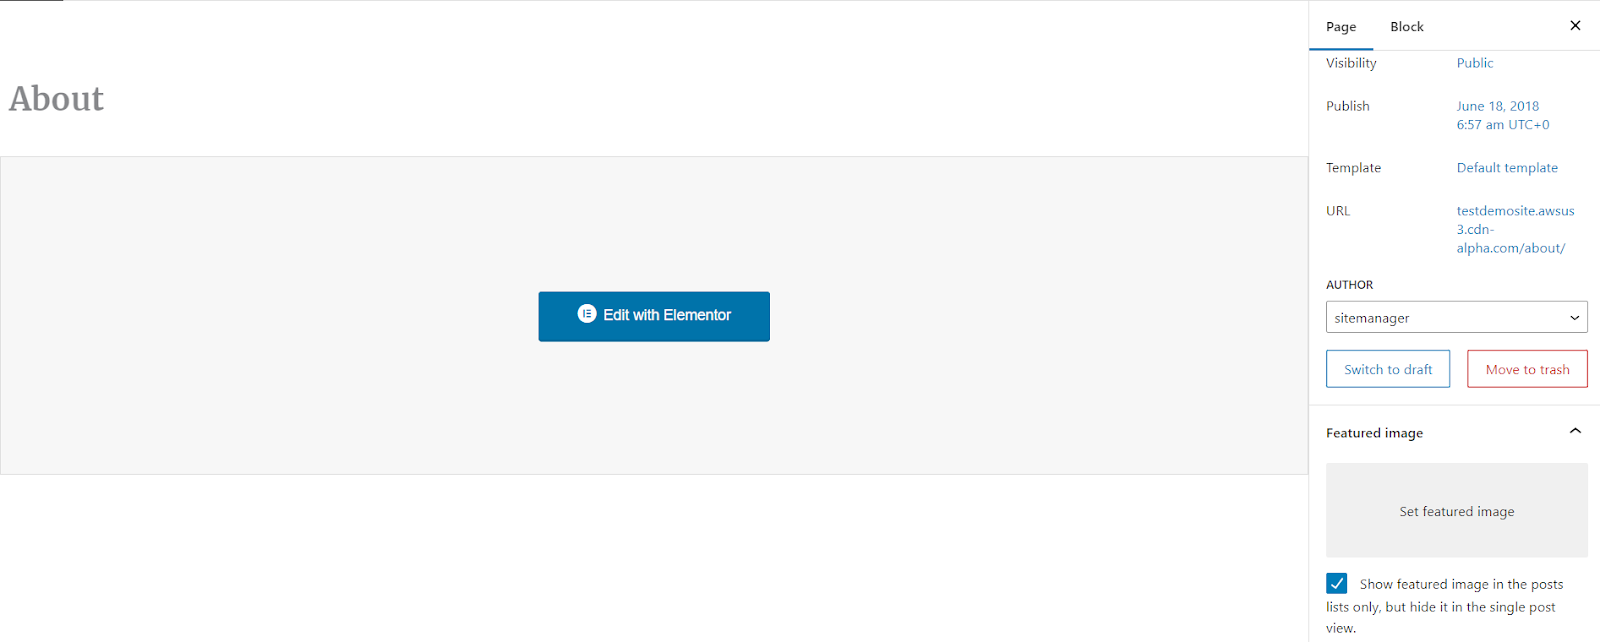
Before you can hide the featured image, you need to identify which image is set as the featured image for your post. In the WordPress admin panel, locate the post editor for the specific post you want to modify. Look for the “Featured Image” section, usually located on the right-hand side of the editor. Take note of the image set as the featured image, as you will need this information later.
3. Understanding WordPress Theme Customizer
The method you use to hide the featured image may vary depending on your WordPress theme. Some themes provide built-in options to hide the featured image, while others may require custom code or the use of plugins. Familiarize yourself with the theme customizer options provided by your theme, as this will help you determine the best approach to hide the featured image.
Learn about private content in WordPress here.
Step-by-Step Guide to Hide Featured Image in WordPress Post
Now that you have fulfilled the prerequisites, we can proceed with the step-by-step guide to hide the featured image in a WordPress single post. In this section, we will explore three different methods you can use to achieve this. Select the process that best suits your needs and follow the instructions provided.
Method 1: Using CSS to Hide Featured Image
- Access the WordPress admin panel by appending “/wp-admin” to your website’s URL.
- Navigate to the post editor for the specific post where you wish to hide the featured image.
- Locate the “Additional CSS” option in the WordPress customizer. This option may be found under “Appearance”> “Customize”> “Additional CSS.”
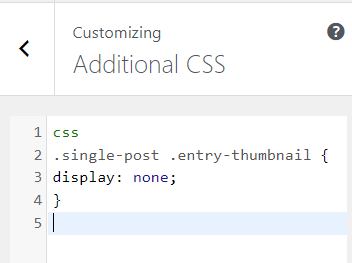
- Open the “Additional CSS” editor and add the following CSS code:
css

.single-post .entry-thumbnail {

display: none;

}
This code targets the specific post and hides the featured image by setting its display property to none.
5. Save your changes, and the featured image will be hidden for that particular post.
Method 2: Using a Plugin to Hide Featured Image
- Access the WordPress admin panel.
- Go to “Plugins”> “Add New” and search for a plugin called “Hide Featured Image.”
- Install and activate the plugin.
- Once activated, go to the post editor for the specific post where you want to hide the featured image.
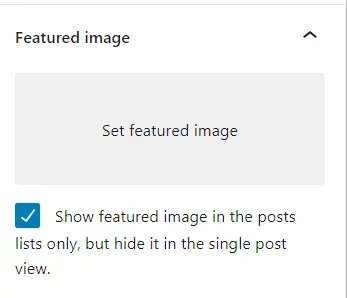
- Look for the “Hide Featured Image” meta box, usually located in the right-hand sidebar of the editor.
- Check the box labeled “Hide Featured Image” to hide the featured image for that particular post.
- Update or save your post, and the featured image will be hidden.
Method 3: Editing Theme Files to Hide Featured Image
Note: This method requires some technical knowledge and should only be attempted if you are comfortable editing theme files. It is suggested to create a child theme before making any modifications.
- Access the WordPress admin panel.
- Navigate to “Appearance”> “Theme Editor.”
- In the right-hand sidebar, locate and click on the file named “single.php” or “content.php,” depending on your theme’s structure.
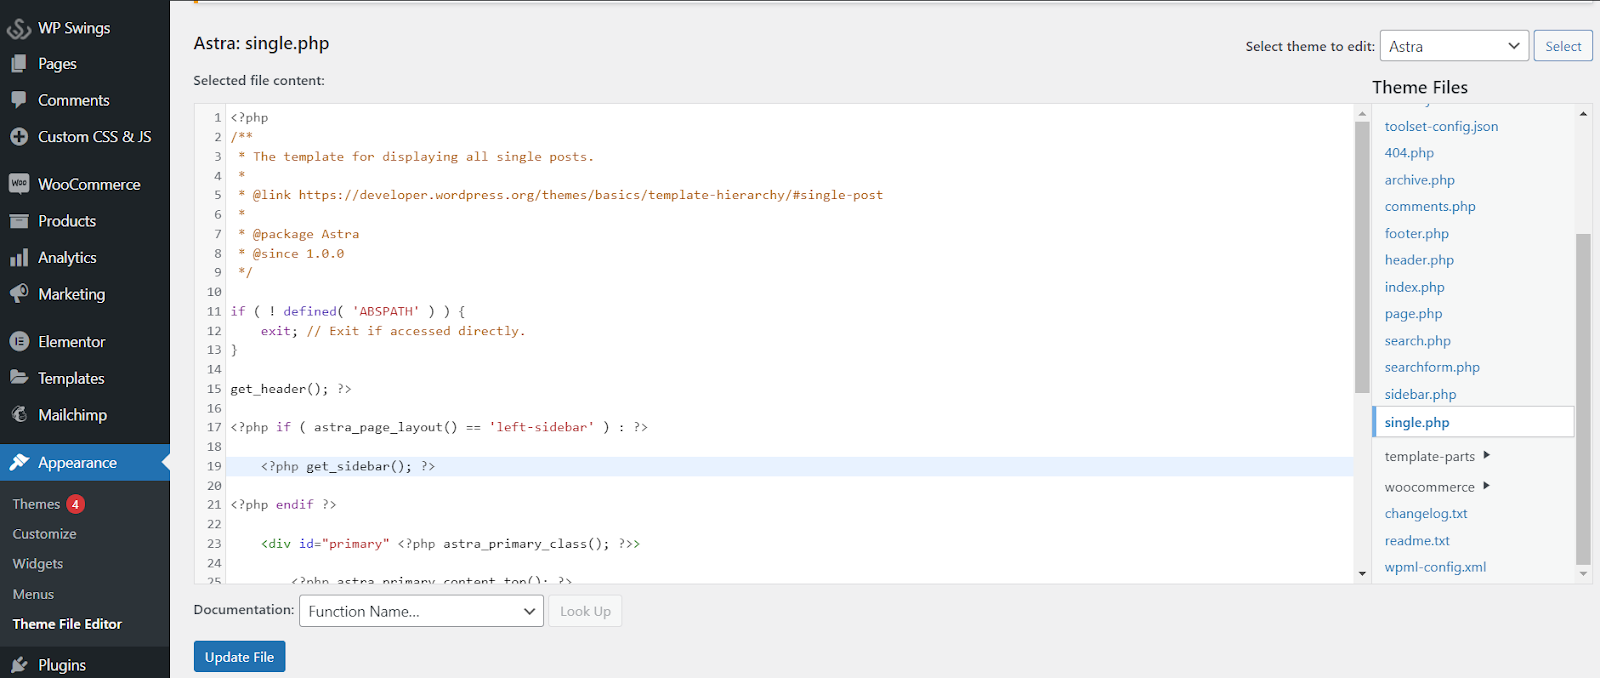
- Locate the code that displays the featured image by right clicking on single.php. Click on inspect to open the editor.

5. Comment out or remove this code to hide the featured image. It should look like this:
6. Save the changes, and the featured image will be hidden for all posts that use this template file.
Hide Featured Images: A Simple Trick for a Cleaner Look
While hiding the featured image in a WordPress post is a relatively straightforward process, you may encounter some common issues along the way. In this section, we will address these issues and provide troubleshooting solutions to help you overcome them.
1. Featured Image Still Visible
If you have followed the steps to hide the featured image, but it is still visible on your website, there are a few things you can check:
- Ensure that you have applied the changes to the correct post or template file. Double-check that you have targeted the right post or modified the correct template file.
- Clear your browser cache. Sometimes, the old version of your website may still be cached in your browser, causing the featured image to appear. Clearing your browser cache can help sort this issue.
- Check for conflicting CSS or plugin code. If you are using CSS or a plugin to hide the featured image, make sure there are no conflicting code or plugin settings that override your changes.
2. Changes not Reflected on the Website
If you have made the necessary changes to hide the featured image, but it is not reflected on your website, consider the following troubleshooting steps:
- Save your changes. After modifying CSS, using a plugin, or editing theme files, ensure that you have saved your changes and refreshed your website to see the updated results.
- Deactivate caching plugins. If you are using any caching plugins on your website, temporarily deactivate them to ensure that your changes are not being cached and are causing the featured image to appear still.
- Verify the correct theme files. If you have edited theme files, double-check that you have modified the correct files and that you have not made any syntax errors in the code.
3. Error in Uploading New Featured Image
If you encounter an error while uploading a new featured image, consider the following solutions:
- Check the file size and format. Ensure that the image you are trying to upload meets the file size and format requirements set by WordPress and your theme.
- Increase the maximum upload file size. If the image size goes beyond the maximum upload file size limit set by WordPress, you may need to increase the limit either through your hosting provider or by modifying the server settings.
- Disable conflicting plugins. Some plugins may interfere with the image-uploading process. Temporarily deactivate any recently installed or updated plugins to see if that resolves the issue.
Hide Featured Images in WordPress: The Easiest Way to Tidy Up Your Site
Your website deserves a design that matches your vision, and sometimes, that means you need to hide featured images in WordPress. It’s a small change that can have a big impact, whether you’re cleaning up your homepage or simplifying your content’s presentation.
Transforming your WordPress site into a sleek, streamlined masterpiece is easier than you think. Hiding featured images lets you clean up your layout, shift focus to your content, and create a more polished user experience—all without the hassle of plugins or complex coding.
With WordPress, the power is in your hands to design the perfect site. Ready to take your website to the next level? Make sure it runs smoothly, fast, and secure by choosing Nestify as your hosting partner. Unlock your site’s full potential with Nestify today!
FAQs on Decluttering Your WordPress Site for a More Focused Design
How can I show the featured image back after hiding it?
If you’ve hidden a featured image, you can easily reverse it by removing the custom CSS code or undoing the settings changes you made. Simply follow the same steps in reverse to re-enable the featured image.
Does hiding the featured image affect my website’s mobile display?
No, hiding the featured image will not affect the mobile display in terms of functionality. If you’ve hidden the image using CSS or theme settings, it will be hidden across all device sizes.
Can hiding the featured image improve my website’s load time?
While hiding a featured image doesn’t directly improve load times, if the image is very large and unnecessary, removing or hiding it can help reduce the overall page size, which can indirectly improve load speed.
