
What distinguishes a Private WordPress Post/Page is its contrast with the term “public.” In essence, a Private WordPress page or post is not visible to the general audience but is accessible to specific users. Those without permission to view the website’s pages and posts will be unable to access the site content, even with a URL.
The privacy settings for these posts and pages are inclined towards specific WordPress user roles, primarily Administrator and Editor. An Administrator, being the website owner, possesses a range of capabilities, including accessing, submitting, editing, publishing, and deleting posts and pages. They can also install plugins and themes, add or delete users, adjust settings in the Dashboard, and designate posts/pages as “Private.” On the other hand, the Editor role allows individuals to open and modify WordPress private pages and posts but lacks the authority to make them private.
Other user roles, beyond Administrator and Editor, are devoid of permissions to access private pages and posts altogether.
Why do You Need Private Posts and Pages?
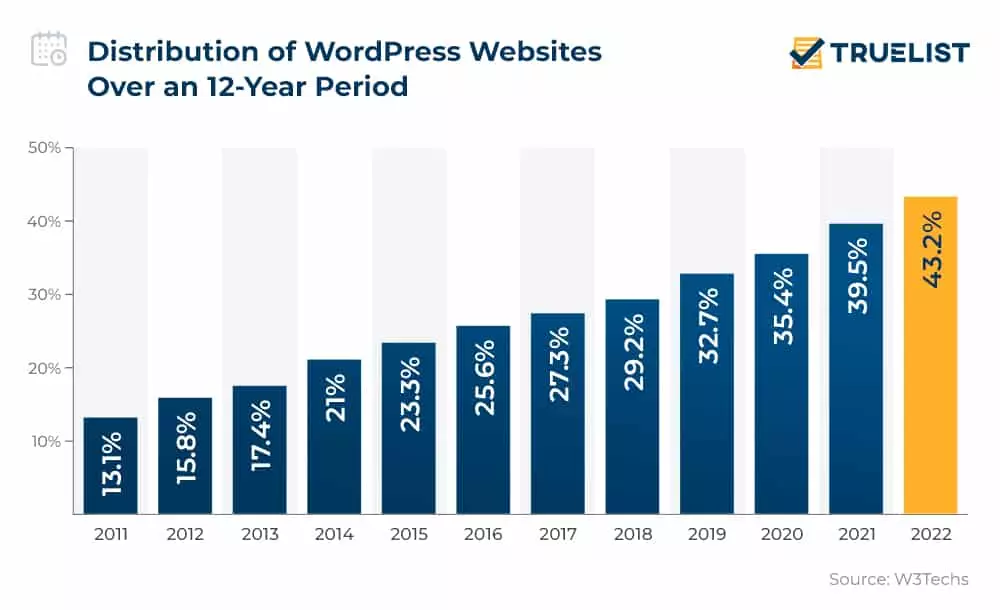
Source: Truelist
- Content and Design Refinements: When undertaking alterations to the content or design of a page/post, maintaining privacy is advantageous. By setting the content visibility to private, you gain the flexibility to refine and enhance it without making premature public disclosures. This allows for meticulous adjustments before deciding to publish.
- Product/Service Launch Preparations: In anticipation of a product or service launch, orchestrating a restricted preview becomes essential. WordPress private posts and pages play a crucial role in regulating who gains access to the content, ensuring a controlled showing exclusively for selected individuals before it becomes available to the wider audience.
- Exclusive Invite-Only Communities: Private pages and posts offer an effective means to curate content accessible only to a specific group of users through password protection. This exclusivity is particularly valuable for invite-only communities, limiting access to privileged information to a select number of individuals.
- Reserved Communication in Blogs: Bloggers occasionally seek to withhold certain content from their general audience, choosing instead to share it selectively with a specific audience. Implementing access restrictions through private posts and pages facilitates this targeted communication, ensuring that the intended audience receives exclusive content.
- Corporate Confidentiality: In corporate settings, it is customary to safeguard internal guidelines, instructions, and other written materials from public view. By utilizing private pages, companies can adhere to this practice, maintaining confidentiality by keeping such information away from the common public domain.
Learn about WordPresss management tools here.
Benefits of Private Pages and Posts:
- Enhanced User Experience: The ability to establish private membership areas fosters a superior user experience. Users gain the opportunity to share thoughts within an exclusive community, cultivating a more personalized and engaging interaction.
- Heightened Exclusivity: Utilizing access restrictions enables the assembly of a specific audience, contributing to heightened exclusivity. This exclusivity, in turn, aids in crafting a stronger brand image, as content is tailored for a select group, fostering a sense of privilege among its members.
- Greater Content Control: Private web pages afford a means to exercise meticulous control over content, offering a protective shield for intellectual property rights. This control extends to the ability to explore innovative avenues for monetization, providing creators with new opportunities to generate revenue.
- Improved Security Measures: Implementing access restrictions serves as a deterrent against hacking attempts, bot traffic, and spam infiltrating the website. This fortification enhances the overall security posture, safeguarding the integrity of the website and ensuring a secure environment for users.
- Enhanced Data Protection Compliance: Restricting access to specific sections of the website contributes to achieving better data protection compliance. By delineating boundaries and controlling information dissemination, the site can align more effectively with regulatory requirements, bolstering its adherence to data protection standards.
Strategies to Make WordPress Pages/Posts Private:
A. Securing the Entire WordPress Site
Various methods can be employed to render a WordPress site private. One approach involves leveraging WordPress’s built-in functionalities to shield the site from search engines. While this prevents search engines like Google, Bing, and Yahoo from indexing the site, it is important to note that individuals possessing the website’s address can still gain access.
Furthermore, this method does not impede referral traffic from reaching the site. Consider a scenario where a guest post service is utilized to disseminate posts to other websites; readers clicking on anchor texts that lead to your site can still access its content.
B. Concealing the Site from Search Engines
By concealing the site from search engines, you effectively prevent it from being indexed by prominent search engines such as Google, Bing, and Yahoo. As a result, the site won’t appear in Search Engine Results Pages (SERPs). This method proves advantageous, especially when initiating the construction of a new WordPress website. It grants ample space to refine content and address potential issues without being concerned about audience visibility or SERP rankings.
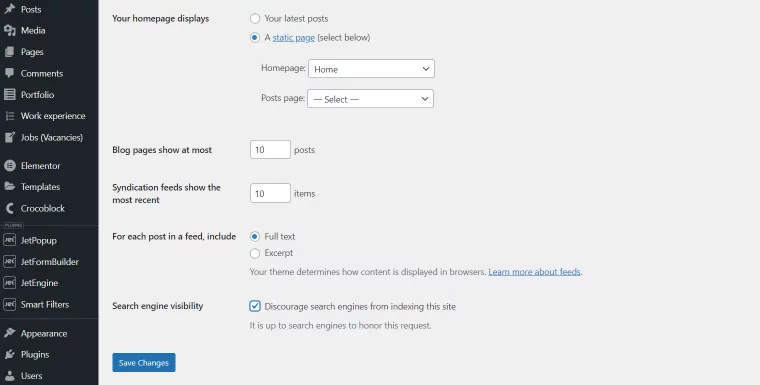
Remarkably, this can be accomplished using the default features of WordPress. Simply log into your site, navigate to Settings > Reading, and locate the Search Engine Visibility option. Activate this option to discourage indexing, and subsequently, click “Save Changes.” This straightforward process ensures that search engines steer clear of indexing your site.
It is imperative to revisit this page and deactivate these settings when you are prepared to unveil your website to the public. This strategic maneuver ensures that your website becomes visible to search engines and potential visitors at the opportune moment.
C. Utilizing a Plugin for Website Concealment
Suppose your website has been live for several weeks, and now you intend to place it back under construction. In such a scenario, relying solely on the method mentioned earlier to hide it from search engines may prove insufficient. Some individuals could still access the site using its direct address.
Hiding a website from search engines may not be the optimal choice for web creators who have no intention of making their websites public. This is where plugins become invaluable.
Plugins stand out as the most effective and user-friendly solution for ensuring maximum privacy for your WordPress website. Among the array of plugins available for this purpose, My Private Site is recognized as exceptionally effective and user-friendly.
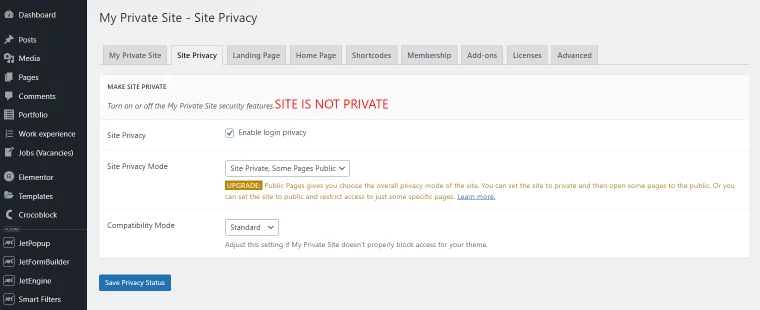
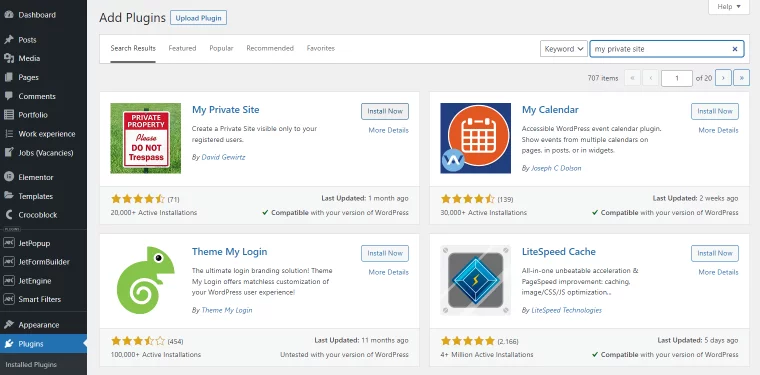
To implement this plugin, navigate to Plugins > Add New. Subsequently, search for the “My Private Site” plugin, which should be prominently featured at the top of the search results. Proceed to install and activate it.Once activated, access My Private Site in the sidebar menu and open the Site Privacy tab on the ensuing page. Here, you will encounter a checkbox enabling the login privacy setting. Select this option, save the changes, and voila – your entire site is now private.
D. Enabling Member Access to Your Website
To grant members access to your WordPress website, follow these steps:
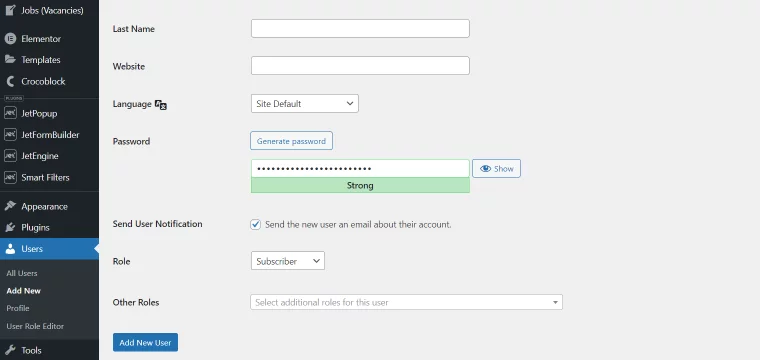
- Navigate to Users > Add New from the sidebar to create member accounts for users requiring site access. You have the flexibility to generate and manage numerous accounts.
- Ensure that the accounts are assigned the “Subscriber” role at the bottom. This role configuration restricts members to accessing only the content they need, preventing access to sensitive admin materials.
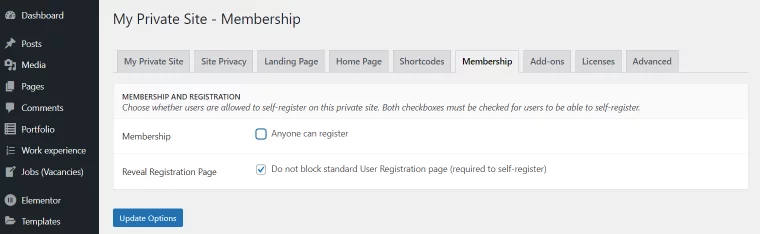
- Additionally, disable the “Anyone Can Register” option under the Membership tab in the My Private Site plugin settings. This step is crucial in averting random individuals from creating accounts and gaining unauthorized access to your website.
E. Making the Site Private Without a Plugin
While it’s possible to make a WordPress site private without a plugin, you’ll need to employ a few lines of code. Here’s the first code snippet:
php
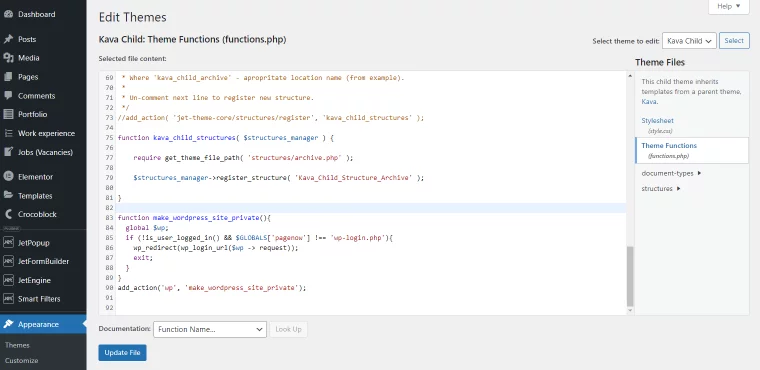
function make_wordpress_site_private(){ global $wp; if (!is_user_logged_in() && $GLOBALS['pagenow'] !== 'wp-login.php'){ wp_redirect(wp_login_url($wp -> request)); exit; } } add_action('wp', 'make_wordpress_site_private');
To implement this code, follow these steps:
- Add the code snippet to the child theme’s functions.php file of the website you wish to make private.
- Navigate to Appearance > Theme File Editor directory. Locate Theme Functions on the right side and click it. The functions.php file should appear. Paste the snippet at the bottom of the existing code, then click “Update File.”
- Your website will now be private, as visitors are redirected to a login page. They can sign in using the accounts you’ve created for them. To make your website public again, return to the dashboard and remove the code.
For a more assertive approach, consider the following code, which directs unauthorized users to a 403 Forbidden page:
htaccess
order deny,allow deny from all allow from 123.45.67.89
Replace the digits in the last line with your IP address. This code should be added to the site’s .htaccess file.
Note: The code is specifically effective for sites running on Apache. This method is recommended if the site is under construction and only a select few developers require access. Alternatively, the plugin and the previous code snippet are better options for private blogs or membership sites catering to family, friends, or a company.
F. Hiding the Entire Site Using WordPress.com
NOTE:
Before proceeding with this method, ensure you have a valid WordPress.com account linked to your website.
To make your website private through the WordPress.com platform, follow these steps:
- Navigate to the Settings pathway in the left sidebar.
- Scroll down the page until you reach the Privacy section.
- Within the Privacy section, you will find three options – “Coming Soon,” “Public,” and “Private.” Select “Private” to hide your website from all users except those you have approved.

Additionally, you can utilize the “Manage > People” tab to invite other WordPress.com members to access and view your private website. It’s essential to note that this method may raise concerns about WordPress privacy since Automattic, the company behind WordPress.com, has access to data about every user on your website. Consider this aspect when choosing a content restriction method.
Hiding Single Pages
Hiding individual pages is a simpler process than hiding an entire website, and you don’t need a plugin or custom code to achieve this. WordPress offers built-in features to make specific pages private, including various “privacy types” you can implement. Let’s explore one of these methods:
A. Using a Password
The first option is to password-protect WordPress without using a plugin. Follow these steps to enable this setting:
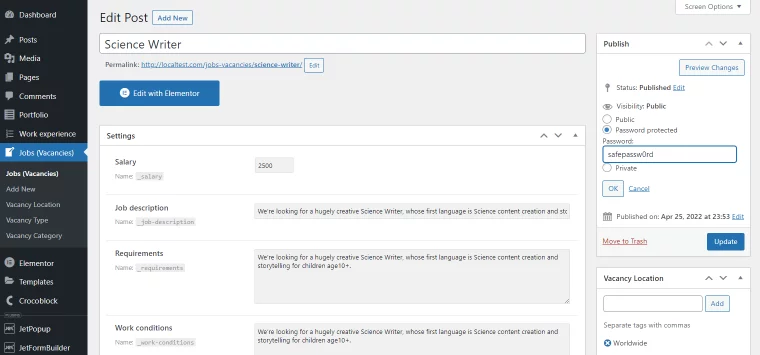
- Open the page or post you want to make private.
- Check the visibility settings, and you will find three options. Choose “Password protected.”
- Create a password for the page or post.
This privacy setting ensures that your page or post is hidden from anyone who doesn’t have the password. Instead of viewing the content, visitors will encounter a page requesting a password.
Apart from the built-in WordPress feature, you can also hide pages with passwords using the PPWP Pro plugin. To use PPWP:
- Navigate to your WordPress admin dashboard, then go to Plugins > Add New.
- Search for “password protect WordPress” in the keyword box, then click “Install” and “Activate.”
- Go to Pages on the WordPress sidebar and visit the page you want to password-protect.
- Head to the Password Protect WordPress section at the top right corner of the page and press “Edit.”
- Enter your passwords, and if you wish to set multiple passwords, each must be displayed on a separate line.
- Set roles for each password if necessary.
B. Displaying Pages Exclusively to Subscribers
If your aim is to monetize your website, you have the option to selectively reveal it only to subscribers. It’s not mandatory to conceal the entire website; instead, you can choose to hide specific pages. This way, you can reserve premium content behind a paywall while keeping the rest of the website accessible to the general public.
Regrettably, WordPress lacks a robust built-in feature to make content accessible exclusively to paid subscribers. Therefore, the solution lies in employing a plugin, and one such option is JetEngine.
JetEngine facilitates the process of placing content behind a paywall with just a few simple steps. Moreover, it allows you to establish various subscription options, including hierarchical subscriptions that enable subscribers to upgrade to different plans.
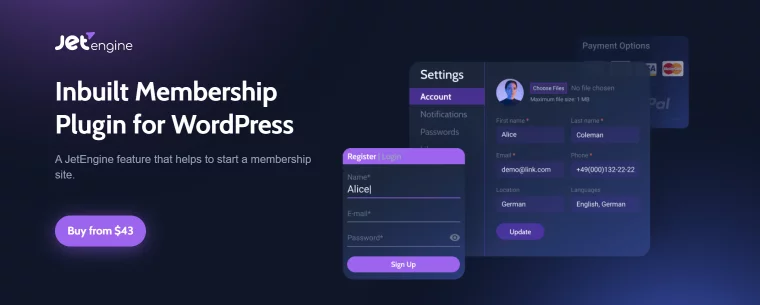
The plugin offers extensive capabilities, enabling you to create membership forms, devise subscription plans, construct pricing pages, oversee members, set access rules for content handling, and manage content visibility seamlessly from a centralized location.
Configuring Privacy Settings for Specific Content
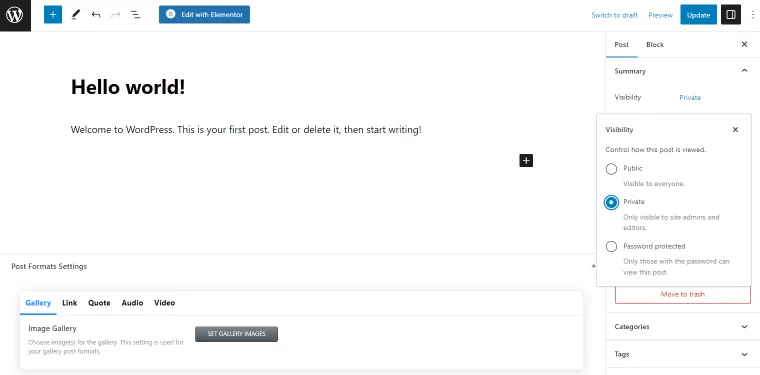
While you can hide a page or post from the public, it remains accessible to site administrators and editors. You can find this setting under the Summary/Publish section in the Visibility dropdown menu.
Conclusion:
To summarize, you have multiple options to hide a WordPress site or specific pages/posts. For the former, you can leverage the built-in WordPress option to hide the site from search engines or employ a WordPress private site plugin like My Private Site. The latter option involves adding a code snippet to your child theme or .htaccess file.
Additionally, you can use password protection to restrict site access, allowing only those with the password to enter. The “Private” option is another alternative, concealing content from everyone except administrators and editors. Utilize the Status & Visibility dropdown menu to individually designate posts and pages as private.
Lastly, for exclusive access to paid subscribers, consider installing the JetEngine plugin. This tool empowers you to restrict visibility either for specific pages or for the entire website, effectively implementing a paywall.
FAQs on Making WordPress Pages and Posts Private:
How to Make a WordPress Site Private Until Launch?
There are diverse methods to shield a website from public view. Options include utilizing a plugin, inserting code into the functions.php or .htaccess file, employing a WordPress.com account, hiding the site from search engines, and using a password for protection.
Can I Use a Plugin to Restrict Access to My Website?
Certainly. Numerous free options are available, such as the My Private Site plugin, which conceals the entire website from users and search engines. Another plugin is PPWP, allowing you to password-protect multiple pages. JetEngine by Crocoblock introduces a membership feature to hide site content behind a paywall.
Who Can See Private Pages and Posts?
Non-public posts and pages are visible exclusively to the Administrator and Editor user roles. Admin has the authority to grant specific registered users permission to access private site content.
How to Stop Google from Indexing My Site?
To prevent Google and other search engines from indexing your site, navigate to Settings > Reading and check the Search engine visibility checkbox. Ensure to save the changes.
Can I Create a WordPress Private Blog?
Certainly, you can establish a private blog using WordPress.com in the Privacy settings block. For a self-hosted WordPress website, you’ll require a plugin or a code snippet.
