
Everyone who has a blog or an internet business pursues with longing a desire, a dream.
We want Google to love us very much. That he wants us so much that he puts us in the first position of his search results for any term that we want to position (or among the first ones at least).

Well, I’m not going to fool you or sell you the Coca Cola formula: this first place is very complicated, it requires time, patience and nobody can guarantee it (at least no one who is a real professional and does not sell smokes).
In fact, I’m not going to talk about SEO either. There are many experts out there who know a lot more about this subject than I do, who only have basic knowledge of the subject.
However, yes I will tell you how you can improve one of the factors that Google takes into account in its algorithm when positioning all the pages and entries of your website.
Today I want to help you figure out how to optimize WordPress to improve your score in the Google Page Speed Test.
What are the factors to optimize WordPress and improve the google page speed test score that you should keep in mind?
As I see it, there are two main blocks in which you can divide these good practices to implement or use in your WordPress and that will determine your score in Google PageSpeed Insights.
On the one hand, there are the main elements that should be selected when planning your web project, either by design themes or functionalities.
In this block, I would put the following general factors that influence the final score that the Google Page Speed Test will end up giving and which, in turn, are variables specific to each project.
What do I mean by saying that they are variables of their own?
Very simple: to depend on what each project has contracted, needs or has chosen at the beginning to develop their idea on the internet.
These factors would be:
- The server or hosting where you have hosted your blog or your website.
- The theme or template you are using.
- The installed plugins that mark the functionalities of your platform.
- The contents.
In a second block, would be the optimization measures that can be implemented in any project (except for some exceptions or incompatibilities that I discovered and that I will mention later).
Come on, these are the ones that you, regardless of what you have implemented in your blog or how you have “mounted the beach bar”, you can carry out and put into practice.
Mainly 3 measures that are in this group and I give faith that put them into practice work to improve your speed test score in an important way since I have personally tested them:
- Image optimization.
- Specify browser cache.
- Code optimization plugins.
I’d better explain them in detail one by one later.
Before this, I want to make some clarifications and warnings that you must take into account.
Clarifications and warnings about the google page speed test
Before I get to tell you all the secrets on how to optimize WordPress to put your speed score with that little green color you like to see, I want to emphasize on some details.
Do not obsess about Google Page Speed Test
The truth of all this is that this Google metric, despite its name, to set your score not only takes into account factors of loading speed, but also good optimization practices that are not necessarily related to such speed.
In other words, having a poor score in this speed test does not always mean that the loading times of a blog are necessarily bad since there are more factors beyond this task that Google takes into account.
In fact, when I want to measure the loading speed of my blog, I go to sites like Pingdom Test or GTMetrix, which seem to me much more reliable.
However, I also understand that it is important to have a good score on this Google test. Precisely because it is from Google and the algorithm of the search engine takes it into account.
But do not go crazy behind making everything perfect and try to not miss any errors in the Google test, because that is almost impossible.

This is just one factor among many others. This not only influences this test in the positioning.
Or what is the same: A good score here is not going to ensure you the top position, just like a bad (or less good) will not prevent you from reaching them.
Give priority to red warnings
I am referring to the messages that in the test of Google Page speed are marked with red color and that, therefore, said the test is considering as serious.
Solve these errors first, because in doing so, your score will go up several points more than if you solve one of the warnings that appear in yellow (which, from experience, I tell you that they are not so relevant and will not increase as much or how much your score if You solve them).
These techniques do not work the same in all cases
As I said before, there are variable factors that will make your score better or worse, depending on what you have previously installed or contracted.
Come, following the same steps that I am going to tell you here, some cases will get a higher score than others.
What I do assure you is that if you apply these recommendations that I will explain here, you will improve the score you get in the Google Page Speed test yes or yes. And not just a little.
Variable factors specific to each project
First, I’ll explain how you can improve the general aspects of your blog so that your score in the speed test of Google and can reach the green in both mobile version and desktop computers.
I have told you before that, from my point of view, there are 4 variable factors that influence this score. Well, let’s look at them one at a time.
The server or hosting
It seems quite obvious that the better the machine where you have hosted your web, the better performance you will have and therefore the better speed and score you will get in the tests.
As I like videogames, I’m going to put a similar example related to this subject so you can get more clearly on this point.
Where will the current games taken out this year run better? On a PC with the features of a computer now purchased or a computer whose internal elements are pieces of 10 years ago?
Well, it’s obvious, right? State-of-the-art video games will always go faster and more fluidly on a newer computer.
In the case of servers, exactly the same thing happens: a better server, which is exclusively used by the web and whose resources are only used by it, will perform better and will go faster than a hosting that is shared or has worse performance.
If you are not very clear about the differences between different types of hosting, I recommend that you go through this mega guide to choose the type of web hosting that is perfect for your WordPress.
The theme or template you are using
Well yes, not all templates that are designed to be used in WordPress are made the same.
And no, I do not mean the aesthetic part that is observed with the naked eye, but the hidden part: that is the code.
Ideally, when you start your project, you have chosen a template that has a friendly code for Google and SEO, so do not use practices in your code that are not recommended by this search engine (such as inline styles) .
As an example WordPress template that has a very well optimized code, I recommend Generatepress, the theme I use in my projects and those of my clients.
The Plugins
Inevitably, the plugins you are using in your project will influence the loading speed of your blog.
Why? The answer is very simple.
Each plugin, depending on what it does and how it has been developed by its creators, has a more or less optimized CSS, has more or less Javascript calls, has a greater or less load time, etc.
To this, must also add another variable: the number of total plugins you are using in your blog. The more plugins, obviously, the longer loading time.
eye! This does not mean that you have to install a few plugins. I have worked on projects that have more than 30 active plugins and its loading speed is optimal (this blog is where you are among them).
So calm and do not panic. The only thing you have to do is to choose the best possible plugins for each task you want to implement in your blog, taking into account the relationship between the functionality and the performance of the plugin on your website.
If you want to know more about this relationship or what plugins are slowing down your blog, I recommend that you install the P3 profiler plugin to get reliable data about it.
The Content
This is a variable factor directly related many times to that of the plugins.
And when I say variable, I mean VERY variable.
Imagine if there are different types of content! As many as pages in every blog or a website!
It is clear that depending on the amount of content and how you are presenting it (static images, sliders or forms loading using javascript, external loads of scripts or images from other pages, presentations, custom web applications, etc.) Time of loading and the speed of your web varies to a greater or smaller extent.
Tips and measures you can implement in your project to optimize WordPress
I know that at this point you may be thinking the following:
“Well, what steps have you taken to optimize WordPress so far? None, it is easily modifiable.”
You’re probably right. But with the above I just wanted you to understand that these general factors also influence when getting a higher or lower score in the Google Page speed test.
But now we are going to see the 3 tasks that you can carry out to optimize WordPress in order to improve the speed test score in Google regardless of all of the above.
Let’s get started!
Image Optimization
This is an aspect that many blogs have pending and do not pay too much attention.
Well, I already know that having your images optimized will make you upload many points in the Google Page Speed test.
Ideally, from the beginning optimize the images in dimensions and weight manually, so that you upload them in the exact size in which you want to publish them (neither major nor minor).
However, chances are that if you spend some time with your blog, you already have several images uploaded and you do not want to walk optimizing them all one by one.
Well, if this is your case, you are already slow to install the WP Smush plugin in your WordPress.
With it, you will be able to perform a massive optimization of images so that the Google speed test loves you a little bit more.
The plugin is very intuitive and does not have too much difficulty.
When you have finished passing WP Smush on all your images and do the Google Page speed test again, you will see with surprise that you have already raised your score (surely importantly).
If you want an alternative plugin to WP Smush, another option that can work very well is the EWWW Image Optimizer plugin.
Specify Browser Cache
This is one of the most typical error messages that gives you the test of speed of Google and that can greatly decrease your score (especially, as I said before if the message appears among the red warnings).
Surely you are thinking that a cache plugin like W3 Total Caché or WP Super Caché will solve the problem.
It’s great that you install this type of plugins to improve the speed of your website, of course. But for Google, most of the time will not be enough.
That’s why I bring you a little “trick” that works much better.
This is a small piece of code that you should add to your .htaccess file, which is located in the root folder of your WordPress.
You can easily edit this file from the file manager of your hosting, your cPanel (if you have one) or with an FTP client such as Filezilla and a code editing program such as Sublime Text or Notepad.
Once you have located and opened the file, all you have to do is add the following to the end:
#Especificar browser cache < IfModule mod_expires . c > ExpiresActive On ExpiresDefault "access plus 10 days" ExpiresByType text / css "access plus 1 week" ExpiresByType text / plain "access plus 1 week" ExpiresByType image / gif "access plus 1 month" ExpiresByType image / png "access plus 1 month " ExpiresByType image / jpeg " access plus 1 month "
I assure you it works out of luxury. Try it and tell me.
Code optimization plugins
If apart from having a template like Generatepress whose code is very well optimized for Google, we give a second round of this optimization nut … do not you think the results will be even better?
Well, that’s where we’re going to work on this point.
Google, in its test of speed, takes into account if the code of your web is optimal and, as far as I have been able to verify, it values 2 things that are very important:
- Let the HTML, CSS and Javascript code be as minimal as possible.
- Remove unnecessary code strings.
Personally, I think these two factors are more good practices than factors that greatly influence the speed of a website because optimizing it as Google wishes you will realize that the loading time of your web will hardly vary (or perhaps nothing).
Well, to meet these two parameters and Google to fall in love a little more of us, I recommend installing the Autoptimize and WPO plugins in your WordPress.
The WPO plugin will be the one that will fulfill the task of eliminating unnecessary code strings. All you have to do is install it … and now.
It has no configuration options or anything similar. You simply install it, activate it and go ahead.
The only “bad” thing is that this plugin is not found (yet) in the WordPress repository. But come on, it is not a Greek tragedy either. Do not be alarmed.
To put it into operation, you first have to download it from this link (thank to the creator, who has allowed me to make it available to you. What a dude this guy is!).
Then you have to install it using the “Plugins – Add new – Upload plugin” option in your administration panel.
Now you need to minify the HTML, CSS and Javascript code with the Autoptimize plugin.
You can install this plugin directly from the repository using “Plugins – Add new” option and put the name of the plugin in the search box on the right side of the screen.
Once you have it installed and active, you will see that you have the configuration options available in “Settings – Autoptimize”.
Click on that option and then click on the button at the top called “Show Advanced Options”.
Well, here you are, optimizing the code as you want. The Google Page Speed test is as easy as marking the boxes that you will see in the next image.
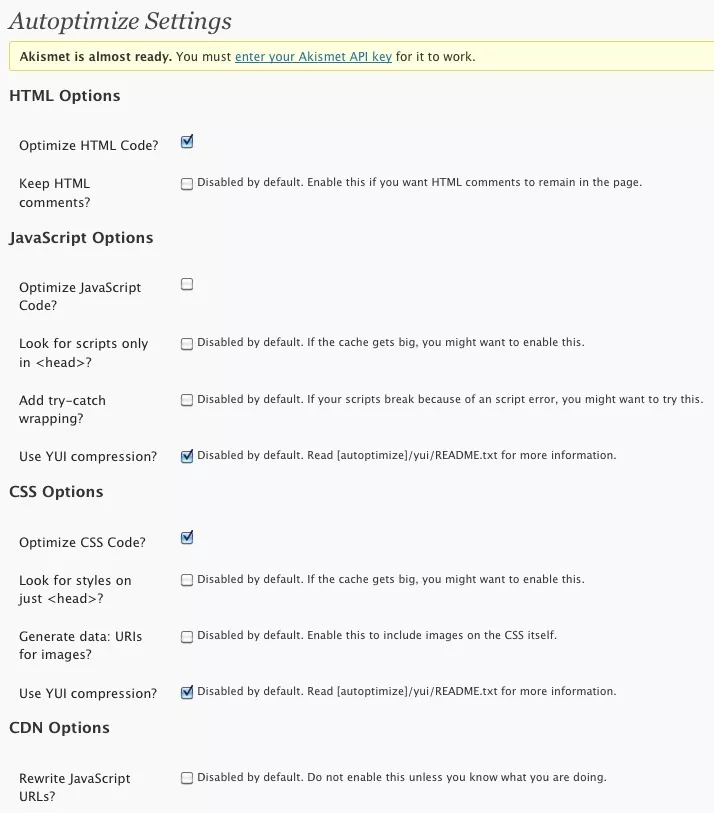
Once again, as the presenter would say, easy, simple and for the whole family.
And it is over! You do not have to do anything else anymore.
With all this, I do not want to wear uniforms or anything like that. I simply want to show you that I have not told you any comic strips to entertain you. What I have taught you here really works.
Conclusion
With these simple tips that will not take you to apply them more than a few minutes, I am convinced that you will greatly improve your Google Pagespeed Insights score.
Now it’s your turn. Take them to practice and tell me how you have been in the comments. And remember that you help me a lot if you share the article through social networks so you can help the maximum number of bloggers possible.
