
In today’s fast-paced digital world, page load speed isn’t just a luxury—it’s a necessity. Visitors won’t wait. If your site takes more than a couple of seconds to load, they’ll bounce to your competitors. And it’s not just about users—Google PageSpeed Insights and Core Web Vitals metrics directly influence your SEO rankings. Speed equals visibility.
But here’s the truth: getting a perfect 100/100 score on PageSpeed Insights isn’t the ultimate goal. What really matters is how your site performs in the real world, for real users. Let’s break down the how, why, and what now of optimizing your website using PageSpeed Insights—without obsessing over vanity scores.
What is Google PageSpeed Insights?
Think of Google PageSpeed Insights (PSI) as a diagnostic tool that gives you an insider look at your website’s performance. This tool evaluates your desktop and mobile page speed, combining lab data from a controlled test environment with field data (also known as real user CrUX data) from the Chrome User Experience Report.
When you enter your URL, PSI delivers:
- A performance score from 0 to 100
- Actionable suggestions to improve performance
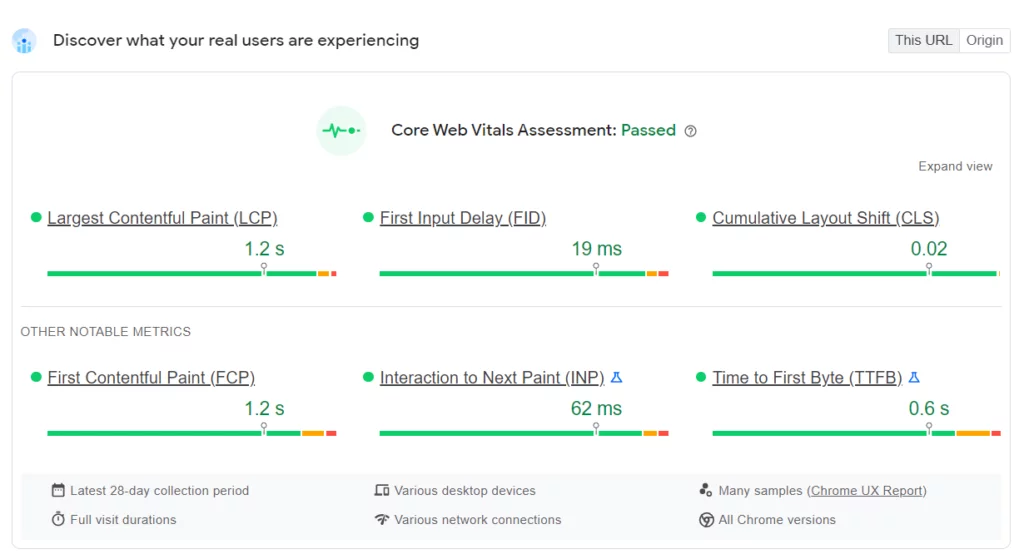
- Insights into both lab data and Core Web Vitals assessment
- Breakdown of key metrics like LCP, FID, CLS, and more
💡 Pro Tip: The recommendations—like minimizing JavaScript, compressing images, or reducing render blocking resources—are far more important than chasing a full 100/100 score.
The Reality Behind the 100/100 PageSpeed Score
Let’s face it: many developers and site owners become obsessed with achieving that elusive 100/100. But what they miss is this—Google’s performance score is a simulation, not an absolute truth.
Here’s why the perfect PageSpeed score isn’t everything:
- Scores vary by testing conditions: Time of day, server location, and network variability can influence results.
- Different tools, different scores: Your score may differ across tools like GTmetrix, Lighthouse, or Pingdom.
- Real performance matters: A site with an 85/100 score might still load in under 500ms in real-world conditions.
Ultimately, your visitors don’t care about your PSI score—they care about how fast your web pages load and how smooth the experience is.
How PageSpeed Insights Affects Your SEO
Back in 2018, Google introduced mobile page speed as a ranking factor. And in 2021, they raised the bar by launching the Core Web Vitals update. Here’s why this matters for SEO:
Google’s Core Web Vitals Metrics Include:
- Largest Contentful Paint (LCP): Measures loading performance (should be ≤2.5s).
- First Input Delay (FID): Measures interactivity (should be ≤100ms).
- Cumulative Layout Shift (CLS): Measures visual stability (should be ≤0.1).
- Speed Index (SI) and Time to Interactive (TTI): Help assess perceived performance.
- Total Blocking Time (TBT): Complements FID during lab data testing.
- First Contentful Paint (FCP): Tracks when the first text/image appears.
Why These Metrics Matter:
- They reflect how real users experience your site.
- They influence rankings—especially on mobile.
- They help identify critical bottlenecks in the critical rendering path.
🚀 Tip for Web Developers: Fixing things like render blocking resources and optimizing the resources load pipeline is key to reducing TTI and improving interactivity.
Why Mobile Page Speed is Non-Negotiable
More than 70% of global traffic comes from mobile devices, and slow mobile page load can tank your engagement, bounce rate, and conversions.
Google PageSpeed Insights offers separate scores for desktop and mobile performance. Prioritize mobile. Always.
The Reality of Google PageSpeed Insights 100/100 Score
What is Google’s PageSpeed Insights Method?
Performance affects SEO in addition to having an impact on User Experience (UX) on your website. Your score could have an impact on your Search Engine Results Page (SERP) rankings, given that PageSpeed Insights is operated by the biggest and most used search engine in the world (at least on Google itself).
In actuality, Google does – sort of – utilize PageSpeed Insights to influence ranks. Simply put, site speed affects rankings. You can quite accurately determine where you stand on that front based on the results of your performance test.
The value in the circle at the top of your PageSpeed results is just one factor that Google takes into account, though. A perfect score of 100/100 will not guarantee you the first page of the SERPs.
Having said that, you may still use the PageSpeed Insights findings to enhance your SEO. For instance, Google has used mobile page speed as a ranking criterion since 2018. You will see that the results of your performance test include information for both your site’s desktop and mobile versions.
The data under the Google PageSpeed Insights Mobile tab is essential because more than 73 percent of mobile internet users claim to have come across a website that loads slowly. You will get a competitive advantage by using the suggestions made here to reduce loading times on smartphones and other devices.
What criteria should be taken into account while measuring page speed?
The Core Web Vitals Google update places a strong emphasis on website performance as a crucial ranking factor.
An update was announced in the middle of 2021, and it started to be implemented gradually after that. Core Web Vitals takes into account the following factors:
- First Input Delay (FID)
- Total Blocking Time (TBT)
- First Contentful Paint (FDP)
- Largest Contentful Paint (LCP)
- Speed Index (SI)
- Cumulative Layout Shift (CLS)
- Time to Interactive (TTI)
This shows that after Google’s update, page speed has grown in importance as a ranking factor. A website that loads quickly provides a better user experience, which Google considers when assessing speed.
Websites that load quickly reach the top of search results, whereas those that take longer to load are ranked lower. Additionally, a website that has been optimized for SEO has a higher chance of ranking higher over time. You can use a number of on-page SEO techniques to augment the visibility of your website.
Knowing the platform that hosts your website is also essential. The platforms would provide access to a variety of tools for performance testing and optimization, especially if they were made with WordPress.
Guidelines For Increasing Google PageSpeed Insights Score
1. Minimize Post-Click Landing Page Redirects
Redirects are often perceived as a harmless way to guide users from one page to another, especially after they click on a link or submit a form. However, post-click landing page redirects can be detrimental to both user experience and page speed. Every redirect introduces an additional HTTP request, which can slow down your website and create unnecessary delays, frustrating users who are eager to access your content.
Even though redirects might seem like a convenient solution for gathering more data or guiding users through a marketing funnel, they are counterproductive in the long run. Excessive redirects lead to a negative feedback loop—slower pages and reduced Core Web Vitals scores. Instead of relying on redirects, look for alternative ways to gather information or provide a smoother experience. If you must use redirects, ensure they are quick and seamless, and avoid unnecessary ones whenever possible.
2. Make use of the compression method
Compression refers to the process of reducing the size of your website’s data, including images, scripts, and CSS files, by eliminating unnecessary characters and data. This technique is one of the most effective ways to reduce page load times and improve performance.
One popular method of compression is using WEBP format for images, as it offers high-quality results with smaller file sizes compared to other formats like PNG or JPEG. Additionally, tools like Gzip or Brotli can compress your HTML, CSS, and JavaScript files, further minimizing page size and speeding up your website.
3. Utilize Browser Caching for Optimal Performance
Every time a user visits your website, their browser requests files from the server to load the page. This includes all the images, CSS, JavaScript, and other elements necessary for the page to display correctly. While this is standard practice, it can also significantly slow down the load time for repeat visits—especially if the same files are requested every time a user returns.
This is where browser caching comes into play. When browser caching is properly configured, certain elements of your website—such as images, CSS files, JavaScript, and fonts—are stored locally in the user’s browser. Instead of fetching these resources from the server every time the user revisits the site, the browser retrieves them from its local cache. This drastically reduces load times on subsequent visits, improving both the user experience and your Google PageSpeed Insights score.
How to Implement Browser Caching:
- Set Expiry Dates for Resources: By configuring proper expiration headers for cached resources (such as setting them to be cached for a week, month, or even a year), you ensure that the user’s browser knows how long it can reuse files before checking for updates.
- Leverage Cache-Control Headers: These headers tell the browser how long specific resources can be stored in the cache and when they should be fetched again from the server.
- Tools and Plugins: For those using platforms like WordPress, several plugins (e.g., W3 Total Cache or WP Super Cache) make it easy to configure browser caching. With a simple installation and setup, you can greatly enhance your website’s speed.
4. Prioritize Above-the-Fold Content
The above-the-fold content refers to the part of a webpage visible to the user without scrolling. It’s crucial that this content loads quickly to capture the user’s attention and ensure they stay engaged. Users are more likely to bounce if they have to wait for critical content, such as headlines, images, or calls-to-action (CTAs), to load.
By ensuring that above-the-fold content loads first, you create a faster perceived performance—even if the rest of the page still loads in the background. This approach is especially important when you have heavy content further down the page.
How to Prioritize Above-the-Fold Content:
- Lazy Load Below-the-Fold Elements: Lazy loading is a technique that ensures images, videos, and other elements load only when they come into view. By applying this to elements below the fold, you reduce the load time for the critical content that’s visible when the page first opens.
- Inline Critical CSS: One effective way to speed up above-the-fold content is to inline critical CSS directly in the HTML. This allows the browser to render the visible portion of the page without waiting for additional external files.
- Asynchronous JavaScript Loading: For non-essential JavaScript, ensure that scripts are loaded asynchronously. This allows the page to render without waiting for the JavaScript to complete, which can be especially beneficial for above-the-fold content.
5. Improve Server Response Time
Server response time is the amount of time it takes for the server to respond to a request from a user’s browser. This is a key factor that influences how quickly a webpage loads, and several things can impact this timing:
- Web Hosting: If you’re using a shared hosting provider, your website may be competing for resources with other websites, resulting in slower server response times.
- Server Location: The geographical distance between your server and the user’s device can introduce latency, making the response time slower.
- Server Performance: The quality of your hosting service and the hardware used on your server plays a significant role in its ability to respond quickly.
How to Improve Server Response Time:
- Upgrade Hosting: If you’re on shared hosting, consider upgrading to a Virtual Private Server (VPS) or dedicated hosting. These options give you more resources and faster response times.
- Optimize Your Server: Ensure that your server is properly configured. Tools like Nestify provide optimized server environments for WordPress sites, which can boost performance.
- Use a Content Delivery Network (CDN): By using a CDN, you can store cached copies of your site on multiple servers across the globe. This reduces the load on your main server and helps deliver content faster to users, no matter where they are.
6. Eliminate Render-Blocking Resources
Render-blocking resources—such as JavaScript and CSS—are files that must load before the page can be displayed. When these files block the rendering of your page, it delays the time it takes for users to see any content, leading to a frustrating experience.
How to Eliminate Render-Blocking Resources:
- Defer Non-Essential JavaScript: For scripts that are not critical to the page’s initial load, use the
deferorasyncattribute to load them asynchronously. This ensures that the browser can continue rendering the page without waiting for these scripts to finish. - Inline Critical CSS: For the CSS needed to render above-the-fold content, consider inlining it directly in the HTML. This prevents the browser from blocking the page load while it fetches the CSS file.
- Minify and Combine Files: By minifying and combining your JavaScript and CSS files, you reduce the number of HTTP requests, which can help minimize the time the browser spends waiting for these resources.
7. Remove Resources That Block Rendering
Apart from JavaScript and CSS, other resources like images, fonts, and videos can also block the rendering process if they are not loaded efficiently. Delays caused by these resources can significantly slow down the page load time, affecting both user experience and SEO rankings.
How to Remove Render-Blocking Resources:
- Use Lazy Loading for Images and Videos: Images and videos should be loaded only when they come into view, rather than all at once when the page is first loaded. This technique is called lazy loading, and it can drastically reduce initial load times.
- Optimize Media Files: Use compressed image formats like WEBP and ensure video files are in efficient formats like MP4 or WebM to reduce file size and improve load times.
- Remove Unnecessary Third-Party Scripts: Third-party resources (such as ads, social media widgets, and analytics scripts) can delay rendering. Evaluate which third-party scripts are truly necessary and eliminate or delay loading of the others.
8. Implement a Content Delivery Network (CDN)
A Content Delivery Network (CDN) is a network of servers distributed across multiple geographical locations. By storing cached versions of your website’s content (images, stylesheets, JavaScript) on these servers, the CDN can serve these files from the server closest to the user, reducing latency and improving load times.
How a CDN Helps Improve Performance:
- Faster Load Times Globally: With a CDN, users from any part of the world can access your site’s content faster, as it is served from a nearby server.
- Reduced Server Load: By offloading static content to the CDN, your main server experiences less traffic, leading to faster performance.
- Improved Availability and Reliability: CDNs are designed for high availability, ensuring your website is more resilient to traffic spikes and server downtime.
Popular CDNs like Cloudflare and StackPath integrate seamlessly with WordPress and other platforms, offering enhanced performance and security.
9. Introduce Accelerated Mobile Pages (AMP)
AMP (Accelerated Mobile Pages) is a framework designed to optimize mobile page loading by stripping down unnecessary features and resources. AMP prioritizes speed, ensuring that mobile users experience instant load times, even on slower networks.
Why AMP Matters:
- Instant Load Times: AMP pages are optimized for mobile devices and load almost instantly by removing non-essential elements and reducing the complexity of the page structure.
- Boosts SEO Rankings: Google favors fast-loading mobile pages, and implementing AMP can improve your website’s mobile-first indexing, which is crucial for SEO.
When to Implement AMP: AMP is especially beneficial for content-heavy websites like blogs, news sites, and publishers. It’s an excellent choice if a significant portion of your audience accesses your site via mobile devices.
10. Choose Fast-Loading WordPress Themes
Not all WordPress themes are created equal. While some are beautifully designed, they may come with a lot of extra code that slows down your website. A fast-loading theme is one that’s optimized for performance from the start, providing the best balance between aesthetics and speed.
How to Choose a Fast-Loading Theme:
- Look for Lightweight Themes: Themes like GeneratePress, Astra, and Neve are known for their speed and minimalist design, making them great choices for a fast-loading website.
- Prioritize Performance: Choose themes that don’t include excessive features that are not relevant to your site. The fewer unnecessary resources your theme loads, the better the performance.
11. Conduct Routine Website Audits
A website audit is an essential step to ensure your website is performing at its best. Regular audits help you identify issues like slow-loading pages, broken links, and render-blocking resources that can hurt your site’s performance.
How to Conduct a Website Audit:
- Use Google PageSpeed Insights: This free tool provides an in-depth analysis of your website’s performance and offers actionable suggestions for improvements.
- Schedule Regular Audits: Make website audits part of your routine maintenance. Regular audits help identify emerging issues and ensure your website continues to meet performance standards.
By conducting audits regularly, you’ll ensure your site stays fast, responsive, and optimized for the best possible user experience.
12. Optimize Images for Faster Load Times
Images are often one of the largest elements on a webpage, and they can significantly impact load times if not optimized properly. Large image files can cause delays in page rendering, leading to a poor user experience and a higher bounce rate. Optimizing images is one of the most straightforward and impactful methods to speed up your website.
How to Optimize Images:
- Compress Images: Use tools like TinyPNG or ImageOptim to reduce image file sizes without sacrificing quality. Compressing images reduces the bandwidth needed to load them, speeding up your website.
- Use Efficient Image Formats: Switch to more modern image formats like WEBP, which provide smaller file sizes without losing quality. WEBP is supported by most modern browsers and offers superior compression compared to traditional formats like JPEG and PNG.
- Resize Images: Ensure that the images you upload are no larger than necessary. If your website only needs a 600px wide image, don’t upload a 2,000px image. By scaling images to the correct size, you can drastically reduce file sizes.
- Enable Lazy Loading for Images: As mentioned earlier, lazy loading ensures that images load only when they are about to be viewed. This can help speed up the initial page load time by deferring the loading of images that aren’t immediately visible.
13. Streamline Your CSS and JavaScript
Excessive CSS and JavaScript files can severely impact your website’s loading speed. Unoptimized CSS and JavaScript files contain a lot of redundant and unnecessary code, which can be reduced through minification. Minification strips out extra spaces, comments, and characters from your code, reducing its size and improving load times.
How to Streamline Your CSS and JavaScript:
- Minify Your Code: Use tools like UglifyJS or CSSNano to minify your JavaScript and CSS. This process removes all unnecessary characters, reducing file sizes and enhancing page load speed.
- Combine CSS and JavaScript Files: Instead of loading multiple CSS or JavaScript files, combine them into fewer, larger files. This reduces the number of HTTP requests the browser has to make.
- Defer Non-Essential JavaScript: Use the
deferattribute to load JavaScript files that aren’t critical to the initial page render. This allows the page to load and display content without waiting for non-essential scripts to complete. - Inline Critical CSS: Instead of waiting for the CSS file to load externally, inline critical CSS for above-the-fold content directly into the HTML. This helps render the visible content faster, improving perceived load time.
14. Optimize Fonts for Faster Rendering
Fonts, especially web fonts, can be a significant factor in slow page load times. Large font files or inefficiently loaded font files can block page rendering until they’re fully loaded, increasing the time it takes to display content.
How to Optimize Fonts:
- Use Font Subsetting: Instead of loading an entire font family, use subsetting to load only the characters your website needs. This can dramatically reduce font file sizes.
- Use Font Display Swap: Add the
font-display: swap;CSS property to ensure that text is displayed with a fallback font until the custom font has loaded. This prevents text from being invisible during the font load, improving the user experience. - Limit the Number of Web Fonts: While web fonts can add a lot of visual appeal to your site, using too many different fonts or font weights can increase page load time. Stick to just a few fonts and weights to reduce overhead.
15. Reduce HTTP Requests
Each time a user visits your website, the browser makes an HTTP request for each element on the page—images, stylesheets, JavaScript files, fonts, etc. A high number of HTTP requests can slow down the loading time of your site, so reducing the number of requests is critical for improving performance.
How to Reduce HTTP Requests:
- Combine Files: Where possible, combine your CSS and JavaScript files. By reducing the number of files that need to be requested, you can cut down on HTTP requests.
- Use Image Sprites: An image sprite is a collection of images combined into a single image. By using CSS to display specific parts of the image sprite, you can reduce the number of image requests on the page.
- Minimize External Resources: Every external resource, like third-party scripts, fonts, or analytics tools, adds additional HTTP requests. Limit the number of third-party resources to only the most essential ones.
- Use SVGs for Icons: Instead of using multiple image files for icons, switch to SVGs (Scalable Vector Graphics). SVGs are lightweight, resolution-independent, and easy to style with CSS, reducing the need for separate image files.
16. Enable HTTP/2
HTTP/2 is the latest version of the HTTP protocol, which helps websites load faster by introducing features like multiplexing (sending multiple requests in parallel), header compression, and server push. If you’re still using HTTP/1.1, upgrading to HTTP/2 can improve page load times by allowing more efficient communication between the browser and server.
How to Enable HTTP/2:
- Check Your Hosting Provider: HTTP/2 is supported by most modern web hosts. Check with your hosting provider to ensure that HTTP/2 is enabled. If not, consider switching to a hosting provider that offers it.
- Use SSL/TLS: HTTP/2 requires SSL/TLS encryption (HTTPS), so make sure your website is using an SSL certificate. This will not only improve speed but also boost SEO rankings, as Google favors secure websites.
17. Optimize for Mobile Performance
Mobile optimization is not just about responsive design—mobile page speed is a critical factor in user experience and SEO. With more users accessing websites from mobile devices, it’s essential that your site is not only mobile-friendly but also optimized for speed.
How to Optimize for Mobile Performance:
- Responsive Design: Ensure your website uses responsive design principles so that it adapts to different screen sizes and resolutions.
- Optimize for Touch Interactions: Mobile users interact with websites via touch, so make sure buttons, menus, and links are large enough to be easily tapped without errors.
- Reduce Mobile-Specific Load Times: Mobile networks, especially 4G and 3G, tend to be slower than desktop connections. Minimize mobile load times by serving smaller images and reducing the number of HTTP requests on mobile devices.
- Test Mobile Speed: Use Google’s Mobile-Friendly Test and PageSpeed Insights to test and improve your website’s mobile performance.
18. Use Efficient Caching Strategies
Caching plays a critical role in improving page load times by reducing the need to fetch resources from the server every time a user visits a page. However, it’s important to set up caching strategically to ensure it works effectively without serving outdated content.
How to Use Efficient Caching Strategies:
- Leverage Browser Caching for Static Resources: Set long expiration dates for static resources (like images, CSS, and JavaScript) so that they are stored in the user’s browser cache.
- Use Object Caching for Dynamic Content: If your website relies on dynamic content (such as user accounts or frequently updated information), use object caching to store database queries in memory for faster access.
- Utilize Cache-Control Headers: Set the appropriate Cache-Control headers to specify how resources should be cached (e.g., for a day, week, or indefinitely) to improve both speed and performance.
- Content Delivery Networks (CDNs): As mentioned previously, CDNs can store cached copies of your website’s content across multiple servers, speeding up content delivery for users across the globe.
19. Monitor and Optimize User Timing Marks and Measures
Google PageSpeed Insights also provides User Timing Marks and Measures, which are data points that track the performance of specific events on your website. This feature allows you to assess the performance of JavaScript code, as it measures the time between certain points in your scripts.
How to Monitor and Optimize User Timing Marks:
- Set Custom Timing Marks: Use the User Timing API to define custom timing marks in your website’s JavaScript. By marking certain key actions (e.g., the start of a page load or the loading of a specific script), you can monitor how long each action takes and optimize accordingly.
- Analyze the Data: The performance data generated by these marks can give you insights into where bottlenecks are occurring in your code, allowing you to address performance issues more effectively.
- Use This Data for Optimization: Once you’ve identified slow parts of your website, focus on optimizing those areas (whether by refactoring JavaScript, optimizing resources, or using better caching strategies).
This advice only applies if you are utilizing the User Timing API. To help you assess the performance of your JavaScript, this utility generates timestamps. If you have configured the API for your website, PageSpeed Insights will display your marks and metrics under the following heading:

As you can see, this is another Google suggestion that is neither a “pass” nor a “fail.” Simply put, PageSpeed Insights makes this data accessible so you can utilize it to identify places that can benefit from optimization.
The Bottom Line: It’s Not About the Score, It’s About the Experience
Google PageSpeed Insights is more than just a tool for chasing scores—it’s a compass for optimizing your website’s performance. Don’t get bogged down by chasing perfection. Instead, focus on the real goal: delivering an incredibly fast, smooth user experience that helps you rank higher and keep visitors happy.
Remember, page speed isn’t just about impressing Google—it’s about giving your users the best experience possible. So, take the time to implement these strategies, run regular audits, and always keep an eye on your performance metrics.
Get ready to turn your website into a speed machine with Nestify free trial, and watch your SEO rankings soar!
FAQs on Google PageSpeed Insight Score
What is the best way to handle large media files on my website?
For large media files like images, videos, and graphics, optimize them before uploading. Compress images using tools like TinyPNG or ImageOptim, and use efficient formats like WEBP. For videos, consider using streaming formats like MP4 or WebM and avoid large GIFs. Lazy load media that is not visible initially and use a CDN to speed up media delivery.
Does reducing HTTP requests improve page speed?
Yes, reducing HTTP requests can improve page speed. Every file requested from a server (like images, CSS, and JavaScript) adds to the load time. Reducing the number of HTTP requests by combining files, using image sprites, or eliminating unnecessary external resources can significantly boost website performance.
What is HTTP/2, and why should I use it?
HTTP/2 is the latest version of the HTTP protocol, designed to speed up website loading by allowing multiple requests to be processed simultaneously (multiplexing), using header compression, and enabling server push. Switching to HTTP/2 improves your website’s performance by allowing faster communication between the server and the browser, reducing latency and load times.
