Imagine having the ability to turn your most valuable content into a powerful magnet that attracts subscribers, drives sales, and boosts engagement—all while protecting your exclusive material. That’s exactly what a content locker can do for your WordPress site. By locking away premium web content and requiring visitors to take an action, like subscribing to your newsletter, signing up for a membership, or making a purchase, you can create a sense of exclusivity that motivates your audience to act.
Here’s the exciting part: businesses using content lockers have seen as much as a 40% increase in email sign-ups and up to 3x higher engagement. It’s not just a trend—it’s a strategy backed by real results. With 90% of consumers saying they’re more likely to engage when offered something in return, like access to hidden gems on your website, content lockers are a game-changer.
Whether you run a blog, an online store, or a membership platform, a content locker gives you the power to transform casual visitors into loyal subscribers and paying customers. In this guide, we’ll show you how to effortlessly integrate a content locker into your WordPress site and unlock new opportunities for growth. Ready to take your content to the next level? Let’s dive in!
What is a Content Locker?
1. Increase User Engagement
Looking for ways to boost user engagement on your site? Content lockers encourage deeper interaction. When users must take action—like signing up for your newsletter or following your social media accounts—before unlocking content, they’re more likely to stay longer and actively engage with your website. This interaction leads to stronger connections and increased time spent on your site.
2. Boost Social Shares
Want to leverage social media without spending on ads? A content locker can help. By locking part of your high value website content behind a “share to unlock” gate, you encourage visitors to share your content in exchange for access. This turns every user into a mini-marketing machine, instantly expanding your reach as they share your content with their networks.
3. Grow Your Email List Quickly
Looking to build an email list? Content lockers are your secret weapon. By requiring an email subscription to unlock premium or exclusive content, you give high quality leads a strong incentive to sign up. In return for access, you collect valuable contact information or ask to complete specific actions, all while providing users with high-quality content. Whether you’re offering eBooks, webinars, or special guides, a content lock can rapidly expand your email subscriber list with engaged leads.
4. Monetize Premium Content
If you think your content deserves to be behind a paywall, restricting access with a content locker can help you monetize it. Locking great content like in-depth research, insider tips, or specialized tutorials behind a content locker allows you to generate income. You can choose to charge a one-time fee, set up a subscription model, or easily add and sell individual pieces of content, transforming your website or blog into a money-making machine.
Maximize Engagement: How to Use Content Lockers on Your WordPress Site
Method 1: Add Content Locking With OptinMonster (Free Content)
OptinMonster is widely regarded as the top lead generation plugin for WordPress. It is an ideal solution if you want to use exclusive website content to grow your email list by locking it behind an opt-in form.
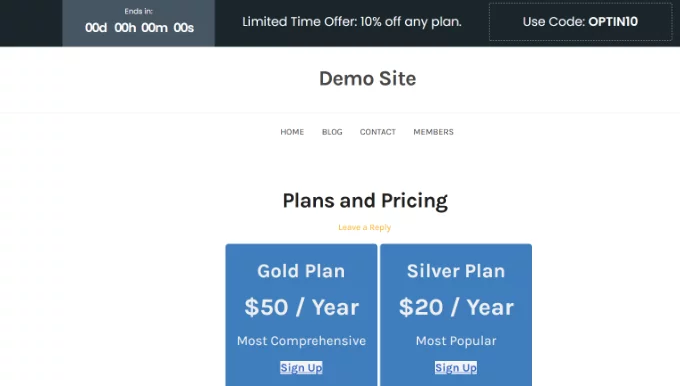
To activate content locking, you need to have at least the Plus plan. WPBeginner users can benefit from a 10% discount by using our OptinMonster coupon.
Step 1: Sign Up for OptinMonster
Start by visiting the OptinMonster website and signing up for a plan by clicking the ‘Get OptinMonster Now’ button.
Step 2: Install and Activate the Plugin
Once you’ve signed up, you’ll need to install and activate the OptinMonster plugin on your WordPress website for content lock.
Step 3: Connect Your OptinMonster Account
After activation, you’ll be greeted by the welcome screen and a setup wizard. Click the ‘Connect Your Existing Account’ button and follow the on-screen prompts. This will open a new window asking you to connect OptinMonster to your WordPress site. Click ‘Connect to WordPress’ and log in to your OptinMonster account (or create a new one if you don’t have one already).
Step 4: Create Your First Campaign
Once connected, go to OptinMonster » Campaigns in your WordPress dashboard. You’ll be prompted to create a new campaign. Click the ‘Create Your First Campaign’ button to begin.
OptinMonster will present you with options for templates or playbooks. You can select ‘Templates’ for a wide variety of campaign designs, or choose ‘Playbooks’ for ready-to-use campaigns based on successful brands. For this tutorial, we’ll choose ‘Templates’.
Step 5: Choose a Template and Start Building
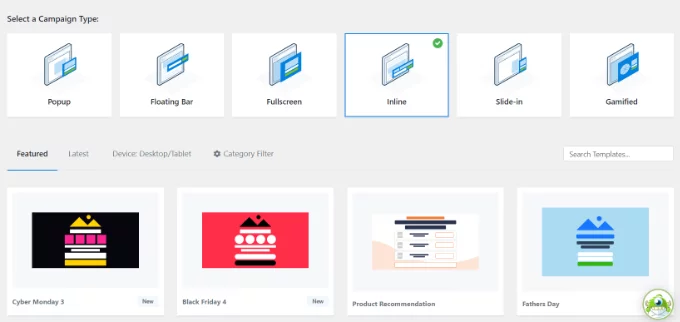
On the OptinMonster website, you’ll be asked to select a campaign type. Choose the ‘Inline’ option for website content locking. Then, scroll down and browse the available templates. Each template is mobile-friendly. Click ‘Preview’ to see the design, and when you find one you like, click ‘Use Template’.
You’ll then be asked to provide a title for your campaign. After entering your title, click ‘Start Building’ to open the OptinMonster editor.
Step 6: Create Your Campaign Title
Next, you’ll be asked to provide a title for your campaign. Once you’ve entered the title, click ‘Start Building’ to open the OptinMonster editor and begin customizing your content locker.
Step 7: Customize Your Content Locker
In the campaign builder, you can use the drag-and-drop interface to modify the template to fit your needs. Add blocks for text, images, videos, countdown timers, and more. Adjust the fonts, colors, and layout to match your branding. You can also customize the success message that users will see once they subscribe to unlock the content.
Step 8: Enable Content Locking
Once you’re happy with your design, it’s time to activate the content locker. Navigate to the ‘Display Rules’ tab, where you can specify when and where the content lock will appear. You can apply the lock to all pages or just select specific ones. Once done, click ‘Done? Go To Actions’, and you’ll be directed to the next screen. Here, you can add animations and set a sound to play when the content locker popup appears.
To enable the content lock, simply toggle ‘Enable Content Lock’ in the ‘Lock Content’ section.
- Configure Display and Cookie Settings
Next, configure the display settings, including cookie settings, to control how frequently the popup will appear to users. You can choose when the content locker should reappear for returning visitors by adjusting the cookie duration.
Once everything is set, click ‘Published’ at the top and then ‘Publish’ to make your content locker campaign live.
Step 9: Save and Publish
After configuring either the automatic or manual locking mode, click ‘Save’ and ‘Publish’. Your content will now be locked behind the opt-in form, and users will need to enter their email addresses to access it.enter their email addresses to view it.
Step 10: Choose How to Lock Content
There are two ways to lock content with OptinMonster:
- Automatic Mode: This option automatically locks content after a certain number of words or paragraphs (for example, after the first three paragraphs of your post). It’s the easiest way to implement a content locker.
- Manual Mode: If you want more control, you can lock specific pieces of content by using a shortcode. Copy the shortcode provided and paste it into your WordPress content editor for the exact pages or posts you wish to lock.
Method 2: Add Content Locking With MemberPress (Paid Content)
MemberPress is a powerful membership plugin for WordPress that allows content lockers and create paid subscriptions. It’s the ideal solution if you want to charge users for access to premium content.
To activate content locking, you’ll need the Basic plan or higher. WPBeginner users can save up to $479 on their first year using our MemberPress coupon.
Step 1: Install and Activate MemberPress
Start by installing and activating the MemberPress plugin. For installation guidance, see our WordPress plugin installation guide.
Once activated, enter your MemberPress license key in MemberPress » Settings and click ‘Activate License Key’.
Step 2: Set Up a Membership Plan
Next, you’ll need to create a membership plan for your subscribers. Navigate to MemberPress » Memberships and click ‘Add New’. Enter a name for your plan and set the pricing and billing options (e.g., one-time payment or subscription).
After configuring the plan, click ‘Publish’.
Step 3: Create Content Access Rules
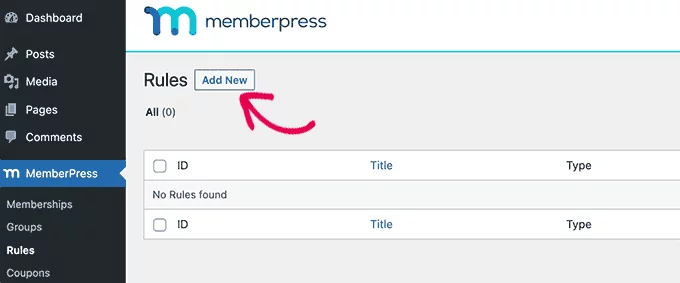
To specify which content is locked for each membership plan, you need to set up rules. Go to MemberPress » Rules and click ‘Add New’.
You can choose to protect content based on tags, categories, or individual posts. For example, you might tag posts with ‘Gold’ and create a rule that only Gold members can access these posts.
Step 4: Configure Drip and Expiration Settings
If you want to release content gradually, you can enable content drip to automatically release content over time. You can also configure content expiration settings if you want content to be accessible for a limited period.
Click ‘Save Rule’ after configuring your settings.
Step 5: Lock Content
Now, go to the post or page you want to lock and apply the membership tag (e.g., Gold) to it.
In the ‘MemberPress Unauthorized Access’ section below the post editor, you can configure what non-members will see when they try to access file locker. You can choose to display a pricing page, a login form, or other custom messages.
Step 6: View Locked Content
Visit the page or post you’ve locked. Non-members will be redirected to a pricing page or a login form, while members who are logged in will be able to view the content.
With MemberPress, you can now easily monetize your website by allowing them to access documents in the form of exclusive content to paying subscribers.
Learn about other content protection plugins here.
Content Locker for WordPress: Strategies to Protect and Profit from Your Content
Implementing a content locker not only helps protect your exclusive website material, but also provides valuable opportunities to increase conversions, grow your audience, and generate revenue. Whether your goal is to build a subscription-based model, generate leads, or offer premium content to paying users, content locking allows you to achieve your objectives with ease. With WordPress, you have a variety of powerful and flexible options to lock your content while ensuring it remains secure and accessible.
For a smooth and reliable experience while managing locked content, you need fast and secure hosting. Try Nestify Hosting today with a free trial and enjoy high-performance WordPress hosting designed to support your content locking strategy and boost your site’s success!
Content Locker 101: Key FAQs
Do I need coding skills to set up content locking in WordPress?
No, you don’t need to be a developer. Many WordPress plugins for content locking offer simple, drag-and-drop interfaces, making it easy for anyone, even beginners, to set up and manage locked website content without writing code.
How can I make sure content locking doesn’t negatively affect user experience?
To avoid disrupting the user experience, be clear about the value users will get by unlocking the content. Use friendly, non-intrusive popups, ensure the process is straightforward, and provide a seamless user journey from locked content to unlocking actions.
Can content locking help increase my website’s revenue?
Yes, content locking can be a great way to increase revenue, especially if you have premium content. By requiring users to pay for access or subscribe to a membership, you can monetize your content while offering added value to your audience.


