
If you’re new to WordPress, one of the first essential skills you’ll need to grasp is how to effectively use its built-in text editor. Whether you’re writing a blog post, creating a new page, or editing existing content, WordPress offers an intuitive and powerful text editor that simplifies the process of adding and formatting content. With these tools, you’ll be able to craft visually appealing, well-structured, and engaging content for your website.
In this detailed guide, we’ll walk you through the fundamental aspects of using the WordPress text editor. We’ll cover both the Classic Editor, which offers a familiar word-processing interface, and the Block Editor (also known as Gutenberg), a more modern and flexible approach to content creation. Whether you’re a beginner or looking to enhance your WordPress editing skills, this guide will help you navigate the process and optimize your content creation workflow.
The Basics of the WordPress Text Editor
WordPress provides two main editing interfaces: the Classic Editor and the Block Editor. Each of these editors is designed to offer a user-friendly experience, but they differ in their approach and functionality. Understanding how both editors work will help you decide which one best fits your needs for different types of content.
1. The Classic Editor: A Familiar, Simplified Interface
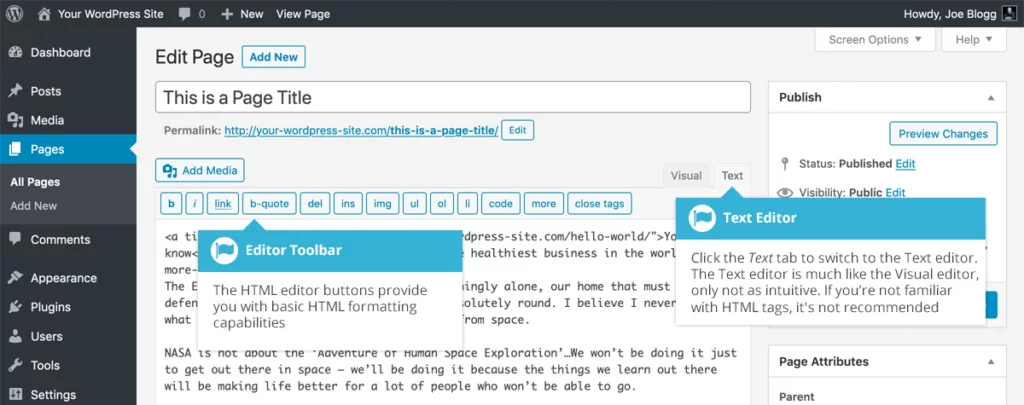
The Classic Editor in WordPress provides a simple, WYSIWYG (What You See Is What You Get) interface, much like a word processor. It’s perfect for those who are used to the straightforward, linear format of writing and formatting content. Here’s a breakdown of the key features:
Writing and Formatting Content
Once you’re inside the Classic Editor, you’ll see a large text box where you can begin typing your content. The toolbar at the top offers familiar formatting options, such as:
- Bold, Italic, Underline: Use these to emphasize important parts of your text.
- Alignment: Adjust text alignment to the left, center, or right.
- Lists: Create bulleted or numbered lists to organize content.
- Links: Highlight text and easily add a hyperlink using the Link button.
- Blockquote: Use this feature for quoting text from other sources.
- Insert Media: Add images, audio, video, and other media elements using the Add Media button.
HTML View vs Visual View
- Visual View: This is the default view, where you can format and add content just like in a word processor. It’s easy and intuitive, perfect for beginners.
- Text View: If you’re comfortable with HTML, you can switch to the Text view. This allows you to see and edit the raw code behind your content. This is especially helpful for adding custom code, embedding widgets, or adjusting specific formatting.
Adding Media
In the Classic Editor, you can click the Add Media button to insert images, videos, audio, and other files into your content. You can also adjust the image’s alignment, size, and even add captions or alt text for better accessibility and SEO.
Preview and Publish
Once you’ve finished creating your post or page, WordPress allows you to preview it before making it live. This feature is crucial to ensure that your content appears as you intended across different devices. After previewing and making any necessary adjustments, simply click Publish to make your content live on your website.
2. The Block Editor (Gutenberg): A More Modern Approach
Introduced as the default editor in WordPress 5.0, the Block Editor (also known as Gutenberg) revolutionizes the way content is created on WordPress. It allows you to build posts and pages using individual content blocks, each representing a different type of content element (e.g., text, images, video, buttons, etc.).
What Are Blocks?
In the Block Editor, content is divided into “blocks.” Each block is a distinct element that can be individually edited, rearranged, and styled. Some common types of blocks include:
- Paragraph: For adding regular text content.
- Heading: To add headings and subheadings, helping you structure your content.
- Image: To insert images directly from your media library.
- List: For creating ordered or unordered lists.
- Quote: To add blockquotes or citations.
- Embed: To embed content from external sites like YouTube or Twitter.
Adding and Customizing Blocks
To add a block, simply click the + button at the top or within the content area. You can then select from a variety of block types, depending on the content you wish to add.
Each block has its own toolbar, offering specific options for customization. For example:
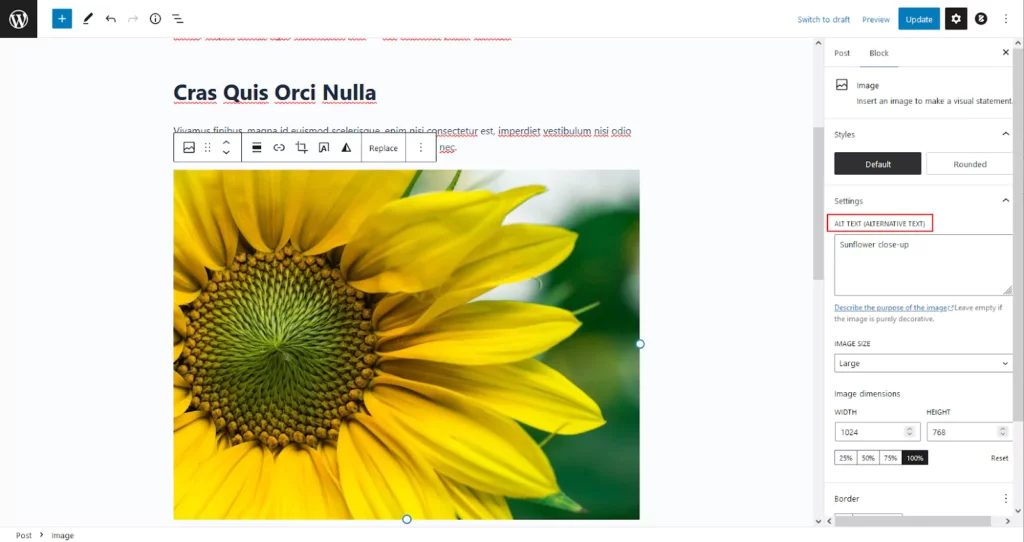
- The Image block allows you to select an image from the media library or upload a new one and adjust its alignment, size, and link settings.
- The Heading block enables you to create headings with customizable font sizes, while also contributing to better SEO by clearly organizing your content.
Reordering Blocks
One of the standout features of the Block Editor is the ability to easily move blocks around. You can click the arrows on the left side of each block to reposition it or drag and drop the blocks to reorder them. This makes it incredibly easy to reorganize the layout of your content without disrupting the flow or formatting.
Preview and Publish
Just like the Classic Editor, the Block Editor allows you to preview your content before publishing. This is essential for checking how your content will look to readers on various devices. Once you’re satisfied, click Publish to make your content visible to the world.
Tips for Using the WordPress Text Editor Effectively
1. Familiarize Yourself with Keyboard Shortcuts
One of the easiest ways to speed up your writing and editing process is by mastering keyboard shortcuts. Both the Classic Editor and the Block Editor support a variety of shortcuts to make formatting and editing faster.
- Bold Text: Press Ctrl + B (Windows) or Cmd + B (Mac).
- Italic Text: Press Ctrl + I (Windows) or Cmd + I (Mac).
- Underline Text: Press Ctrl + U (Windows) or Cmd + U (Mac).
- Strikethrough: Press Alt + Shift + D (Windows) or Option + Shift + D (Mac).
- Add a Link: Press Ctrl + K (Windows) or Cmd + K (Mac).
Mastering these shortcuts will save you time and make your editing experience smoother.
2. Use the Block Editor for More Flexibility
The Block Editor (Gutenberg) introduces a block-based approach to content creation, allowing you to manage individual elements more easily. Here are some tips for using it effectively:
- Organize Your Content with Blocks: Each element in your post or page, whether it’s text, images, videos, or other media, is treated as a separate “block.” This gives you more control over layout and design.
- Customize Blocks with Settings: Every block in the Block Editor comes with its own set of settings. For example, when you add an Image block, you can adjust its alignment, size, and link settings directly within the block’s toolbar or sidebar.
- Rearrange Blocks Easily: One of the main advantages of the Block Editor is the ability to move blocks up or down easily. You can do this by clicking the up and down arrows next to each block, or by simply dragging the block to a new position.
By using the Block Editor’s flexibility, you can create more complex and customized layouts without having to write custom code.
3. Preview Your Content Frequently
Before hitting the “Publish” button, it’s essential to preview your content to ensure it looks as expected. WordPress allows you to preview your post or page before publishing it, so you can see how it will appear to your audience.
- Desktop Preview: Click the Preview button at the top-right corner of the editor. WordPress will show you how the content looks on a desktop screen.
- Mobile Preview: To ensure your content is mobile-friendly, WordPress provides an option to preview your post in mobile view. You can do this by clicking the device icons next to the Preview button.
By previewing your content regularly, you can ensure that your formatting, images, and layout appear correctly on all devices and screen sizes.
4. Use the ‘Add Media’ Button for Easy Image Insertion
Including images, videos, and other media is a great way to enhance your content. WordPress makes it easy to insert media using the Add Media button.
- Insert Images: Click the Add Media button above the editor and select an image from your media library or upload a new one. You can choose the image’s alignment (left, center, or right) and size (thumbnail, medium, large, full).
- Add Captions and Alt Text: When inserting images, don’t forget to add captions and alt text to improve SEO and accessibility. This can be done within the image settings before inserting it into your post.
- Embed Videos: To embed a video (e.g., from YouTube or Vimeo), simply paste the video’s URL into the editor, and WordPress will automatically convert it into a video block.
By using the Add Media feature, you can easily enrich your content with visual elements that help engage your audience.
5. Organize Your Content with Headings and Subheadings
Using proper headings and subheadings is crucial for creating well-structured content. It not only makes your content easier to read but also helps with SEO.
- Heading Levels: WordPress allows you to choose from different heading levels (H1, H2, H3, etc.) to create a hierarchy of information. Typically, your title will be Heading 1 (H1), and then you can use Heading 2 (H2) for major sections and Heading 3 (H3) for subsections within those.
- SEO Benefits: Using headings correctly helps search engines understand the structure of your content, which can improve your rankings. Ensure that your main keywords are included in some of the headings.
By properly using headings, you make your content more digestible and SEO-friendly.
6. Save Your Work Regularly
WordPress autosaves your content as you write, but it’s still a good idea to manually save your drafts regularly to avoid losing any changes.
- Drafts: If you’re not ready to publish, make sure to save your post as a draft. You can find the Save Draft button at the top-right corner of the editor. This is especially important if you need to step away or want to come back to finish your content later.
- Revisions: WordPress tracks all changes made to a post or page, allowing you to view previous revisions. If you accidentally delete or change something you didn’t intend to, you can easily revert to an earlier version by going to the Revisions section under the post editor.
Regularly saving your work helps ensure that you don’t lose important changes and gives you peace of mind.
7. Use Categories and Tags for Better Organization
WordPress allows you to categorize and tag your posts, which can improve navigation on your site and help with SEO.
- Categories: Categories are used to group related posts together. You can assign multiple categories to a post to ensure it fits in the right sections of your website.
- Tags: Tags are more specific labels that describe the details of your post. They can help your readers find content on similar topics. Use relevant tags to increase discoverability.
By organizing your content with categories and tags, you make it easier for your readers to find related posts and improve your site’s overall navigation.
8. Use Custom HTML for Advanced Formatting
If you’re familiar with HTML, you can take your content to the next level by switching to the HTML view in the Classic Editor or adding a Custom HTML block in the Block Editor.
- Classic Editor: Switch to the Text view to directly edit the HTML code of your content. This is useful if you need more control over your formatting or if you want to add custom code (e.g., for embedding external widgets or scripts).
- Block Editor: The Custom HTML block allows you to add raw HTML code to a post or page. This is especially useful for embedding content or applying custom formatting.
Using HTML allows you to create more complex layouts or include third-party widgets, giving you more creative freedom.
Using the Text Editor for Structured Content Layouts in WordPress
Mastering the WordPress text editor is key to creating content that not only looks professional but is also optimized for your audience. Whether you’re using the Classic Editor or the more versatile Block Editor, knowing how to add, edit, and format your content will help you craft polished posts and pages in no time. By mastering these tools and exploring all the features WordPress offers, you can fully leverage the platform to make your website a success.
Want to take your website to the next level? Try Nestify’s free trial hosting today for fast, reliable, and secure WordPress hosting. Get started now and experience top-tier performance for your site!
FAQs on Formatting, Media, and More
Can I customize the text editor in WordPress?
Yes, you can customize the text editor in WordPress by installing plugins that add additional editing features or by using themes that offer custom styling options for the editor interface. Additionally, you can create custom styles for your content using CSS.
Are there keyboard shortcuts available in the text editor?
Yes, there are keyboard shortcuts available in the text editor that can help speed up your workflow. Common shortcuts include Ctrl+B for bold, Ctrl+I for italic, Ctrl+K for adding a hyperlink, Ctrl+Z for undo, and Ctrl+Y for redo.
Is it easy to switch between the visual editor and the HTML editor?
Yes, you can switch between the visual editor (WYSIWYG) and the HTML editor in WordPress. Simply click on the “Visual” or “Text” tab at the top right corner of the editor to toggle between the two modes.
Where can I find extra resources for learning more about WordPress text editing?
Additional resources for learning more about WordPress text editing include the official WordPress documentation, online tutorials, forums such as the WordPress Support Forums, and communities.
