
Have you ever clicked on a link and felt like it was taking forever to load? While short attention spans play a significant role in today’s patience threshold, long loading times could be more attractive to online consumers. Whether staring at a blank screen or watching the hourglass spin endlessly, seconds can feel like an eternity in the digital realm.
But what if there was a way to make those endless loading times more bearable? Enter skeleton screens, a game-changing solution revolutionizing how we experience website load times.
Say goodbye to the dreaded loading spinners and hello to a digital world where every second counts. Skeleton screens are ingenious design elements that serve as placeholders while actual content is loading. Whether you need to load multiple images or simply provide a visual cue of loading progress, skeleton screens emphasize user focus and create a smoother experience.
What Are Skeleton Screens?
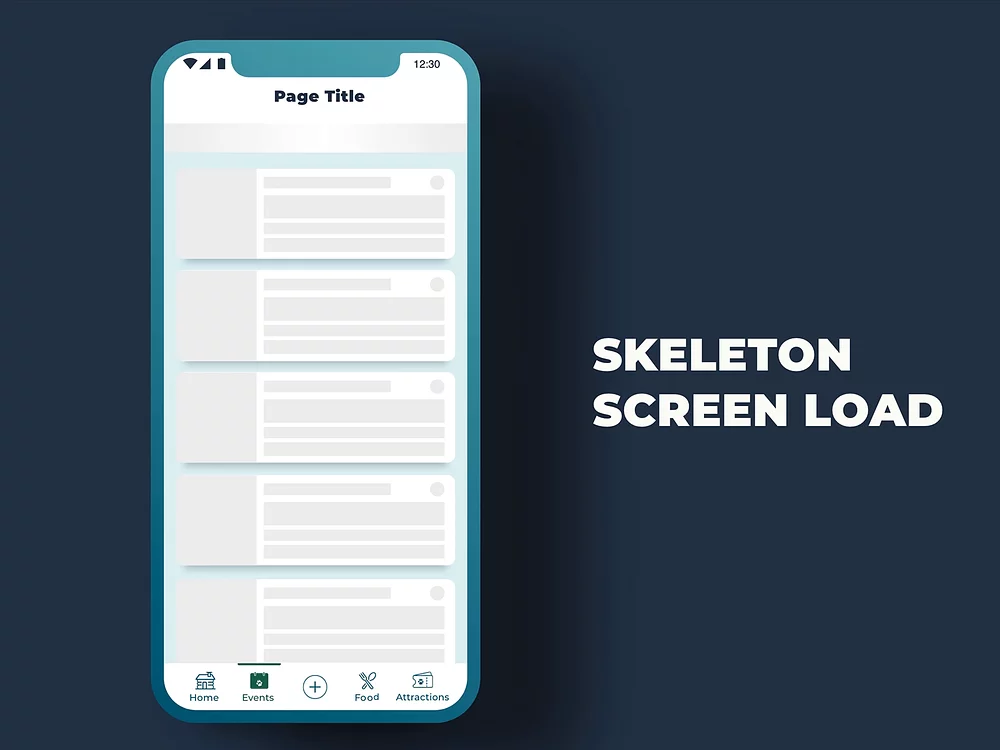
Skeleton screens are visual placeholders that appear while the actual content is loading. Unlike traditional loading spinners or progress bars that simply indicate loading is happening, skeleton screens provide a preview of the page’s layout and structure. These placeholders can be designed to mimic the final layout of the page, including images, text blocks, and other elements, giving users a sense of progress and reducing perceived wait times.
Advantages of Using Skeleton Screens
- Enhanced User Experience: Skeleton screens keep users engaged by previewing the content layout, reducing the frustration associated with waiting.
- Reduced Perceived Load Time: Skeleton screens reduce the wait time by visually indicating that content is on its way.
- Improved Focus and Attention: These placeholders guide users’ focus on where content will appear, helping them anticipate and prepare for incoming information.
- Better Aesthetic Appeal: Skeleton screens offer a more polished and professional look than traditional loading spinners, contributing to a better overall design.
- Seamless Transition: The transition from skeleton screens to actual content is smooth, making the loading process less jarring for users.
The Ultimate Page Speed Optimization Hierarchy: Your Guide to Lightning-Fast Websites
How Skeleton Screens Work and How to Implement Them:
Skeleton screens enhance the user experience by displaying placeholders that mimic the final content while the actual content is being loaded. Here’s a detailed overview of how these and how you can implement them effectively:
1. Markup Structure
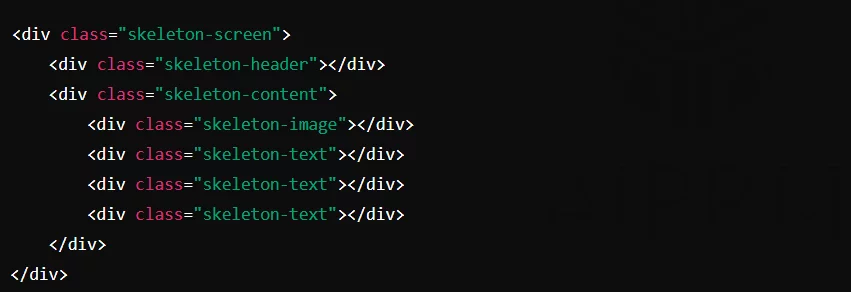
The HTML structure is designed with placeholders representing the actual content. These placeholders are typically empty elements, such as light grey boxes or shapes, that correspond to the layout and structure of the final content. The goal is to create a visual guide that users can follow, making the wait time shorter and less frustrating.
Example HTML:
2. Styling with CSS
Cascading Style Sheets (CSS) style these placeholders to match the final content design. This involves setting the placeholders’ appropriate sizes, shapes, and colors. Typically, a light grey color indicates that the content is loading.
Example CSS:
.skeleton-screen {
display: flex;
flex-direction: column;
gap: 10px;
}
.skeleton-header {
width: 100%;
height: 50px;
background-color: #e0e0e0;
}.skeleton-content {
display: flex;
flex-direction: column;
gap: 10px;
}.skeleton-image {
width: 100%;
height: 200px;
background-color: #e0e0e0;
}.skeleton-text {
width: 100%;
height: 20px;
background-color: #e0e0e0;
}3. Adding Animations with JavaScript

Optionally, JavaScript can add animations or transitions to the skeleton screen elements. This can enhance the user experience by making the placeholders appear more dynamic and engaging. A common technique is to add a shimmer effect to the placeholders, indicating ongoing loading activity.
Example JavaScript for Shimmer Effect:
/* Add this CSS for the shimmer effect */
@keyframes shimmer {
0% { background-position: -1000px 0; }
100% { background-position: 1000px 0; }
}
.skeleton-screen {
position: relative;
overflow: hidden;
background: #e0e0e0;
background-image: linear-gradient(
90deg,
#e0e0e0 0px,
#f0f0f0 40px,
#e0e0e0 80px
);
background-size: 1000px 100%;
animation: shimmer 2s infinite;
}The Truth About Page Loading Animations ⏳
4. Content Loading
In the background, the actual content is fetched from the server. Once the content is available, it replaces the placeholders. This transition can be made smoother by using JavaScript to gradually fade out the skeleton elements and fade in the actual content.
Example JavaScript for Content Loading:
document.addEventListener("DOMContentLoaded", function() {
// Simulate content loading with a delay
setTimeout(function() {
// Fetch content (this would be replaced with actual content fetching logic)
const content = <h1>Actual Header</h1> <div> <img src="image.jpg" alt="Actual Image"> <p>Actual text content goes here.</p> <p>Additional text content goes here.</p> <p>More text content here.</p> </div> ;
// Replace skeleton screen with actual content
const skeletonScreen = document.querySelector('.skeleton-screen');
skeletonScreen.innerHTML = content;
skeletonScreen.classList.remove('skeleton-screen'); // Remove skeleton class to stop animation
}, 2000); // Simulate 2-second load time});
5. Conduct a Website Performance Audit

Start by conducting a thorough performance audit of your website or app. This audit will help you identify the pages or components where loading times are currently a concern. It will also guide you on where such screens can be most effective. Use various online tools to identify performance bottlenecks:
- Google PageSpeed Insights: This tool analyzes the content of your web pages and provides suggestions for making them faster. It gives you insights into mobile and desktop performance.
- Lighthouse: An open-source, automated tool for improving the quality of web pages. It has audits for performance, accessibility, SEO, and more.
- GTmetrix: This tool provides detailed performance reports and recommendations for optimizing your website. It evaluates your site’s speed and gives actionable insights to improve load times.
6. Choose the Right Elements for Skeleton Screens
Skeleton screens are not needed for every element on your webpage. Focus on identifying the content or components with the longest load times or are most critical for the overall user experience.
Here are some common choices for implementing these screens:
- Images: Use skeleton screens to provide placeholders for large images that take time to load. This ensures users see the layout and know images are on the way.
- Videos: For video content, skeleton screens can show a thumbnail or a static placeholder indicating the video is loading.
- Text Blocks: Displaying text placeholders can help users understand the structure of the content, making the wait for actual text less frustrating.
- Interactive Elements: Elements like buttons, forms, or interactive charts can benefit from skeleton screens to indicate where they will appear and are loading.
7. Strategic Implementation
Pick elements strategically to create a sense of progress as they gradually load. Here’s how you can approach this:
- Identify Critical Components: Determine which components are essential for user engagement and satisfaction. These should be prioritized for skeleton screen implementation.
- Analyze Load Times: Use data from your performance audit to find elements with the highest load times. These are prime candidates for skeleton screens.
- Design Placeholder Layouts: Create screen designs that closely mimic the final content layout. This helps users anticipate the content and reduces perceived load times.
- Test and Iterate: After implementing skeleton screens, test their effectiveness in reducing bounce rates and improving user satisfaction. Use feedback and performance data to make necessary adjustments.
Optimize or Bust: Performance Budgets to Stay Ahead in Web Development
8. Integrate with Existing Web Development Frameworks

For seamless implementation of skeleton screens, it’s crucial to integrate them with your existing web development framework. Here’s how to effectively do this:
- Collaborate with Your Development Team: Work closely with your developers to understand the current structure of your website or app. This will help design skeleton screens that fit seamlessly into the existing codebase.
- Implement HTML: Use HTML to create the basic structure of your skeleton screens. This involves setting up placeholders that match the layout of the final content.
- Style with CSS: Style these placeholders using CSS, ensuring they closely resemble the final design. This includes setting dimensions, colors, and other visual properties.
- Add Animations with JavaScript: Enhance the user experience by adding animations or transitions with JavaScript. Animated skeleton screens can indicate ongoing loading activity and shorten the wait time.
Conclusion:
Skeleton screens are an advanced user interface design technique employed to enhance the user experience during content loading. By using placeholders that resemble the layout of the final content, they effectively manage user expectations and improve the overall perception of performance.
FAQs on Skeleton Screens:
Do skeleton screens require additional resources or libraries to implement?
Implementing skeleton screens typically requires front-end development skills and may involve using frameworks or libraries like React Skeleton, Shimmer, or custom CSS solutions. These tools help simplify the creation and customization of skeleton screens.
Can skeleton screens be used for dynamic content that loads asynchronously?
Yes, skeleton screens can be adapted for dynamic content that loads asynchronously, such as content loaded via AJAX or API calls.
