
Developers often find themselves grappling with the arduous task of repeatedly writing code, day in and day out. Crafting program functions that have already been implemented in various projects can be time-consuming and demanding. Most developers would prefer to channel their energy into creating new business functions rather than reproducing the same HTML and CSS code repeatedly.
Fortunately, Laravel offers a straightforward solution for constructing extensive applications while seamlessly integrating various packages and external libraries. Additionally, it boasts an array of pre-built Laravel admin panels designed to simplify the management of complex applications with just a few clicks.
The market is teeming with advanced Laravel admin dashboards that empower developers to work with pre-fabricated functions, effectively liberating them from the wearisome cycle of repetitive coding.
So, In this article, we’ll learn how to build a complex Bootstrap frontend using Laravel’s admin panel.
How Laravel Admin Panel Dashboard Simplifies the Development Process
By harnessing the power of a Laravel admin panel, developers can eliminate the bulk of manual programming tasks through the inclusion of pre-designed dashboard functions. This affords them the opportunity to concentrate on essential core functionalities, unburdened by the demands of extensive coding. These Laravel admin dashboards bestow remarkable flexibility by enabling the seamless integration of multiple ecommerce templates, packages, libraries, and other utilities.
For those who have an affinity for Bootstrap, there’s a plethora of Bootstrap-based admin panels available in the market. These panels are highly customizable and effortlessly integratable with Laravel. With these tools at their disposal, developers can construct interactive front-ends without drowning in a sea of code. Consequently, developers can effectively manage and simplify their workload without the need for additional effort.
Requirements before we start
Before diving into the integration process, ensure that you have Laravel installed on a web server. The following setup is required:
- PHP 7.1
- MySQL
- Laravel
Every Code Is Different, but the Method of Doing Is the Same
While it may seem that each piece of code is unique, the underlying method of achieving efficiency remains consistent. Laravel and Bootstrap, when combined, showcase this synergy.
Developers may find themselves writing different code for various functions, yet the fundamental approach of leveraging pre-built solutions remains constant.
This consistent method empowers developers to work smarter, not harder, focusing on innovation rather than reinventing the wheel.
Admin Panel Files Setup
To incorporate an admin panel into Laravel, begin by copying and pasting all CSS and JS files/folders into the vendor folder. Subsequently, reference these files in the app.blade.php file.
<script src="{{ asset('js/app.js') }}" defer></script>

<!-- Fonts -->

<link rel="dns-prefetch" href="//fonts.gstatic.com">

<link href="https://fonts.googleapis.com/css?family=Nunito" rel="stylesheet" type="text/css">

<!-- Styles -->

<link href="{{ asset('css/app.css') }}" rel="stylesheet">

<link href="{{ asset('css/font-awesome/css/font-awesome.min.css') }}" rel="stylesheet">

<!-- Page level plugin CSS-->

<link href="{{ asset('css/sb-admin.css') }}" rel="stylesheet">

<link href="{{ asset('css/datatables/dataTables.bootstrap4.css') }}" rel="stylesheet">

<!-- Custom styles for this template -->

<link href="{{ asset('css/sb-admin-2.css') }}" rel="stylesheet">
Registration Form Setup
The registration form serves as a pivotal point for user interaction within a web application. Hence, it’s essential to craft an appealing and user-friendly design. Laravel facilitates this process by providing a predefined login and registration interface with predefined form fields. To implement a login and registration layer in your application, execute the following command.
Should you find the default Laravel registration form unsuitable, you have the option to integrate a pre-built Laravel dashboard registration form. To achieve this, insert the following code:
<!DOCTYPE html>

<html lang="en">

<head>

  <meta charset="utf-8">

  <meta http-equiv="X-UA-Compatible" content="IE=edge">

  <meta name="viewport" content="width=device-width, initial-scale=1, shrink-to-fit=no">

  <meta name="description" content="">

  <meta name="author" content="">

  <title>SB Admin - Start Bootstrap Template</title>

  <!-- Bootstrap core CSS-->

  <link href="vendor/bootstrap/css/bootstrap.min.css" rel="stylesheet">

  <!-- Custom fonts for this template-->

  <link href="vendor/font-awesome/css/font-awesome.min.css" rel="stylesheet" type="text/css">

  <!-- Custom styles for this template-->

  <link href="css/sb-admin.css" rel="stylesheet">

</head>

<body class="bg-dark">

  <div class="container">

    <div class="card card-register mx-auto mt-5">

      <div class="card-header">Register an Account</div>

      <div class="card-body">

        <form action="register.php" method="post">

          <div class="form-group">

            <div class="form-row">

              <div class="col-md-6">

                <label for="exampleInputName">First name</label>

                <input type="text" class="form-control" id="exampleInputName" name="first_name" placeholder="Enter first name">

              </div>

              <div class="col-md-6">

                <label for="exampleInputLastName">Last name</label>

                <input type="text" class="form-control" id="exampleInputLastName" name="last_name" placeholder="Enter last name">

              </div>

            </div>

          </div>

          <div class="form-group">

            <label for="exampleInputEmail1">Email address</label>

            <input type="email" class="form-control" id="exampleInputEmail1" name="email" aria-describedby="emailHelp" placeholder="Enter email">

          </div>

          <div class="form-group">

            <div class="form-row">

              <div class="col-md-6">

                <label for="exampleInputPassword1">Password</label>

                <input type="password" class="form-control" id="exampleInputPassword1" name="password" placeholder="Password">

              </div>

              <div class="col-md-6">

                <label for="exampleConfirmPassword">Confirm password</label>

                <input type="password" class="form-control" id="exampleConfirmPassword" name="confirm_password" placeholder="Confirm password">

              </div>

            </div>

          </div>

          <button type="submit" class="btn btn-primary btn-block">Register</button>

        </form>

        <div class="text-center">

          <a class="d-block small mt-3" href="login.html">Login Page</a>

          <a class="d-block small" href="forgot-password.html">Forgot Password?</a>

        </div>

      </div>

    </div>

  </div>

  <!-- Bootstrap core JavaScript-->

  <script src="vendor/jquery/jquery.min.js"></script>

  <script src="vendor/bootstrap/js/bootstrap.bundle.min.js"></script>

  <!-- Core plugin JavaScript-->

  <script src="vendor/jquery-easing/jquery.easing.min.js"></script>

</body>

</html>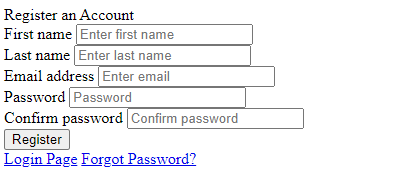
Setup of Login Form
Similar to the registration form, the login form must be intuitive and user-friendly, guiding users through a straightforward login process. Fortunately, the admin dashboard furnishes a simple login form that allows users to access the system with their registered email and password.
If you prefer to revert to Laravel’s default form code for the login form, simply insert the following code in the login.blade.php file.
@extends('layouts.app')

@section('content')

<div class="container">

    <div class="row justify-content-center">

        <div class="col-md-8">

            <div class="card">

                <div class="card-header">{{ __('Login') }}</div>

                <div class="card-body">

                    <form method="POST" action="{{ route('login') }}">

                        @csrf

                        <div class="form-group row">

                            <label for="email" class="col-md-4 col-form-label text-md-right">{{ __('E-Mail Address') }}</label>

                            <div class="col-md-6">

                                <input id="email" type="email" class="form-control{{ $errors->has('email') ? ' is-invalid' : '' }}" name="email" value="{{ old('email') }}" required autofocus>

                                @if ($errors->has('email'))

                                <span class="invalid-feedback" role="alert">

                                    <strong>{{ $errors->first('email') }}</strong>

                                </span>

                                @endif

                            </div>

                        </div>

                        <div class="form-group row">

                            <label for="password" class="col-md-4 col-form-label text-md-right">{{ __('Password') }}</label>

                            <div class="col-md-6">

                                <input id="password" type="password" class="form-control{{ $errors->has('password') ? ' is-invalid' : '' }}" name="password" required>

                                @if ($errors->has('password'))

                                <span class="invalid-feedback" role="alert">

                                    <strong>{{ $errors->first('password') }}</strong>

                                </span>

                                @endif

                            </div>

                        </div>

                        <div class="form-group row">

                            <div class="col-md-6 offset-md-4">

                                <div class="form-check">

                                    <input class="form-check-input" type="checkbox" name="remember" id="remember" {{ old('remember') ? 'checked' : '' }}>

                                    <label class="form-check-label" for="remember">

                                        {{ __('Remember Me') }}

                                    </label>

                                </div>

                            </div>

                        </div>

                        <div class="form-group row mb-0">

                            <div class="col-md-8 offset-md-4">

                                <button type="submit" class="btn btn-primary">

                                    {{ __('Login') }}

                                </button>

                                @if (Route::has('password.request'))

                                <a class="btn btn-link" href="{{ route('password.request') }}">

                                    {{ __('Forgot Your Password?') }}

                                </a>

                                @endif

                            </div>

                        </div>

                    </form>

                </div>

            </div>

        </div>

    </div>

</div>

@endsection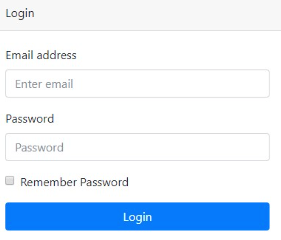
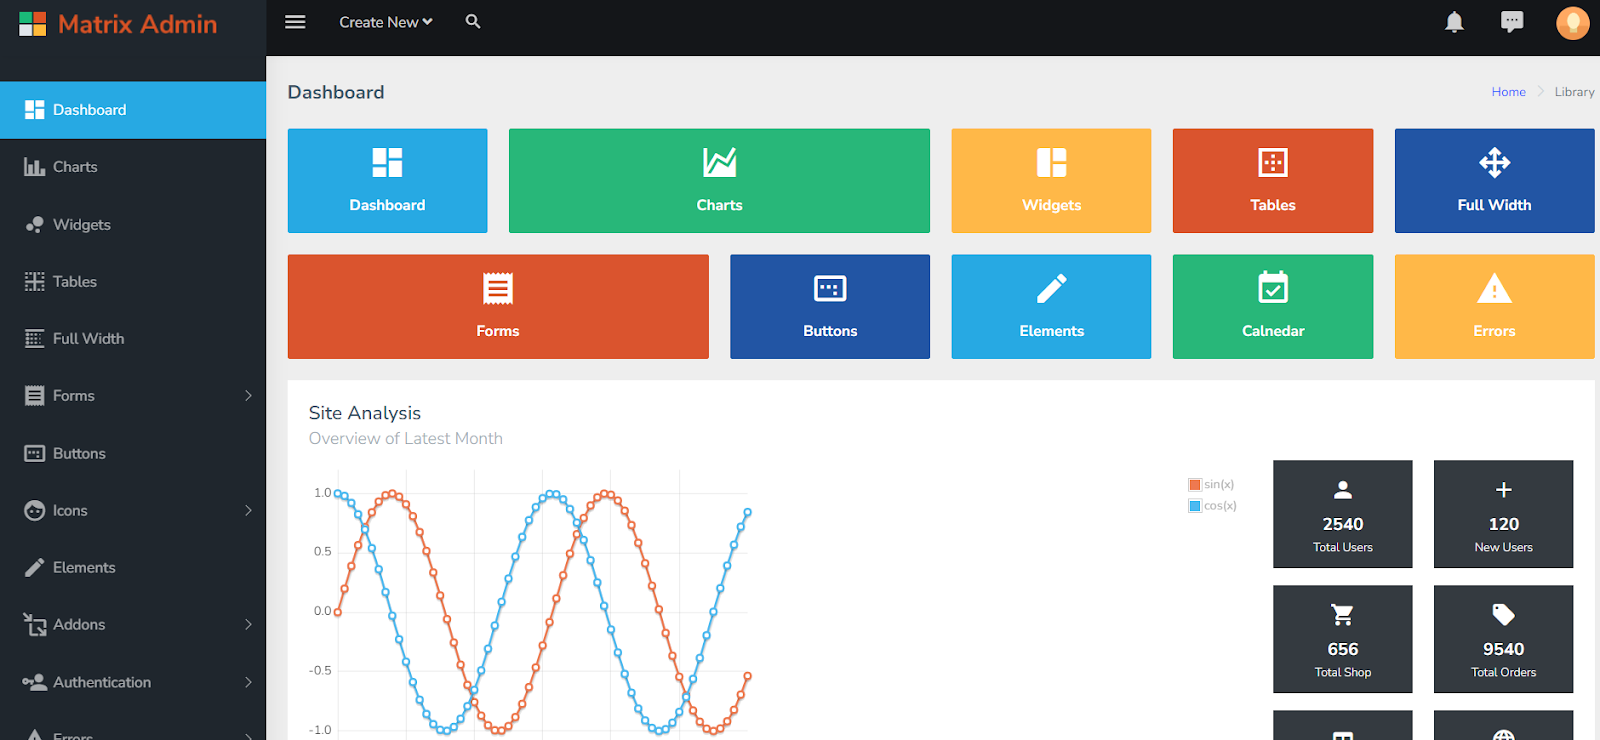
Home Page
Navigating the Bootstrap dashboard is a breeze, offering an array of options such as Charts, Tables, Components, Menu Levels, and more, making it accessible even to beginners.
To obtain the dashboard’s view, insert the following admin panel index.html code into the home.blade.php file.

Code:
<?php

namespace Database\Seeders;

use Illuminate\Database\Seeder;

use App\Models\User;

class DatabaseSeeder extends Seeder

{

    /**

     * Seed the application's database.

     *

     * @return void

     */

    public function run()

    {

         User::factory()->create([

            'name' => 'Admin',

            'email' => '[email protected]',

            'password' => ('secret')

        ]);

    }

}
You can download this here for free – Laravel Admin Panel
Design Migrations
The supplied PHP code constitutes a Laravel migration responsible for generating a “users” table within a database. This specific table serves as a foundational component for handling user management within the application, encompassing a variety of columns aimed at storing crucial user data like their name, email, phone number, location, and additional pertinent details. It’s essential to emphasize that Laravel migrations offer a seamless and organized approach to constructing and overseeing database tables within web applications.
<?php

use Illuminate\Database\Migrations\Migration;

use Illuminate\Database\Schema\Blueprint;

use Illuminate\Support\Facades\Schema;

class CreateUsersTable extends Migration

{

    /**

     * Run the migrations.

     *

     * @return void

     */

    public function up()

    {

        Schema::create('users', function (Blueprint $table) {

            $table->id();

            $table->string('name');

            $table->string('email')->unique();

            $table->timestamp('email_verified_at')->nullable();

            $table->string('phone')->nullable();

            $table->string('location')->nullable();

            $table->text('about')->nullable();

            $table->string('password');

            $table->rememberToken();

            $table->timestamps();

        });

    }

    /**

     * Reverse the migrations.

     *

     * @return void

     */

    public function down()

    {

        Schema::dropIfExists('users');

    }

}
Product migration
This PHP script serves the purpose of establishing a database table known as “products” within a Laravel application. Within this table, you will find a collection of columns designated to capture diverse product particulars such as the brand name, category, pricing details, and quantity on hand. Additionally, the table incorporates timestamps that signify when each record was initially created and subsequently modified. This script plays a pivotal role in the efficient management and storage of comprehensive product information within the database.
<?php

use Illuminate\Support\Facades\Schema;

use Illuminate\Database\Schema\Blueprint;

use Illuminate\Database\Migrations\Migration;

class CreateProductsTable extends Migration

{

    /**

     * Run the migrations.

     *

     * @return void

     */

    public function up()

    {

        Schema::create('products', function (Blueprint $table) {

            $table->increments('id');

            $table->string('brand_name')->nullable();

            $table->string('generic_name')->nullable();

            $table->string('category')->nullable();

            $table->string('receive_date')->nullable();

            $table->string('exp_date')->nullable();

            $table->double('orginal_price')->nullable();

            $table->double('sell_price')->nullable();

            $table->integer('quantity')->nullable();

            $table->integer('quantity_left')->nullable();

            $table->double('total')->nullable();

            $table->timestamps();

        });

    }

    /**

     * Reverse the migrations.

     *

     * @return void

     */

    public function down()

    {

        Schema::dropIfExists('products');

    }

}
Sales Migration
The given PHP code represents a Laravel migration script that serves to define a database table named `sales`. This table is designed to store a variety of sales-related information, including user and product IDs, prices, quantities, and timestamps. Furthermore, the code establishes crucial foreign key relationships with the `users` and `products` tables while also configuring cascading deletes and updates for these relationships. To create this table in your Laravel project, you can simply execute the `php artisan migrate` command.
<?php

use Illuminate\Support\Facades\Schema;

use Illuminate\Database\Schema\Blueprint;

use Illuminate\Database\Migrations\Migration;

class CreateSalesTable extends Migration

{

    /**

     * Run the migrations.

     *

     * @return void

     */

    public function up()

    {

        Schema::create('sales', function (Blueprint $table) {

            $table->increments('id');

            $table->integer('user_id')->unsigned();

            $table->foreign('user_id')->references('id')->on('users')->onUpdate('cascade')->onDelete('cascade');

            $table->integer('product_id')->unsigned();

            $table->foreign('product_id')->references('id')->on('products')->onUpdate('cascade')->onDelete('cascade');

            $table->string('brand_name')->nullable();

            $table->string('generic_name')->nullable();

            $table->string('category')->nullable();

            $table->double('orginal_price')->nullable();

            $table->double('sell_price')->nullable();

            $table->integer('quantity')->nullable();

            $table->double('profit')->nullable();

            $table->double('total')->nullable();

            $table->timestamps();

        });

    }

    /**

     * Reverse the migrations.

     *

     * @return void

     */

    public function down()

    {

        Schema::dropIfExists('sales');

    }

}
To migrate every migration into the database after they have all been created, enter the following command.
Php artisan make:migrate
View the product page
Right now, make a brand-new ‘product‘ folder in the Laravel views folder. A new index.blade.php file should also be created, and it should include the following code:
@extends('layouts.app')
@section('content')
<div class="main-grid">
<div class="agile-grids">
<div class="table-heading">
<h2>{{--{!! $user->name !!}'s--}} Point Of Sale Products</h2>
</div>
<div class="row">
<div class="col-md-8">
<p>Total Number of Products: <strong>{{$num}}</strong></p>
</div>
<div class="col-md-4">
<a class="btn btn-primary" type="submit" data-toggle="modal" data-target="#myModalProduct">+ Add Product</a>
</div>
</div>
<!-- Modal: Add Product -->
<div id="myModalProduct" class="modal fade" role="dialog">
<div class="modal-dialog">
<div class="modal-content">
<div class="modal-header">
<button type="button" class="close" data-dismiss="modal">×</button>
<h3 class="modal-title">Add Product</h3><br>
</div>
<div class="modal-body">
<form class="form-horizontal" method="POST" action="product">
{{csrf_field()}}
<!-- Form input fields here -->
<!-- Example:
<div class="form-group">
<label for="brand_name" class="col-sm-2 control-label">Brand Name</label>
<div class="col-sm-9">
<input type="text" name="brand_name" class="form-control" id="brand_name" placeholder="Enter Brand Name" required>
</div>
</div>
-->
<br>
<input class="btn btn-primary" type="submit" value="Submit">
</form>
</div>
<div class="modal-footer">
<button type="button" class="btn btn-hover btn-primary btn-sm" data-dismiss="modal">Close</button>
</div>
</div>
</div>
</div>
<!-- End: Modal Add Product -->
<hr>
<div class="well">
<div class="w3l-table-info">
<table id="customer" class="table">
<thead>
<tr>
<th class="text-center">ID</th>
<th class="text-center">Brand Name</th>
<th class="text-center">Generic Name</th>
<th class="text-center"><p>Category/Description</p></th>
<th class="text-center">Date Received</th>
<th class="text-center">Expiry Date</th>
<th class="text-center">Original Price</th>
<th class="text-center">Selling Price</th>
<th class="text-center">Qty</th>
<th class="text-center">Qty Left</th>
<th class="text-center">Total</th>
<th class="text-center">Action</th>
</tr>
</thead>
<tbody>
@foreach($products as $product)
<tr>
<td class="text-center"><strong>{!! $product->id !!}</strong></td>
<td class="text-center"><strong>{!! $product->brand_name !!}</strong></td>
<td class="text-center"><strong>{!! $product->generic_name !!}</strong></td>
<td class="text-center"><strong>{!! $product->category !!}</strong></td>
<td class="text-center"><strong>{!! $product->receive_date !!}</strong></td>
<td class="text-center"><strong>{!! $product->exp_date !!}</strong></td>
<td class="text-center"><strong>{!! $product->orginal_price !!}</strong></td>
<td class="text-center"><strong>{!! $product->sell_price !!}</strong></td>
<td class="text-center"><strong>{!! $product->quantity !!}</strong></td>
<td class="text-center"><strong>{!! $product->quantity_left !!}</strong></td>
<td class="text-center"><strong>{!! $product->total !!}</strong></td>
<td class="text-center">
<div class="row">
<div class="col-md-6">
<a class="btn btn-success" href="{!! route('product.update', $product->id) !!}">Update</a>
</div>
<div class="col-md-6">
<a class="btn btn-danger" data-toggle="modal" data-target="#deleteProduct{{$product->id}}">Delete</a>
</div>
</div>
</td>
</tr>
<!-- Modal: Delete Product -->
<div id="deleteProduct{{$product->id}}" class="modal fade" role="dialog">
<div class="modal-dialog">
<div class="modal-content">
<div class="modal-header">
<button type="button" class="close" data-dismiss="modal">×</button>
<h3 class="modal-title">Delete Product Confirmation</h3><br>
</div>
<div class="modal-body">
<p>Are you sure you want to delete this product?</p>
<form class="form-horizontal" method="get" action="/product/delete/{{$product->id}}">
{{csrf_field()}}
<br>
<div class="row">
<div class="col-md-9">
<button type="button" class="btn btn-hover btn-primary btn-sm" data-dismiss="modal">Cancel</button>
</div>
<div class="col-md-3">
<input class="btn btn btn-hover btn-danger btn-sm" type="submit" value="Yes, Delete">
</div>
</div>
</form>
</div>
</div>
</div>
</div>
<!-- End: Modal Delete Product -->
@endforeach
</tbody>
</table>
</div>
</div>
</div>
</div>
@endsectionSame method is gone for Delete products, sales page and other useful pages to create a Laravel admin page.
Update the product
Simply create a new update.blade.php file and enter the following code there if you want to update the product data.
<div class=”main-grid”>
<div class=”agile-grids”>
<div class=”table-heading”>
<h2>Add Product</h2>
</div>
<!– Form Start –>
<div class=”panel panel-widget forms-panel”>
<div class=”forms”>
<div class=”form-grids form-grids-right”>
<div class=”widget-shadow” data-example-id=”basic-forms”>
<div class=”form-title”>
<h4 class=”text-center”>Add Product Information:</h4>
</div>
<div class=”form-body”>
<form class=”form-horizontal” method=”POST” action=”{!! route(‘product.edit’,$product->id) !!}” id=””>
{{ csrf_field() }}
<div class=”form-group”>
<label for=”brandName” class=”col-sm-2 control-label”>Brand Name</label>
<div class=”col-sm-9″>
<input type=”text” name=”brand_name” class=”form-control” id=”brandName” value=”{{ $product->brand_name }}” required>
</div>
</div>
<div class=”form-group”>
<label for=”genericName” class=”col-sm-2 control-label”>Generic Name</label>
<div class=”col-sm-9″>
<input type=”text” name=”generic_name” class=”form-control” id=”genericName” value=”{{ $product->generic_name }}” required>
</div>
</div>
<div class=”form-group”>
<label for=”category” class=”col-sm-2 control-label”>Category</label>
<div class=”col-sm-9″>
<input type=”text” name=”category” class=”form-control” id=”category” value=”{{ $product->category }}” required>
</div>
</div>
<div class=”form-group”>
<label for=”arrivalDate” class=”col-sm-2 control-label”>Arrival Date</label>
<div class=”col-sm-9″>
<input id=”arrivalDate” type=”date” class=”form-control” name=”receive_date” value=”{{ $product->receive_date }}” required>
</div>
</div>
<div class=”form-group”>
<label for=”expDate” class=”col-sm-2 control-label”>Exp Date</label>
<div class=”col-sm-9″>
<input id=”expDate” type=”date” class=”form-control” name=”exp_date” value=”{{ $product->exp_date }}” required>
</div>
</div>
<div class=”form-group”>
<label for=”originalPrice” class=”col-sm-2 control-label”>Original Price</label>
<div class=”col-sm-9″>
<input type=”number” name=”original_price” class=”form-control” id=”originalPrice” value=”{{ $product->original_price }}” required>
</div>
</div>
<div class=”form-group”>
<label for=”sellingPrice” class=”col-sm-2 control-label”>Selling Price</label>
<div class=”col-sm-9″>
<input type=”number” name=”sell_price” class=”form-control” id=”sellingPrice” value=”{{ $product->sell_price }}” required>
</div>
</div>
<div class=”form-group”>
<label for=”quantity” class=”col-sm-2 control-label”>Quantity</label>
<div class=”col-sm-9″>
<input type=”number” name=”quantity” class=”form-control” id=”quantity” value=”{{ $product->quantity }}” required>
</div>
</div>
<br>
<input class=”btn btn-primary” type=”submit” value=”Update”>
</form>
</div>
</div>
</div>
</div>
</div>
</div>
</div>
Delete Product
To delete a specific product, click DELETE. The following dialogue will then show. Its source code is located in the aforementioned index.blade.php file.
Sales Page
On to the sales page now. In the Laravel view, create a sales folder, and then add an index.blade file to it. Now enter the code below into it.
<div class="form-body">
<form class="form-horizontal" method="POST" action="{{ route('product.order') }}">
{{ csrf_field() }}
<div class="form-group">
<div class="col-sm-7">
<select id="inputState" class="form-control" name="product">
@foreach($products as $product)
<option value="{{$product->id}}">{{$product->brand_name}}</option>
@endforeach
</select>
</div>
<div class="col-md-2">
<input type="number" name="quantity" class="form-control" id="quantity" placeholder="Quantity" required>
</div>
<div class="col-md-1"></div>
<div class="col-md-2">
<button class="btn btn-primary" type="submit"><strong>+</strong> Add To Cart</button>
</div>
</div>
</form>
</div>
<div class="well">
<div class="w3l-table-info">
<table id="customer" class="table">
<thead>
<tr>
<th class="text-center">Product Name</th>
<th class="text-center">Generic Name</th>
<th class="text-center">Category/Description</th>
<th class="text-center">Price</th>
<th class="text-center">Quantity</th>
<th class="text-center">Amount</th>
<th class="text-center">Profit</th>
<th class="text-center">Action</th>
</tr>
</thead>
<tbody>
@foreach(\Cart::content() as $sale)
<tr>
<td class="text-center"><strong>{!! $sale->name !!}</strong></td>
<td class="text-center"><strong>{!! $sale->options->generic_name !!}</strong></td>
<td class="text-center"><strong>{!! $sale->options->category !!}</strong></td>
<td class="text-center"><strong>{!! $sale->price !!}</strong></td>
<td class="text-center"><strong>{!! $sale->qty !!}</strong></td>
<td class="text-center"><strong>{!! $sale->subtotal !!}</strong></td>
<td class="text-center"><strong>{!! $sale->options->profit !!}</strong></td>
<td class="text-center">
<a class="btn btn-danger" href="{{ route('product.remove',$sale->rowId) }}">Cancel</a>
</td>
</tr>
@endforeach
</tbody>
</table>
<div class="row">
<div class="col-md-7">
</div>
<div class="col-md-5">
<h3>Total amount: {{ \Cart::subtotal() }}</h3>
</div>
</div>
</div>
<br>
<button class="btn btn-primary" type="submit" data-toggle="modal" data-target="#myModal_product">Save</button>
<!-- Begin: Modal Add product -->
<div id="myModal_product" class="modal fade" role="dialog">
<div class="modal-dialog">
<div class="modal-content">
<center>
<div class="modal-header">
<div class="row">
<div class="col-md-11">
<h3 class="modal-title">Cash</h3>
</div>
<div class="col-md-1">
<button type="button" class="close" data-dismiss="modal">×</button>
</div>
</div>
</div>
</center>
<div class="modal-body">
<form class="form-horizontal" method="POST" action="/Point-Of-Sale-master/public/payment">
{{ csrf_field() }}
<div class="form-group">
<label for="customerName" class="col-sm-2 control-label">Customer Name</label>
<div class="col-sm-9">
<input type="text" name="name" class="form-control" id="customerName" placeholder="Enter Customer Name" required>
</div>
</div>
<div class="form-group">
<label for="cashAmount" class="col-sm-2 control-label">Cash Amount</label>
<div class="col-sm-9">
<input type="number" name="cash" class="form-control" id="cashAmount" placeholder="100" required>
</div>
</div>
<br>
<input class="btn btn-primary" type="submit" value="Save">
</form>
</div>
</div>
</div>
</div>
</div>
Next, make a file called sale.blade.php and paste the content below into it.
<div class="form-body">
<form class="form-horizontal" method="POST" action="{{ route('product.order') }}">
{{ csrf_field() }}
<div class="form-group">
<div class="col-sm-7">
<select id="inputState" class="form-control" name="product">
@foreach($products as $product)
<option value="{{$product->id}}">{{$product->brand_name}}</option>
@endforeach
</select>
</div>
<div class="col-md-2">
<input type="number" name="quantity" class="form-control" id="quantity" placeholder="QTY" required>
</div>
<div class="col-md-1"></div>
<div class="col-md-2">
<button class="btn btn-primary" type="submit"><strong>+</strong> Add To Cart</button>
</div>
</div>
</form>
</div>
<div class="well">
<div class="w3l-table-info">
<table id="customer" class="table">
<thead>
<tr>
{{--<th class="text-center">ID</th>--}}
<th class="text-center">Product Name</th>
<th class="text-center">Generic Name</th>
<th class="text-center"><p>Category/Description</p></th>
<th class="text-center">Price</th>
<th class="text-center">QTY</th>
<th class="text-center">Amount</th>
<th class="text-center">Profit</th>
<th class="text-center">Action</th>
</tr>
</thead>
<tbody>
@foreach(\Cart::content() as $sale)
<tr>
<td class="text-center"><strong>{!! $sale->name !!}</strong></td>
<td class="text-center"><strong>{!! $sale->options->generic_name !!}</strong></td>
<td class="text-center"><strong>{!! $sale->options->category !!}</strong></td>
<td class="text-center"><strong>{!! $sale->price !!}</strong></td>
<td class="text-center"><strong>{!! $sale->qty !!}</strong></td>
<td class="text-center"><strong>{!! $sale->subtotal !!}</strong></td>
<td class="text-center"><strong>{!! $sale->options->profit !!}</strong></td>
<td class="text-center">
<a class="btn btn-danger" href="{{ route('product.remove',$sale->rowId) }}">Cancel</a>
</td>
</tr>
@endforeach
</tbody>
</table>
<div class="row">
<div class="col-md-7">
</div>
<div class="col-md-5">
<h3>Total amount: {{ \Cart::subtotal() }}</h3>
</div>
</div>
</div>
<br>
<button class="btn btn-primary" type="submit" data-toggle="modal" data-target="#myModal_product">Save</button>
<!-- Begin: Modal Add product -->
<div id="myModal_product" class="modal fade" role="dialog">
<div class="modal-dialog">
<div class="modal-content">
<center>
<div class="modal-header">
<div class="row">
<div class="col-md-11">
<h3 class="modal-title">Cash</h3>
</div>
<div class="col-md-1">
<button type="button" class="close" data-dismiss="modal">×</button>
</div>
</div>
</div>
</center>
<div class="modal-body">
<form class="form-horizontal" method="POST" action="/Point-Of-Sale-master/public/payment">
{{ csrf_field() }}
<div class="form-group">
<label for="customerName" class="col-sm-2 control-label">Customer Name</label>
<div class="col-sm-9">
<input type="text" name="name" class="form-control" id="customerName" placeholder="Enter Customer Name" required>
</div>
</div>
<div class="form-group">
<label for="cashAmount" class="col-sm-2 control-label">Cash Amount</label>
<div class="col-sm-9">
<input type="number" name="cash" class="form-control" id="cashAmount" placeholder="100" required>
</div>
</div>
<br>
<input class="btn btn-primary" type="submit" value="Save">
</form>
</div>
</div>
</div>
</div>
</div>Web Routes
Let’s construct some web routes now by writing the provided code.
- // Product Routes
Route::group(['middleware' => 'auth'], function () {

    Route::get('/product', [

        'as'   => 'product.index',

        'uses' => 'ProductController@index',

    ]);

    Route::post('/product', [

        'as'   => 'product.store',

        'uses' => 'ProductController@store',

    ]);

    Route::get('/update/product/{id}', [

        'as'   => 'product.update',

        'uses' => 'ProductController@update',

    ]);

    Route::post('/update/product/{id}', [

        'as'   => 'product.edit',

        'uses' => 'ProductController@edit',

    ]);

    Route::get('/product/delete/{id}', [

        'as'   => 'product.delete',

        'uses' => 'ProductController@destroy',

    ]);

});- // Sell Routes
Route::group(['middleware' => 'auth'], function () {

    Route::get('/sales', [

        'as'   => 'sales.index',

        'uses' => 'SaleController@index',

    ]);

    Route::post('/cart', [

        'as'   => 'sale.store',

        'uses' => 'SaleController@store',

    ]);

    Route::get('/update/sale/{id}', [

        'as'   => 'sale.update',

        'uses' => 'SaleController@update',

    ]);

    Route::post('/sale/delete/{id}', [

        'as'   => 'sale.delete',

        'uses' => 'SaleController@destroy',

    ]);

    Route::get('/product/delete/{id}', [

        'as'   => 'product.delete',

        'uses' => 'ProductController@destroy',

    ]);

});
Product Controller
Let’s move on to the controller section after constructing the routes and views. Using the Artisan command, create a controller with the name productController and enter the following code.
<?php

namespace App\Http\Controllers;

use Illuminate\Http\Request;

use Auth;

use App\Product;

class ProductController extends Controller

{

    public function index()

    {

        $user = Auth::user();

        $num = Product::count();

        $products = Product::all();

        return view('product.index', compact('user', 'num', 'products'))->with('title', 'Products');

    }

    public function update($id)

    {

        $user = Auth::user();

        $product = Product::find($id);

        return view('product.update', compact('user', 'product'))->with('title', 'Edit Product');

    }

    public function store(Request $request)

    {

        $this->validate(request(), [

            'brand_name' => 'required',

            'generic_name' => 'required',

            'category' => 'required',

            'receive_date' => 'required',

            'exp_date' => 'required',

            'orginal_price' => 'required',

            'sell_price' => 'required',

            'quantity' => 'required',

        ]);

        $product = new Product();

        $product->brand_name = request('brand_name');

        $product->generic_name = request('generic_name');

        $product->category = request('category');

        $product->receive_date = request('receive_date');

        $product->exp_date = request('exp_date');

        $product->orginal_price = request('orginal_price');

        $product->sell_price = request('sell_price');

        $product->quantity = request('quantity');

        $product->quantity_left = request('quantity');

        $sell = $product->sell_price;

        $left = $product->quantity_left;

        $product->total = $sell  $left;

        $product->save();

        $notification = [

            'message' => 'Product is added successfully!',

            'alert-type' => 'success',

        ];

        return redirect('/product')->with($notification);

    }

    public function edit(Request $request, $id)

    {

        $this->validate(request(), [

            'brand_name' => 'required',

            'generic_name' => 'required',

            'category' => 'required',

            'receive_date' => 'required',

            'exp_date' => 'required',

            'orginal_price' => 'required',

            'sell_price' => 'required',

            'quantity' => 'required',

        ]);

        $data = [

            'brand_name' => $request->input('brand_name'),

            'generic_name' => $request->input('generic_name'),

            'category' => $request->input('category'),

            'receive_date' => $request->input('receive_date'),

            'exp_date' => $request->input('exp_date'),

            'orginal_price' => $request->input('orginal_price'),

            'sell_price' => $request->input('sell_price'),

            'quantity' => $request->input('quantity'),

            'quantity_left' => $request->input('quantity'),

        ];

        Product::where('id', $id)->update($data);

        $notification = [

            'message' => 'Product is updated successfully!',

            'alert-type' => 'success',

        ];

        return redirect('/product')->with($notification);

    }

    public function destroy($id)

    {

        Product::where('id', $id)->delete($id);

        $notification = [

            'message' => 'Product Deleted Successfully!',

            'alert-type' => 'info',

        ];

        return redirect('/product')->with($notification);

    }

}
Sale Controller
<?php

namespace App\Http\Controllers;

use Illuminate\Http\Request;

use Auth;

use App\Product;

use App\Sale;

class SaleController extends Controller

{

    public function index()

    {

        $user = Auth::user();

        $products = Product::all();

        return view('sale.index', compact('user', 'products'))->with('title', 'Sales');

    }

    public function store(Request $request)

    {

        $user = Auth::user();

        $products = Product::all();

        $id = $request->input('product');

        $qty = $request->input('quantity');

        $product = Product::find($id);

        $sale = new Sale();

        $sale->product_id = $id;

        $sale->user_id = $user->id;

        $sale->brand_name = $product->brand_name;

        $sale->generic_name = $product->generic_name;

        $sale->category = $product->category;

        $sale->orginal_price = $product->orginal_price;

        $sale->sell_price = $product->sell_price;

        $sale->quantity = $qty;

        $real_price = $sale->orginal_price;

        $real_qty_price = $real_price  $qty;

        $sell_price = $product->sell_price;

        $total = $sell_price  $qty;

        $sale->total = $total;

        $profit = $total - $real_qty_price;

        $sale->profit = $profit;

        $sale->save();

        return view('sale.sale', compact('user', 'products', 'sale'))->with('title', 'Sales');

    }

    public function destroy($id)

    {

        Sale::where('id', $id)->delete($id);

        $notification = [

            'message' => 'Sale Product Deleted Successfully!',

            'alert-type' => 'info',

        ];

        return redirect('/sales')->with($notification);

    }

}
Product.php (Model):
This code defines a “Product” model class in a Laravel web application. It’s a blueprint for interacting with a “products” database table, using Laravel’s Eloquent ORM. You can customize it to add specific functionality for managing product data.
<?php

namespace App;

use Illuminate\Database\Eloquent\Model;

class Product extends Model

{

    //

}
Sale.php (Model):
The supplied PHP code defines a “Sale” class within a Laravel web application. This class serves as a bridge to interface with a database table responsible for housing sales-related data. To streamline database interactions, the code employs Laravel’s Eloquent ORM. However, it’s essential to note that the provided code is a shell, and it necessitates further modification to function effectively with a designated database table and its associated data.
<?php

namespace App;

use Illuminate\Database\Eloquent\Model;

class Sale extends Model

{

    //

}
Conclusion
We have explored the process of building an advanced Bootstrap frontend for your Laravel application, complemented by a feature-rich Laravel Admin Panel. By combining these powerful tools, you can create visually stunning web applications with a robust backend, offering both form and function.
Remember that this is just a basic example, and the possibilities are limitless when it comes to designing and customizing your frontend. Take advantage of Bootstrap’s extensive documentation and Laravel’s flexibility to tailor your application to your specific needs.
Now, armed with the knowledge of integrating Bootstrap and Laravel Admin Panel, you can embark on your journey to create impressive web applications that not only look great but also deliver a seamless user experience. So, go ahead and start building your next web project with confidence!
FAQs on Laravel Admin Panel
Is it possible to customize the PayPal integration in PHP to match the branding and style of my website or application?
Yes, PayPal offers customization options that allow you to tailor the payment experience to match your branding and style. One common customization is the ability to customize the appearance of the PayPal checkout page, including adding your logo and modifying the color scheme to align with your website’s design. Additionally, you can implement PayPal’s REST API in your PHP application, which provides greater control over the payment process, enabling you to create a seamless and branded experience for your users. This includes handling the entire payment flow on your website while still utilizing PayPal’s secure payment processing in the background. By leveraging these customization options, you can ensure a cohesive and branded payment experience for your customers.
How can I test PayPal integration without real transactions?
PayPal offers a sandbox environment for testing, allowing you to create simulated buyer and seller accounts. This enables you to thoroughly test your PHP PayPal integration without processing actual payments, ensuring a smooth experience before going live.
Can I customize the PayPal integration to match my website’s style?
Yes, PayPal allows customization to align the payment experience with your website’s branding. You can add your logo, adjust colors, and even use the REST API to control the entire payment process on your site while benefiting from PayPal’s secure payment processing in the background.
