
Are you struggling to upload large videos to your WordPress website? Dealing with file size limitations can be frustrating, especially when you have valuable video content that you want to share with your audience. But fear not! Let’s discover various methods to overcome WordPress’ maximum upload file size and successfully upload those large videos.
You’ll have a comprehensive understanding of how to upload large videos to WordPress and optimize your website for video content after going through the blog. So, let’s get started on enhancing your video-uploading experience and taking your WordPress site to the next level!
Understanding WordPress Video Upload Limitations
WordPress is a robust content management system (CMS) that permits users to develop and manage their websites easily. However, when it comes to uploading large videos, WordPress imposes certain limitations that you need to be aware of. Understanding these limitations will help you find effective solutions to overcome them.
- Maximum Upload File Size: By default, WordPress has a maximum upload file size limit, which is set by your hosting provider. This limit determines the maximum size of files you can upload to your WordPress site, including videos. If your video file exceeds this limit, you will encounter issues during the upload process.
- Execution Time Limit: WordPress also has an execution time limit, which determines the maximum time allowed for a script to run. When uploading large videos, the upload process may exceed this time limit, causing the upload to fail or time out.
- Memory Limit: WordPress has a memory limit that defines the maximum amount of memory allocated for PHP scripts to run. When uploading large videos, the memory required to process and handle the file may exceed this limit, resulting in errors or failed uploads.
- Server Restrictions: In addition to WordPress limitations, your hosting server may have its own restrictions on file size and upload limits. These restrictions can vary depending on your hosting plan and provider.
It’s important to have a clear understanding of these limitations to effectively tackle the challenges of uploading large videos to WordPress.
Methods to Increase WordPress Maximum Upload File Size
When dealing with large video files, it’s crucial to increase the maximum upload file size of videos in WordPress and there are several methods you can employ to achieve this.
- Modifying the php.ini File: The php.ini file contains various settings for PHP, the scripting language that powers WordPress. By altering this file, you can increase the maximum upload file size limit. However, keep in mind that accessing and modifying the php.ini file requires a certain level of technical knowledge and access to your server. We will provide step-by-step instructions on how to make the necessary changes.
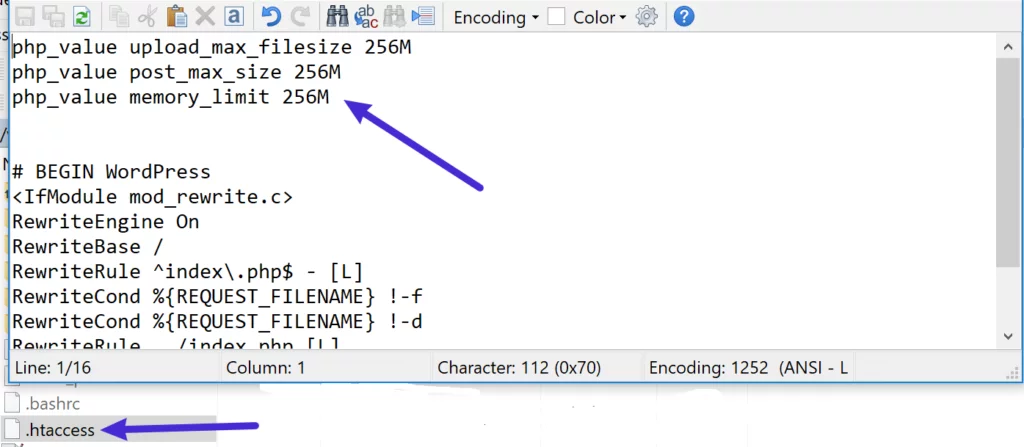
- Using the .htaccess Method: The .htaccess file is a configuration file that controls multiple aspects of your website’s functionality. By adding specific directives to the .htaccess file, you can do additions to the maximum upload file size limit. This method is relatively easier compared to modifying the php.ini file and is accessible to users with basic knowledge of working with files on their server.
- Using a WordPress Plugin: If you prefer a more user-friendly approach, you can leverage WordPress plugins specifically designed to increase the maximum upload file size limit. These plugins simplify the process and eliminate the need for manual configuration. We will explore some popular plugins and guide you through the steps required to install, configure, and utilize them effectively.
How to Compress Videos for WordPress
Compressing videos for WordPress is crucial to reduce their file size without compromising on quality. Large video files can significantly slow down your website’s loading speed and consume excessive storage space. In this section, we will discuss the importance of video compression, explore various tools available for video compression, and provide a step-by-step guide on how to compress videos effectively.
Why Compression is Important?
Video compression is essential for optimizing your website’s performance. Compressed videos load faster, resulting in a better user experience. Additionally, compressed videos require less storage space, allowing you to accommodate more content on your website without sacrificing speed or exceeding storage limits.
Tools for Video Compression
There are several tools available to compress videos for WordPress. We will discuss both online and offline tools that offer different features and functionalities. Some popular tools include Adobe Media Encoder, HandBrake, FFmpeg, and online platforms like Clideo, CloudConvert, and Compressify.
Compressing Videos Using HandBrake
Step 1: Download and Install HandBrake
- Visit the official HandBrake website (https://handbrake.fr/) and download the right version for your operating system (Windows, macOS, Linux).
- Install the software by following the instructions popping on the screen.
Step 2: Import the Video File
- Launch HandBrake after installation.
- Click on “Open Source” in the upper left corner and select the video file you want to compress. HandBrake will analyze the file and display its details.
Step 3: Adjust Compression Settings
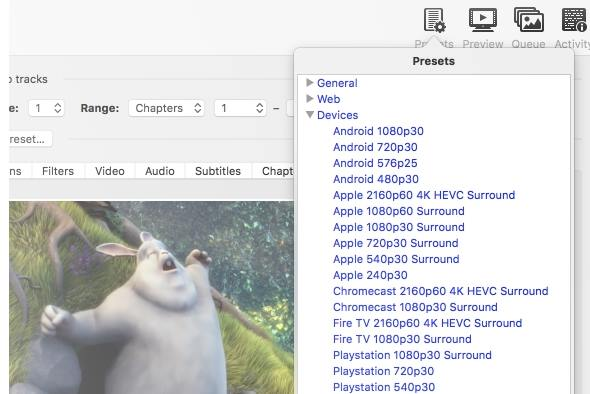
- Choose a Preset:
- On the right-hand side, you’ll find a range of presets designed for different devices and use cases (e.g., Normal, Web, Devices). Choose a preset that suits your needs. For example, “Fast 1080p30” is a balance between speed and quality.
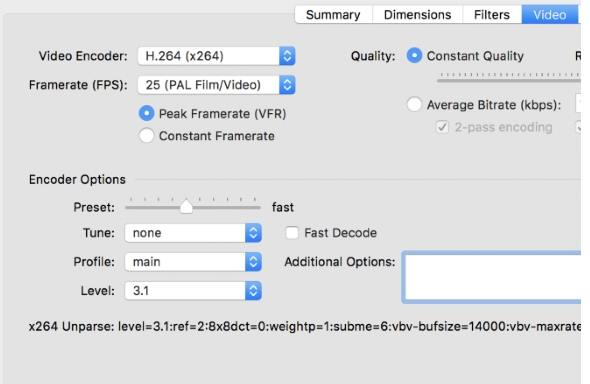
- Video Tab:
- Click on the “Video” tab. Here, you can adjust settings like Video Codec (H.264 or H.265 for better compression), Framerate, and Quality (Constant Quality or Average Bitrate). Higher quality settings will accommodate larger files, so you might want to experiment to strike the correct balance between file size and quality.
- Audio and Subtitles:
- Click on the “Audio” tab to adjust audio settings. You can choose the audio codec, bitrate, and mixdown options.
- If your video has subtitles, you can add or import them in the “Subtitles” tab.
Step 4: Select the Output Format and Destination
- Output Settings:
- At the bottom, you can choose the source where the compressed file will be saved by clicking on “Browse” under the “Destination” section.
- Container Format:
- Choose the output container format (MP4 is widely supported) from the “Container” dropdown menu.
Step 5: Initiate the Compression Process
- Once you have set all the settings to your preference, click on the “Start” button located in the upper toolbar.
- HandBrake will begin compressing the video based on your settings. The time taken for compression depends on the length of your video and the performance of your computer.
After the compression process is complete, you will find the compressed video file in the destination folder you specified. Always remember to check the compressed video to ensure the quality meets your expectations before sharing or using it for your intended purpose.
By following this guide, you will be able to effectively compress your videos for WordPress, resulting in faster loading times, reduced storage requirements, and improved overall website performance. Let’s get started with the importance of compression and explore the tools and techniques to compress videos efficiently.
Using a Video Hosting Service for Large Videos
When dealing with exceptionally large videos that exceed the limitations of WordPress, utilizing a video hosting service can be a viable solution. In this section, we will explore the advantages of using a video hosting service, provide recommendations for some of the top video hosting platforms, and guide you on how to embed videos from a hosting service into your WordPress website seamlessly. Video hosting services offer various benefits, such as:
- Scalability: Video hosting platforms are designed to handle large video files and high traffic demands, ensuring smooth playback and optimal performance.
- Bandwidth and Storage: These services provide ample bandwidth and storage space to accommodate large video files without affecting your website’s performance.
- Video Analytics: Video hosting services often offer detailed analytics, allowing you to track video performance, engagement, and viewer behavior.
- Customization and Branding: Many hosting platforms allow you to customize the player appearance, add your branding elements, and create a cohesive viewing experience for your audience.
Top Video Hosting Services
Some of the leading video hosting services available in the market. These platforms have proven track records, robust features, and excellent user experiences. Some popular video hosting services include YouTube, Vimeo, Wistia, and Dailymotion.
By leveraging a video hosting service, you can overcome the limitations of WordPress and effectively manage large video files on your website. Let’s explore the advantages of using a hosting service, discover the top platforms available, and learn how to seamlessly embed videos into your WordPress content.
Optimizing WordPress Site for Video Content
Optimizing your WordPress site for video content is crucial to enhancing user experience, improving video discoverability, and maximizing engagement.
- Choosing a Video-Friendly WordPress Theme: Selecting a WordPress theme that is specifically designed for video content can greatly enhance the visual appeal and functionality of your website. We will explore important features to look for in a video-friendly theme, such as video player integration, responsive design, customizable layouts, and compatibility with popular video formats.
- Using Video SEO Plugins: Video SEO plugins can aid in improving the visibility of your videos in search engine results and double-up organic traffic to your website. We will discuss popular video SEO plugins like Yoast SEO, Rank Math, and All in One SEO Pack and guide you on optimizing video metadata, adding video sitemaps, and implementing schema markup for better search engine indexing.
- Tips for User-friendly Video Placement: Proper placement and presentation of videos on your WordPress site can significantly impact user engagement. We will provide tips on effectively incorporating videos into your content, such as using attention-grabbing thumbnails, utilizing video playlists, adding video transcripts and captions, and optimizing video loading times for different devices and connection speeds.
Conclusion
By implementing these optimization techniques, you can create a visually appealing and user-friendly environment for video content on your WordPress site. Let’s explore how to choose a video-friendly theme, leverage video SEO plugins, and optimize the placement of your videos to maximize engagement and enhance the overall user experience.
