
Shipping is an important aspect of any online business, and offering a flat rate shipping option can simplify the process for both you and your customers. In the vast universe of online retail, ensuring a seamless and cost-effective shipping strategy is akin to unlocking a hidden treasure trove. Whether you’re a budding entrepreneur venturing into the digital marketplace or a seasoned business owner looking to optimize your WooCommerce store, this blog is your compass through the intricate world of flat rate shipping. Join us as we unravel the secrets, step by step, transforming shipping complexities into a simplified, efficient, and user-friendly experience for both you and your customers.
Understanding the Basics: What is Flat Rate Shipping and Why Use it in WooCommerce
Flat rate shipping is one type of shipping method where a fixed fee is charged for all orders, regardless of their weight or destination. Unlike other shipping methods that calculate shipping costs based on factors such as weight, fragility, distance, and package dimensions, flat rate shipping offers a simplified and predictable cost for shipping.
There are several reasons why using flat rate shipping in WooCommerce can be beneficial for your business:
- Transparency and Simplicity: This type of shipping provides transparency to your customers by offering a fixed shipping cost for all orders. This eliminates any confusion or surprises during the checkout process and simplifies the overall shipping experience.
- Ease of Calculation: With this type of shipping, you don’t need to calculate shipping costs for each individual order based on weight or destination. This saves time and effort, especially if you sell products that vary significantly in size and weight.
- Cost Control: This type of shipping allows you to have better control over your shipping costs. By setting a fixed rate, you can ensure that your shipping expenses are accounted for and can be integrated into your pricing strategy.
- Customer Experience: Offering a flat rate shipping option can improvise the customer experience by providing a consistent and predictable shipping cost. Customers appreciate knowing exactly how much they will be charged for shipping, which can increase their trust and confidence in your business.
- Competitive Advantage: This type of shipping can give you a competitive edge by offering a shipping option that is straightforward and easy to understand. This can attract customers who prefer a hassle-free shipping experience and may even encourage them to make larger purchases.
Before implementing this shipping in your WooCommerce store, there are a few key considerations to keep in mind:
- Product Variation: Assess whether your products have significant variations in size, weight, or shipping requirements. This type of shipping may not be the best option for businesses that sell extremely large, heavy, or fragile items that require specialized shipping methods.
- Shipping Costs: Evaluate your shipping costs and determine an appropriate flat rate that covers your expenses while remaining competitive. It’s important to strike a balance between profitability and customer satisfaction.
- Target Audience: Understand your target audience’s preferences and expectations when it comes to shipping. Consider factors such as location, demographics, and purchasing behavior to ensure that this type of shipping aligns with their needs.
- Shipping Zones: Familiarize yourself with the different shipping zones or regions where you plan to offer this type of shipping. Depending on your business’s reach, you may need to create specific shipping zones to accommodate different areas and adjust the flat rate accordingly.
By understanding the basics of flat rate shipping and its benefits, as well as considering these key elements, you can make a smart decision about implementing flat rate shipping in your WooCommerce store. The next section will delve into the prerequisites you need to fulfill before setting up flat rate shipping.
Preparing for Flat Rate Shipping Setup in WooCommerce
Before diving into the setup process of this type of shipping in WooCommerce, it’s essential to make some preparations. This section will guide you through the necessary steps to ensure a smooth and successful setup.
Why Flat Rate Shipping is Beneficial for Your Business
Before proceeding with the setup, it’s important to understand why this type of shipping can be beneficial for your business. We have already discussed the advantages in the previous section, but it’s crucial to assess how these benefits align with your specific business goals and customer expectations.
Key Considerations Before Setting Up This Type of Shipping
- Product Analysis: Analyze your products and categorize them based on their size, weight, and shipping requirements. This will help you determine if this type of shipping is suitable for all your products or if certain items require alternative shipping methods.
- Pricing Strategy: Consider your pricing strategy and how the shipping cost will be integrated into your product pricing. Evaluate the impact on profit margins and ensure that the flat rate is competitive while still covering your shipping expenses.
- Shipping Insurance: Assess whether you need to include shipping insurance in your shipping cost. Shipping insurance protects against loss or damage during transit and provides added security for both you and your customers.
- Delivery Timeframe: Determine the expected delivery timeframe for your flat rate shipping option. This will help fulfil customer expectations and ensure that the estimated delivery time aligns with your shipping capabilities.
Prerequisites for Setting Up Flat Rate Shipping
- Install and Activate WooCommerce Plugin: Ensure that installation and activation of the WooCommerce plugin has been done on your WordPress website. WooCommerce is a powerful e-commerce platform that provides the necessary tools and functionalities for setting up flat rate shipping.
- Configure Basic Store Settings: Set up your basic store settings in WooCommerce, including currency, tax settings, and general store information. This will provide a foundation for your flat rate shipping configuration.
- Gather Shipping Information: Collect all the necessary shipping information, such as shipping origin address, packaging dimensions, and weight ranges for your products. This information will be used to calculate accurate shipping costs during the flat rate setup process.
Also Read: How to Add Shipping Charges in WooCommerce
By completing these preparations, you will be well-equipped to proceed with the setup of flat rate shipping in WooCommerce. In the next section, we will guide you through the step-by-step process of configuring flat rate shipping in your WooCommerce store.
How to Configure Flat Rate Shipping in WooCommerce
Configuring flat rate shipping in WooCommerce involves a few simple steps. In this section, we will walk you through the process of setting up flat rate shipping in your WooCommerce store.
Accessing WooCommerce Shipping Settings
- Log in to your WordPress admin dashboard.
- Go to “WooCommerce” in the left-hand menu of the dashboard and click on “Settings.”
- From the top navigation menu, select the “Shipping” tab.
- In the “Shipping” tab, you will see a list of available shipping methods. Click on the “+ Add Shipping Method” button.
- From the dropdown menu, select “Flat Rate” as the shipping method you want to set up.
- Click on the “Add Shipping Method” button next to the dropdown menu.

Customizing Flat Rate Shipping Options
- Once you have added the flat rate shipping method, you will be directed to the settings page for the flat rate shipping option.
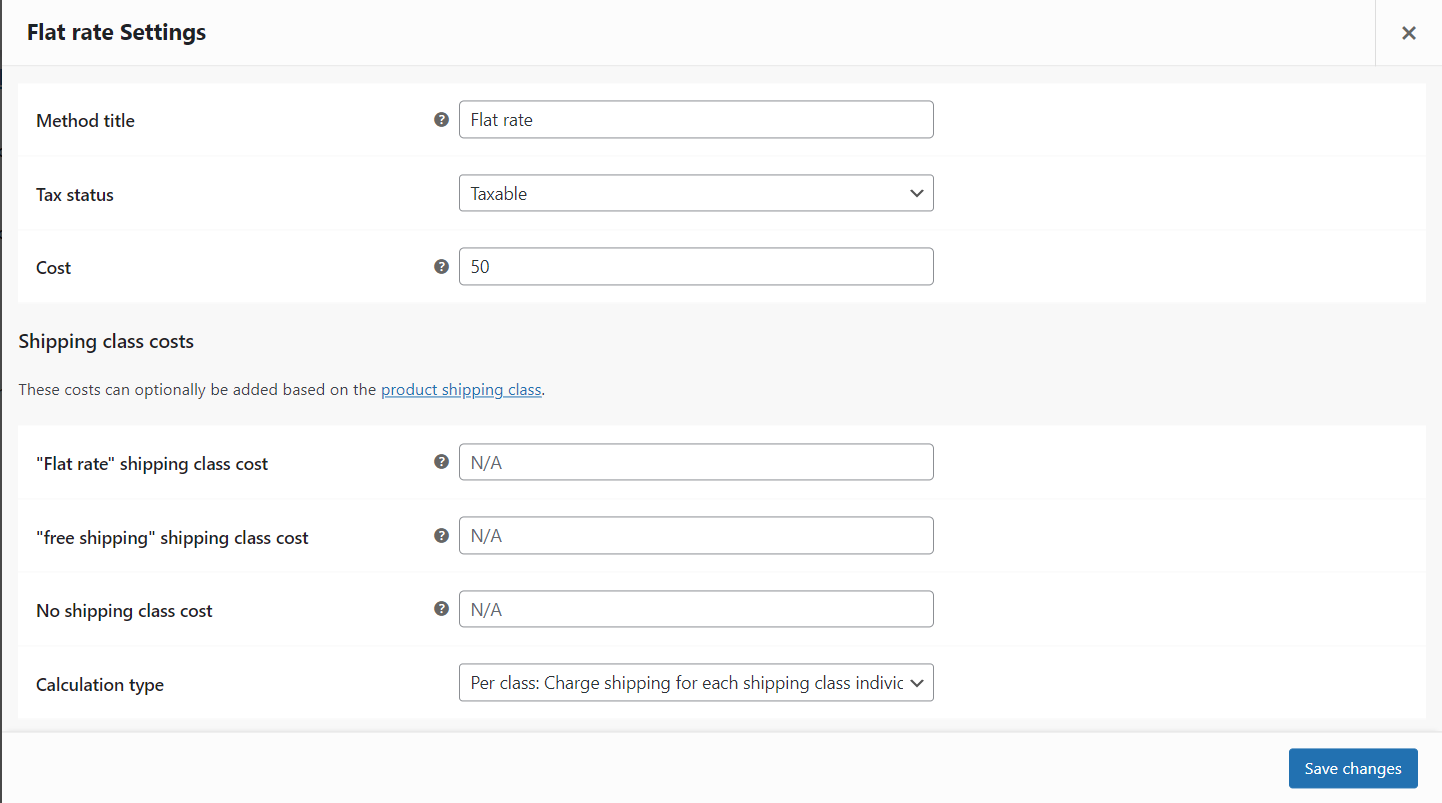
- Provide a suitable title for the flat rate shipping method. This title will be displayed to customers during the checkout process.
- Set the cost for flat rate shipping. Enter the fixed amount you want to charge for shipping all orders. You can enter a numeric value or use a formula if you want to calculate the cost based on specific criteria.
- If applicable, you can add additional costs or fees by enabling the “Add costs to shipping total” option. This allows you to include extra charges, such as handling fees or packaging costs, in the flat rate shipping cost.
- Specify the tax status for the flat rate shipping method. Choose whether the shipping cost should be taxable or not based on your tax settings and regulations.
- Save your changes.
Once you have configured the flat rate shipping method, it will be available as an option for your customers during the checkout process. They will see the specified flat rate cost alongside other available shipping methods.
It’s important to note that the steps outlined above provide a basic setup for flat rate shipping. However, WooCommerce offers advanced features that allow you to customize your flat rate shipping options further. In the next section, we will explore some of these advanced settings, including creating shipping zones and implementing conditional flat rate shipping.
Advanced Flat Rate Shipping Setup in WooCommerce
Once you have set up the basic flat rate shipping option in WooCommerce, you may want to explore more advanced settings to tailor your shipping options to specific regions, product categories, or conditions. In this section, we will delve into the advanced features of flat rate shipping in WooCommerce.
Creating Shipping Zones
- In the WooCommerce settings, navigate to the “Shipping” tab.
- Click on the “Shipping Zones” tab from the top navigation menu.
- Click on the “+ Add Shipping Zone” button to create a new shipping zone.
- Provide a name for the shipping zone, such as “Domestic” or “International.”
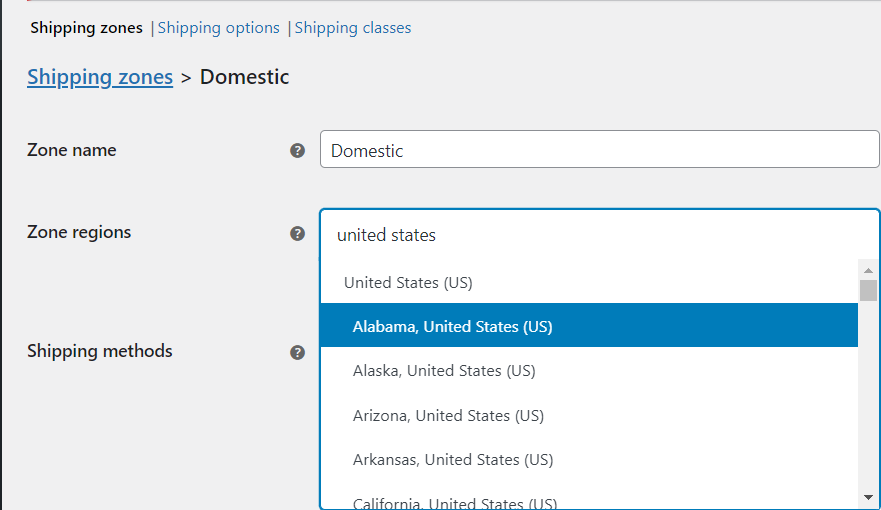
- Specify the region or locations included in the shipping zone. You can choose countries, states, or even specific zip codes.
- Save the shipping zone.
By creating different shipping zones, you can apply specific flat rate shipping costs based on the customer’s location. For example, you can set a lower flat rate for domestic shipping and a higher rate for international shipping.
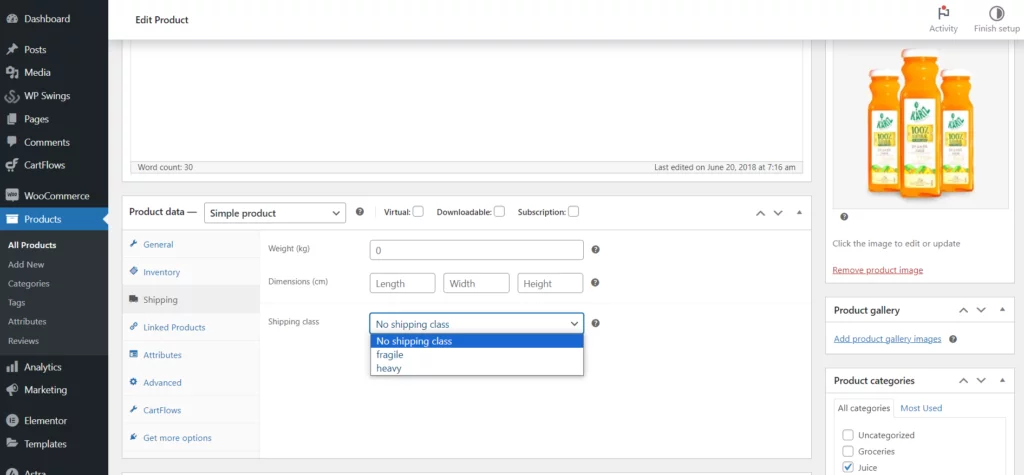
Setting Up Shipping Classes
- In the WooCommerce settings, navigate to the “Shipping” tab.
- Click on the “Shipping Classes” tab from the top navigation menu.
- Click on the “+ Add Shipping Class” button to create a new shipping class.
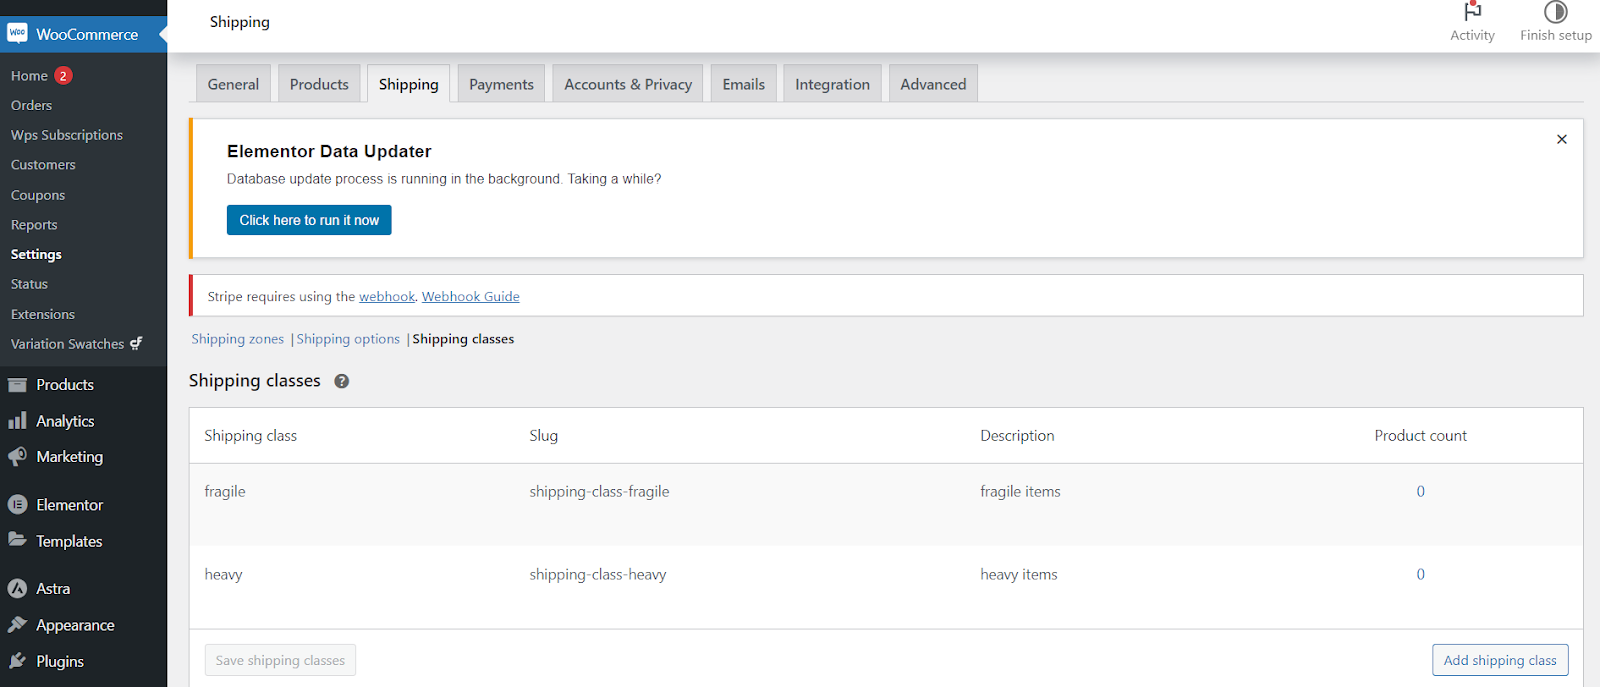
- Provide a name for the shipping class, such as “Fragile” or “Heavy Items.”
- Assign products to the shipping class by editing the product and selecting the appropriate shipping class from the dropdown menu.
- Save the shipping class.
Using shipping classes, you can differentiate the flat rate shipping cost based on the product category or characteristics. For example, you can set a higher flat rate for heavy items or a lower rate for lightweight products.
Implementing Conditional Flat Rate Shipping
- Install and activate a conditional shipping plugin compatible with WooCommerce, such as “Conditional Shipping for WooCommerce.”
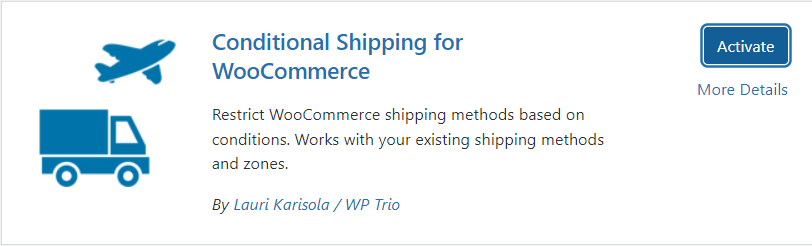
- After installing the plugin, the “Conditions” option automatically pops up under the shipping section in WooCommerce settings.
- Configure the plugin according to the specific conditions you want to set for flat rate shipping. This may include order total, product quantity, specific products, or customer roles.
- Set the flat rate shipping cost for each condition.
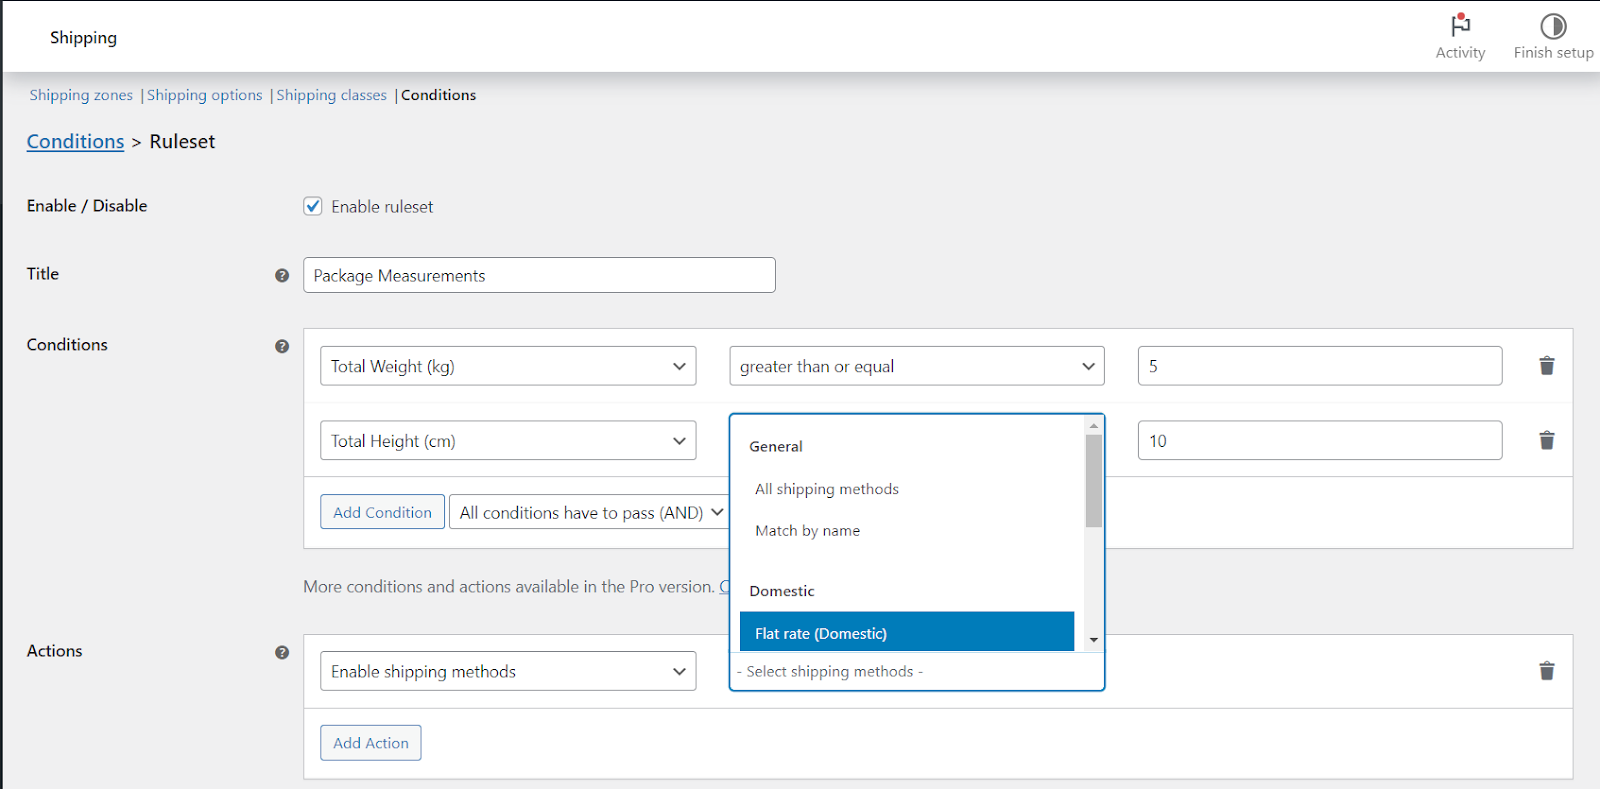
- Save your changes.
With conditional flat rate shipping, you can define different flat rate costs based on specific conditions. For example, you can offer a discounted flat rate for orders over a certain value or provide free flat rate shipping for specific products or customer groups.
By exploring these advanced features of flat rate shipping in WooCommerce, you can customize your shipping options to better suit your business requirements and provide a more tailored shipping experience for your customers.
Troubleshooting Common Issues in Flat Rate Shipping Setup
Setting up flat rate shipping in WooCommerce is generally a straightforward process. However, like any configuration, there may be some common issues that arise. In this section, we will address these issues and provide troubleshooting solutions to help you overcome them.
Why is the Flat Rate Shipping Option Not Showing?
If the flat rate shipping option does not appear during the checkout process, there are a few potential causes and solutions to consider:
- Shipping Zone Configuration: Ensure that you have correctly set up your shipping zones and assigned the flat rate shipping method to the appropriate zones. Double-check the regions and locations included in each shipping zone.
- Product Restrictions: Verify that your products are eligible for flat rate shipping. Some products may have particular shipping requirements or may be excluded from certain shipping methods. Check the shipping class or product settings to ensure compatibility with flat rate shipping.
- Cache and Plugin Conflicts: Clear your website cache and disable any cache plugins temporarily. Sometimes, caching can interfere with the visibility of shipping options. Additionally, check for any plugin conflicts by temporarily deactivating non-essential plugins and testing the checkout process.
How to Handle Flat Rate Shipping for Multiple Products?
When dealing with multiple products in an order, you may encounter scenarios where the flat rate shipping cost needs to be adjusted. Here are a few strategies to handle this situation:
- Shipping Classes: Assign appropriate shipping classes to your products. This allows you to set different flat rate costs based on the shipping class. For example, you can assign a “Heavy Item” shipping class to products that require additional shipping fees.
- Conditional Shipping Rules: Utilize conditional shipping plugins to set specific rules based on order total, quantity, or specific products. This enables you to apply different flat rate costs depending on the conditions you define.
- Communication with Customers: Clearly communicate any potential variations in flat rate shipping costs for multiple products to your customers. Provide transparent information on how the shipping cost is calculated and any possible adjustments that may be made.
How to Manage Flat Rate Shipping for International Orders?
International shipping introduces additional complexities. Here are some considerations for managing flat rate shipping for international orders:
- Shipping Zones: Create specific shipping zones for different countries or regions. Assign appropriate flat rate shipping costs to each zone based on the shipping rates for international destinations.
- Customs and Duties: Familiarize yourself with international customs and duties regulations. Inform your customers about the potential additional costs they may incur and ensure that these fees are not included in your flat rate shipping cost.
- Shipping Insurance and Tracking: Consider offering shipping insurance and tracking options for international orders. This provides added security and peace of mind for both you and your customers.
By addressing these common issues and implementing the suggested solutions, you can overcome potential hurdles in setting up and managing flat rate shipping in WooCommerce.
Conclusion
Congratulations! You now have a comprehensive understanding of how to set up flat rate shipping in WooCommerce. With this knowledge, you can provide a seamless and transparent shipping experience for your customers, ultimately enhancing their satisfaction and boosting your business success. Happy shipping!
