
Managing a WordPress site often involves multiple users—editors, authors, contributors, administrators, developers, and even clients. When all these users perform different actions, keeping track of what’s happening behind the scenes becomes a critical aspect of security, content governance, and site stability.
That’s where user activity logging becomes an essential part of your website maintenance toolkit.
In this comprehensive guide, you’ll learn how to monitor and review user actions in WordPress using the Simple History plugin. We’ll cover everything from why it’s necessary, how to install and configure it, how to read the logs, export records, and use its debugging tools—so you can manage your site more intelligently and securely.
📌 Why Track User Activity in WordPress?
Tracking user activity is a crucial aspect of maintaining the security, performance, and accountability of your WordPress site. By using tools like the Simple History plugin, administrators can ensure that all significant events, such as changes to themes, plugin installations, or media uploads, are comprehensively logged. This activity log allows you to monitor the health of your WordPress site and provides essential insights into how it is being used or modified. Let’s explore the reasons why it’s critical to track user activity and how you can effectively do so on your site.
1. Security Monitoring and Audit Trail
One of the primary reasons to track user activity is security monitoring. Unexpected changes, such as a plugin failure, theme alteration, or modification of the homepage layout, can have significant security implications. Having a well-maintained audit log enables you to pinpoint the user who made a particular change and the exact time it occurred.
This audit trail serves as a foundational element of security, especially for high-traffic or business-critical websites. By tracking logged events, administrators can quickly identify unauthorized actions, detect security vulnerabilities, and prevent further issues. Furthermore, being able to trace back important events provides the ability to take quick action to mitigate risks.
2. Accountability in Multi-User Environments
In WordPress environments where multiple administrators, editors, or content managers are involved, user activity logs are invaluable for ensuring accountability. By tracking the changes made by individual users, such as the creation of posts or updates to widgets, you can avoid confusion and establish a clear record of who is responsible for which actions.
This is particularly important in preventing miscommunication and ensuring that editorial workflows are followed. User activity logs also help provide transparency for all involved, making it easier to understand which user made specific changes. This helps avoid accidental or unauthorized content modifications and provides a clear trail for further investigation if necessary.
3. Change Management for Developers
For developers, tracking user activity is an essential part of managing website changes and troubleshooting issues. When issues arise, such as performance drops or functionality problems, developers can trace changes made to the site using detailed logs. By tracking plugin activations, widget updates, or changes to core settings, developers can gain insights into potential conflicts or recent alterations that may have caused problems.
This allows for faster debugging and rollbacks when necessary. With the support of WP CLI commands, developers can automate certain logging tasks and even integrate with other development tools to create more robust custom logs. This is particularly helpful when managing multiple projects or working with large teams of developers and content managers.
4. Post-Hack Investigation
In the unfortunate event of a security breach or hack, having a detailed activity log can help identify the attack vector and understand how unauthorized access occurred. An audit log records all user actions and significant events, making it easier to piece together the timeline of events leading up to the breach.
By tracking user activity and understanding what changes were made, administrators can quickly remediate the issue and strengthen security to prevent future incidents. Activity logs are essential for performing post-hack investigations, helping teams identify how attackers gained access, which data was compromised, and what security measures need to be improved.
Learn about the activity log in detail here.
What Types of Activities Does Simple History Log in WordPress?
The Simple History plugin is designed to track a wide range of activities and events on your WordPress site, providing you with a comprehensive audit trail of how your website is being used. Once activated,
Simple History starts recording these activities in real-time, giving you a transparent view into the day-to-day changes being made on your platform. Whether you’re managing a small blog or a large, multi-user installation, the plugin offers valuable insights. Below is an overview of the key activities tracked by Simple History:
1. User Login Activity
Simple History logs all user authentication attempts, providing insight into when and how users access your site. This includes successful login attempts, which record the exact time a user logged in along with their username and role. Additionally, it tracks failed login attempts, which are useful for detecting suspicious access attempts, such as brute-force attacks.
The plugin also logs user logouts and session expirations when supported by extensions or configurations, providing a complete view of user activity. This feature is essential for maintaining a secure WordPress admin area and preventing unauthorized access.
2. Post and Page Operations
Simple History tracks a wide array of editorial activities on your site. This includes the creation of new posts, pages, and custom post types, allowing you to see who added new content and when it was added. The plugin also records revisions and updates to existing content, so you can track changes made to published or draft entries.
Additionally, the plugin logs deletions or trashing of content, which helps ensure that accidental or unauthorized removals are detected. If content is scheduled for publication, Simple History tracks these transitions, such as from draft to published or published to private, providing full transparency in the editorial process.
3. Plugin and Theme Management
The plugin tracks events related to plugin and theme management. This includes the installation of new plugins, plugin updates (both automatic and manual), and the deactivation or removal of plugins. These logs are particularly useful for tracking changes in site functionality or investigating issues that arise due to plugin conflicts.
In terms of theme management, Simple History records theme activations, updates, and installations. This includes keeping track of changes made to the site’s frontend, such as when a new theme is enabled or when an update is applied to a theme. This helps ensure design integrity, especially in staging or production environments where theme updates can affect the site’s layout.
4. Media Library Activity
Simple History also tracks changes made in the WordPress media library. This includes the upload of images, documents, videos, and audio files, along with metadata such as the file name, upload timestamp, and the user responsible for the upload.
The plugin also logs media deletions, which is important for managing broken links or missing assets. Edits to media metadata, such as changes to titles, alt text, or captions, are also recorded, providing insight into content updates and ensuring that media assets are properly managed.
5. User Role and Profile Management
Simple History tracks any changes to user accounts, ensuring that there is transparency in access control. This includes user account creation and deletion, which is particularly useful for auditing new user registrations or account removals. It also tracks changes made to user roles, such as upgrading a user from a Subscriber to an Editor, or downgrading a user’s role.
Modifications to user profiles, including changes to email addresses, passwords, or display names, are also logged. This feature is especially important for sites with multiple authors, membership platforms, or any site that requires strict role management.
6. Dashboard Menu and Widget Modifications
Changes to the WordPress dashboard menu and widgets are tracked by Simple History. This includes updates to the navigation menu, such as reordering menu items, adding new links, or deleting existing ones. Widget modifications are also logged, including when widgets are added, removed, or reconfigured in sidebars or footers.
This helps administrators track interface changes and provides insight when dealing with layout inconsistencies or regressions in the admin interface. Additionally, widget plugin integrations are monitored, ensuring that any new interface elements introduced by plugins are properly recorded.
7. WooCommerce-Specific Logging
For WordPress sites running WooCommerce, Simple History tracks eCommerce activities such as order creation, edits, and cancellations. It also logs changes to product listings, including updates to pricing, descriptions, and stock levels. Coupon creation and management are also tracked, providing insight into promotional activity on the site. The plugin logs customer profile updates as well, ensuring that changes to customer accounts are properly monitored.
8. Third-Party Plugin Integrations
Simple History supports logging for many popular third-party plugins. For example, it can track form submissions from plugins like Contact Form 7 or Gravity Forms, changes made through SEO plugins like Yoast, and performance-related actions triggered by caching plugins such as WP Rocket. The plugin can also track redirects created or deleted using tools like Redirection. These third-party integrations help ensure that all critical events across your WordPress site are logged, even if they are initiated by other plugins.
9. Custom Event Logging and Developer Integrations
For advanced use cases, developers can use Simple History’s API to log custom events. This includes logging interactions with custom REST API endpoints, recording configuration changes to themes or plugins, and capturing system-level events, especially in enterprise environments using continuous integration/continuous deployment (CI/CD) pipelines. These advanced capabilities provide developers with the flexibility to track any activity that is relevant to their specific WordPress setup, making the plugin highly extensible.onitoring system beyond the default plugin coverage.
Steps to Use Simple History Plugin in WordPress
Step 1: Install the Plugin
To get started, you’ll need to install and activate the Simple History plugin from the WordPress admin dashboard:
- Log in to Your WordPress Admin Dashboard
- Navigate to your website’s admin panel by entering your login credentials.
- Go to the Plugins Section
- On the left sidebar of the dashboard, hover over or click on Plugins, then select Add New from the submenu.
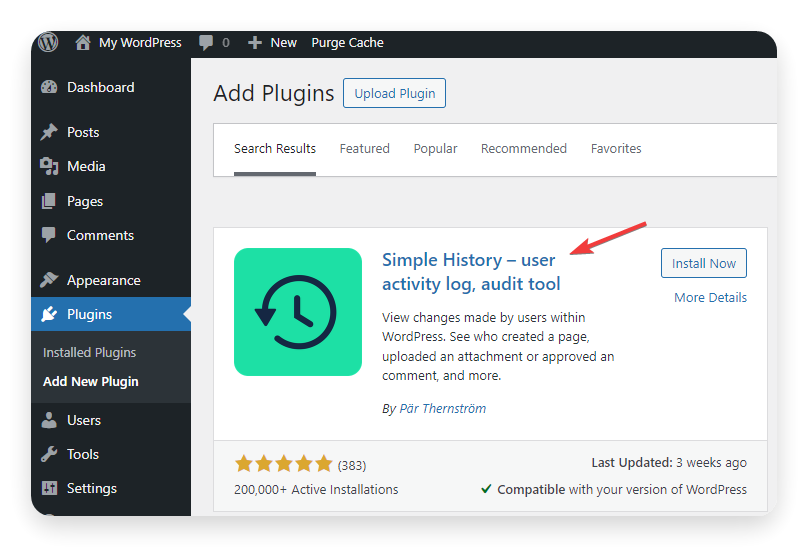
- Search for Simple History
- In the search bar located at the top right corner of the screen, type “Simple History”.
- As you type, the plugin should appear in the search results.
- Install and Activate the Plugin
- Once you see Simple History in the results, click the Install Now button.
- After the installation is complete, click Activate to enable the plugin on your site.
Step 2: Access Simple History Settings
Once the plugin is activated, you’ll be able to configure it according to your needs.
- Navigate to the Settings Section
- On the left-hand sidebar, go to Settings and select Simple History from the dropdown menu.
- Explore the Plugin’s Tabs
- The settings page will open, and you will see three primary tabs that manage the plugin’s configuration:
- Settings: Customize how Simple History operates and displays logs.
- Export: Export the activity logs for analysis or archiving.
- Debug: View diagnostic information to troubleshoot any issues.
- The settings page will open, and you will see three primary tabs that manage the plugin’s configuration:
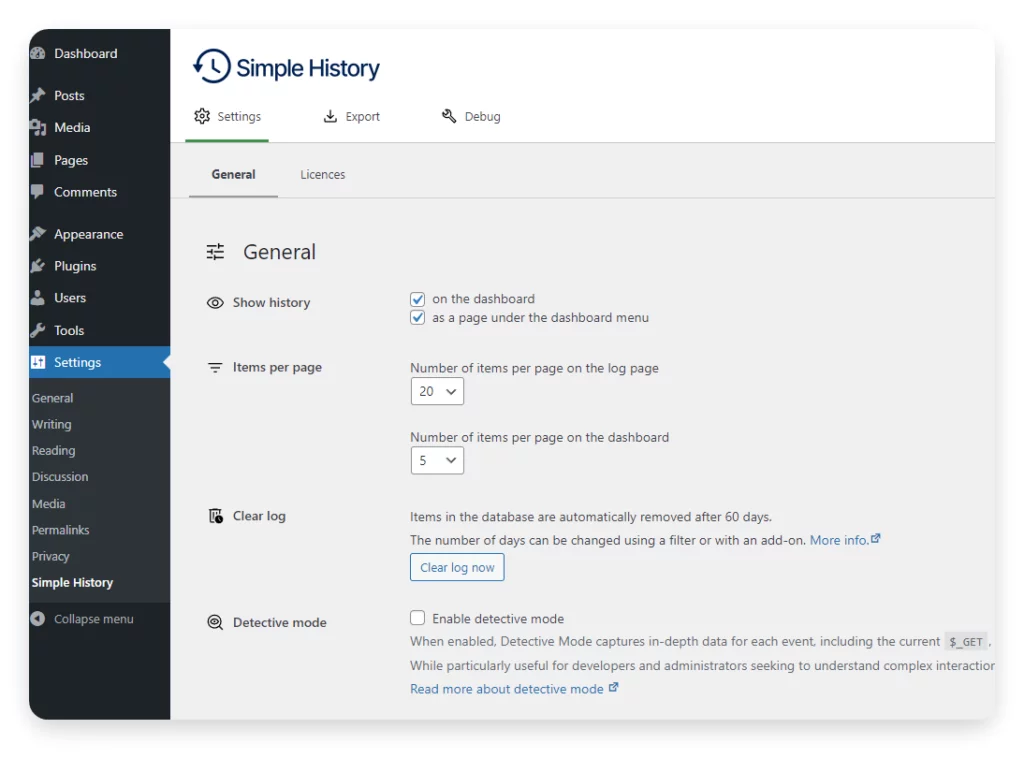
Step 3: Configuring the Plugin Settings (Settings Tab)
In the Settings tab, you have several options to define how the plugin tracks and displays activity logs:
Display Options
- Dashboard Display: Choose if you want the activity history to appear directly on the dashboard or on a dedicated plugin page. This is useful for administrators or team leads who need quick access to recent changes made to the site.
- Display Location: You can also decide whether the log should appear on the main admin dashboard, in a sidebar widget, or as a standalone page for easier monitoring.
Number of Days to Keep Entries
- Define how long the logs should be kept. The default retention period is 60 days, but you can adjust this according to your website’s activity level, data retention policies, or compliance needs.
Visibility by User Role
- You can limit access to the logs based on user roles. For example, you may choose to allow only administrators and editors to view the history, restricting access for authors, contributors, or other roles.
- This helps maintain privacy and ensures that only authorized users can access sensitive data regarding site activity.
After configuring the settings to your preferences, be sure to click the Save Changes button at the bottom of the page to apply your settings.
Step 4: Exporting Activity Logs (Export Tab)
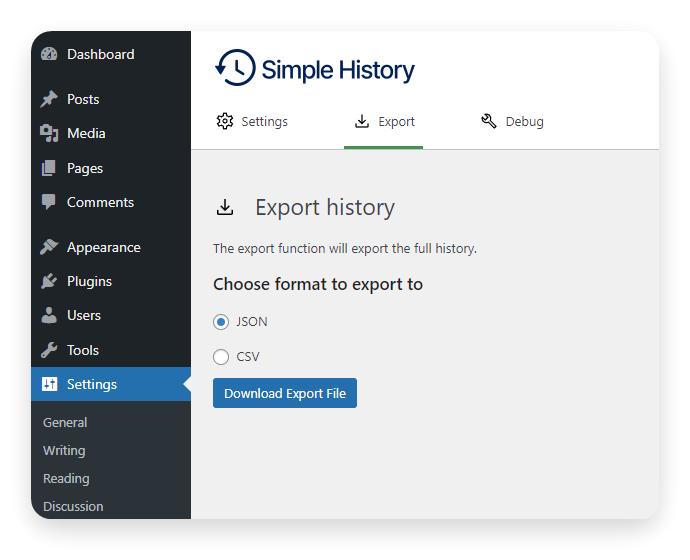
The Export tab enables you to download and back up the logs for offline analysis or long-term storage:
- Export in CSV Format:
- The CSV format is perfect for users who prefer to analyze the data in tools like Excel or Google Sheets. With the exported file, you can easily filter, sort, and analyze trends in user behavior or site changes.
- Export in JSON Format:
- The JSON format is more suitable for developers or users who wish to integrate the data with other tools or logging systems, or parse it programmatically.
This feature is invaluable for:
- Maintaining security audit trails
- Monitoring editorial contributions over time
- Archiving user behavior logs for compliance purposes
Step 5: Troubleshooting with the Debug Tab
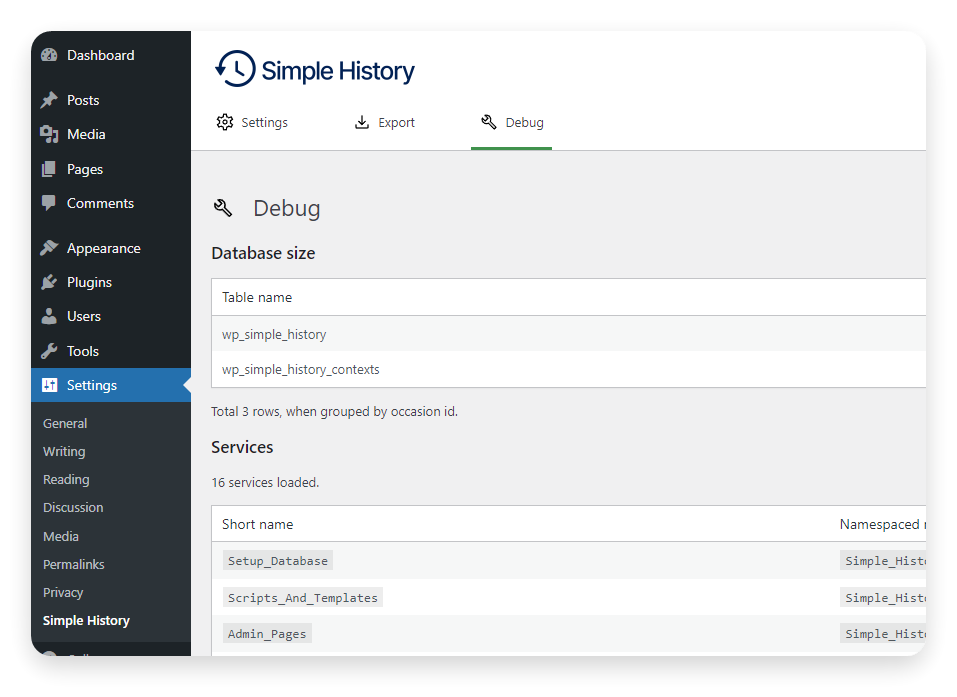
The Debug tab is where you can find diagnostic information to help troubleshoot issues with the plugin:
- Plugin Diagnostics:
- If Simple History is not logging actions correctly, the Debug tab will display diagnostic messages to help identify any issues.
- Warnings or Alerts:
- If any misconfigurations are detected (e.g., plugin conflicts, missing permissions), this section will notify you and provide suggestions on how to resolve them.
- Fixing Problems:
- This tab offers suggestions on how to troubleshoot or correct potential issues, such as plugin conflicts or problems with log data not being recorded properly.
Developers or site administrators can rely on this section for diagnosing why certain events might not be appearing in the history logs.
Step 6: Viewing the User History Logs
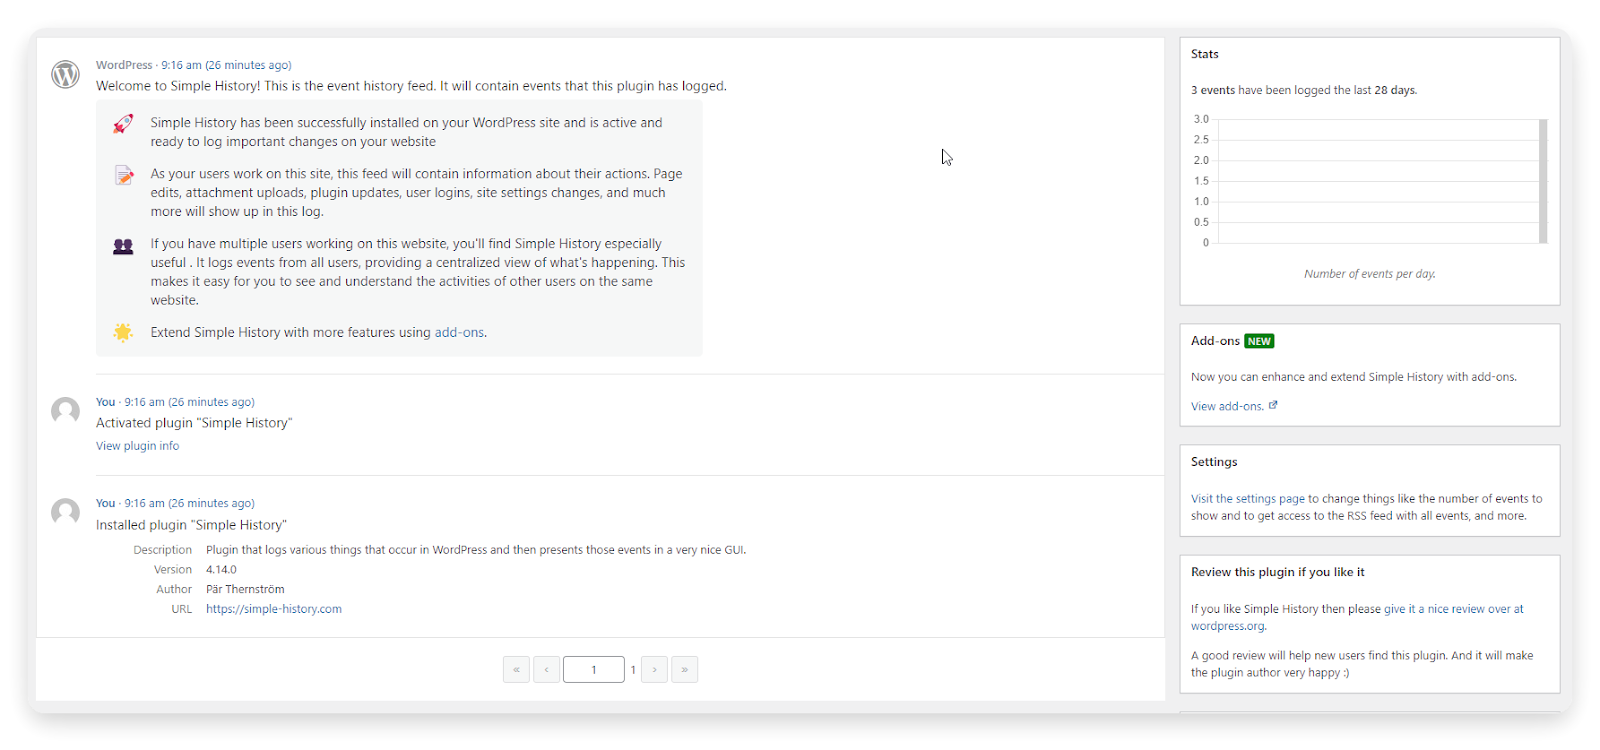
After configuring Simple History, you can begin viewing and managing the user activity logs:
- Access the User Activity Logs:
- To view the logs, go to Dashboard > Simple History from the left sidebar.
- This will open a timeline-style display of all logged activities, where each entry includes:
- Timestamps for when the event occurred.
- Usernames of the individuals who performed the actions.
- Descriptive messages explaining what happened (e.g., “John Doe updated post ‘Sample Post Title'”).
- Search and Filter Options:
- If you have a lot of activity data, Simple History provides robust filtering options to help you navigate and isolate specific events:
- Search by Date Range: Filter the logs by a specific time frame, such as last week, last month, or a custom range.
- Filter by Log Level: You can filter logs by event type, such as informational logs, warning messages, or error logs.
- Filter by Event Type: You can filter by the type of action performed, such as logins, plugin changes, post updates, etc.
- Search by Keywords or Usernames: Enter specific keywords or usernames to quickly locate particular events, such as which user installed a specific plugin or when a post was deleted.
- If you have a lot of activity data, Simple History provides robust filtering options to help you navigate and isolate specific events:
These search and filtering tools make it efficient to track important changes, such as:
- Who installed or removed a plugin
- When a post was deleted
- Which user modified a particular menu item
Then, you can do this by accessing the plugins section on your admin dashboard.
After successfully installing and activating the plugin, go to Settings > Simple History in the left menu of your dashboard.
This will direct you to the plugin’s settings page, where you can adjust its configurations.
A Full-Scale Audit Trail, Right in Your Dashboard
While the Simple History plugin is excellent for logging actions within WordPress, pairing it with a reliable, developer-focused hosting platform like Nestify amplifies your monitoring and optimization capabilities.
Why Nestify?
- 🚀 Built-in performance monitoring
- 🔁 Daily backups to support rollback if changes break the site
- 🔐 Staging environments for safe plugin testing
- ☁️ Automatic security patches
- ⚙️ Developer tools to manage CI/CD and versioning
Nestify’s compatibility with popular plugins—including Simple History—makes it the perfect platform for agencies, businesses, and developers managing complex sites.
Hence, you can confidently scale and manage your website with better insight, performance, and stability.
FAQs on History in WordPress
How can I resolve problems with the Simple History plugin?
Go to the “Debug” tab in the Simple History plugin’s settings if you’re having issues with it. This tab gives you information about what the plugin is doing and offers recommendations to help you fix frequent problems. Try contacting the plugin’s support staff or community forums if you need any extra help.
Does Simple History work with every theme and plugin available for WordPress?
Many of WordPress themes and plugins are compatible with Simple History by design. If you run into any issues, though, check out the support page for the plugin or get in touch with the developer for help.
