
Adding custom meta boxes to your WordPress pages and posts certainly enhances the user experience. Seeing a date, who has written it, and who has reviewed it builds trust in the user, and the article comes across as authentic and honest.
Despite this, WordPress automatically adds information, including the publishing date, categories, and tags, to your material. You could, nonetheless, also choose to provide your own unique metadata.
This post will show how to create a custom metadata box in WordPress and quickly add unique information to your text.
Now if the concept is not clear to you, don’t worry. In this article, you will know how to create custom meta boxes and add them to WordPress.
So, let’s get right into it!
What is a Custom Meta Box?
When a user modifies a post, the edit screen contains numerous default boxes, including Editor, Publish, Categories, and Tags.
These are metaboxes. Plugins can include custom meta boxes in the edit screen of any post type.
The content of custom meta boxes is often HTML form elements where the user inputs data relevant to the goal of the Plugin, but it may be almost any HTML you choose.
Why Should You Use Meta Boxes?
Meta boxes are convenient, adaptable, modular edit screen items that may be used to collect information about the post being modified.
Your custom meta box will be shown alongside all other post-related information, establishing a clear link.
Meta boxes are readily hidden from those who do not need to view them and visible to those who need them. The edit panel allows users to arrange meta boxes.
Users may organize the edit screen in any way they see fit, providing them complete flexibility over their editing environment.
How to Add Custom Meta Boxes in WordPress Posts
Adding custom meta boxes to WordPress is made easy with the Advanced Custom Fields plugin. Follow these steps:
Install and activate Advanced Custom Fields. It may be found in WordPress’s plugin repository.
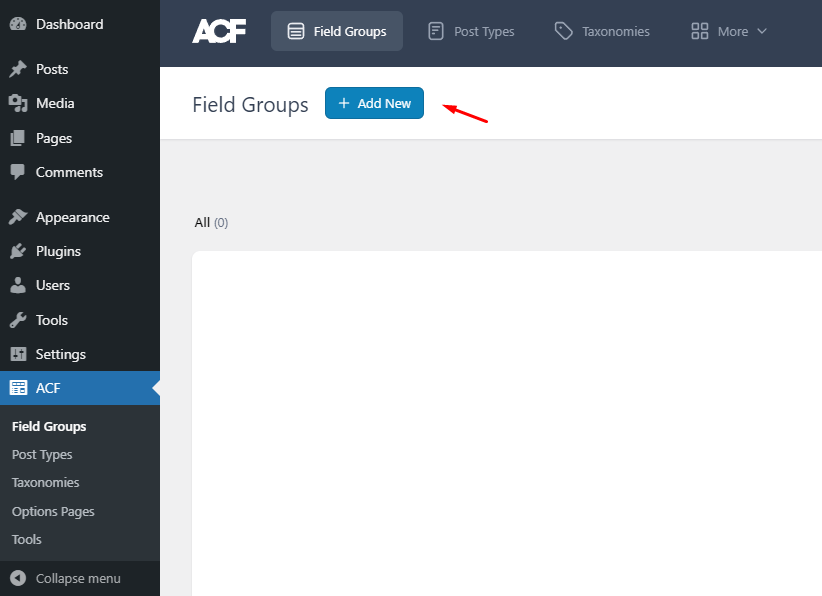
- Once activated, navigate to ACF » Field Groups from the WordPress admin sidebar.
- Click on the ‘Add New‘ to create a new custom meta box.
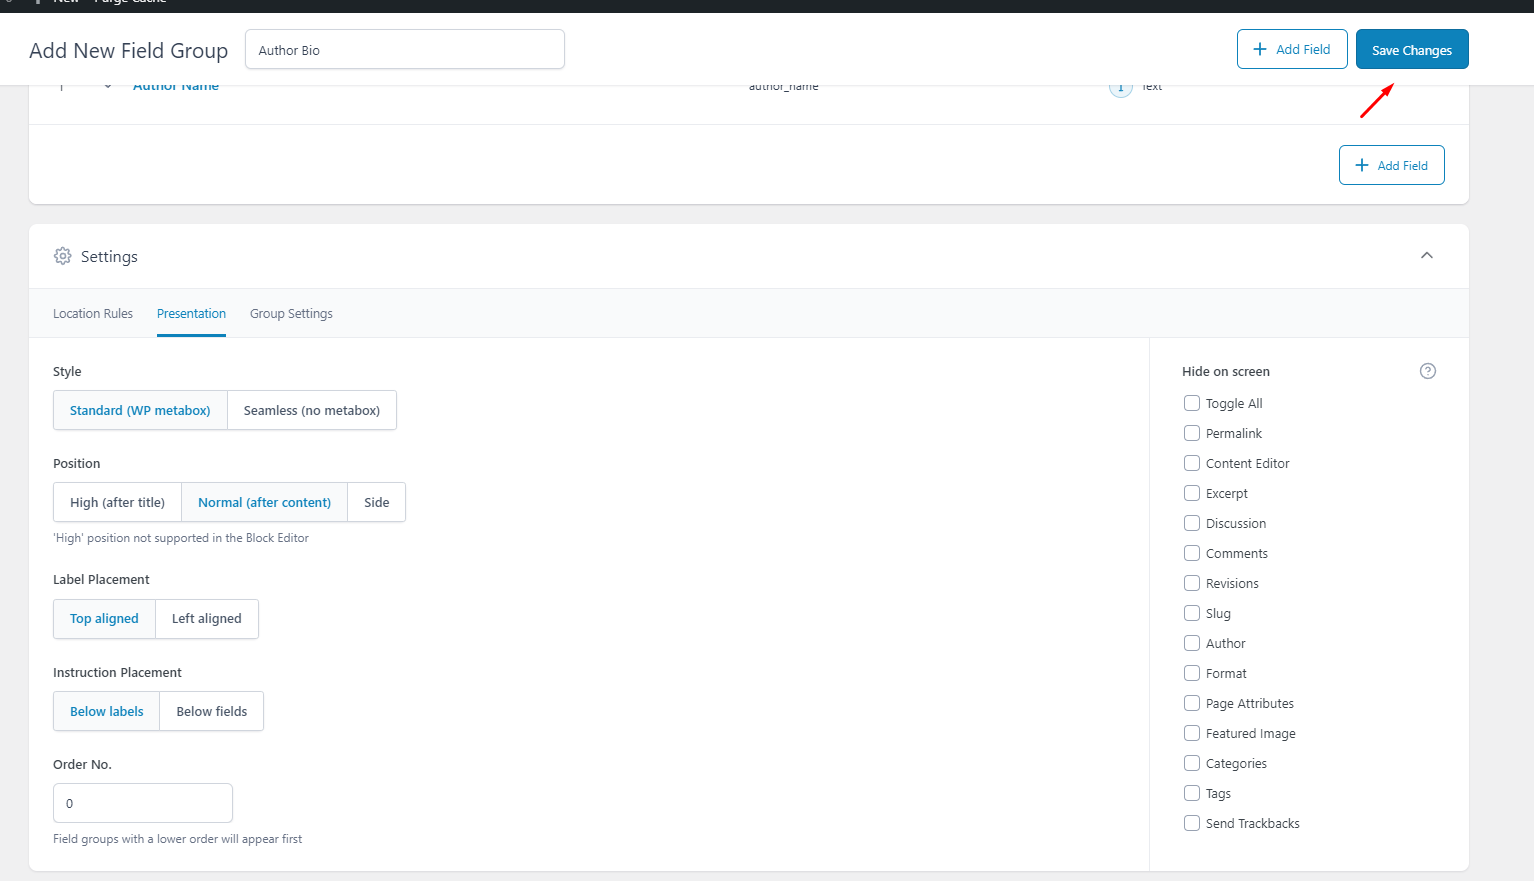
- Give your meta box a descriptive title in the ‘Field Group Title‘ field. This title will appear in the WordPress content editor.
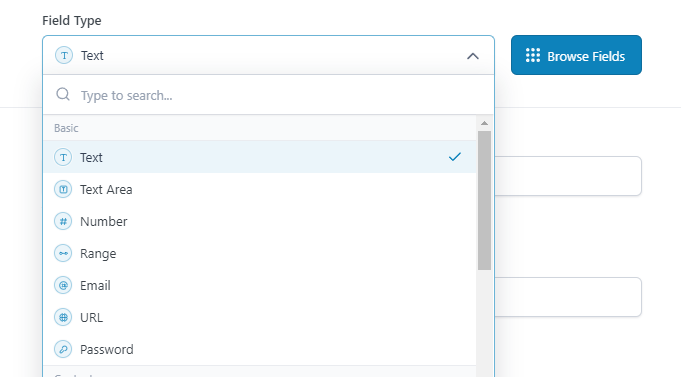
- Start adding custom fields to your meta box by selecting a field type from the ‘Field Type‘ dropdown menu.
- Options include Date Picker, Checkbox, Text field, and more.
- Enter a label for the field, which will help users understand what information to input.
- Advanced Custom Fields will generate the ‘Field Name‘ automatically. You can leave this field empty.
- Optionally, set a ‘Default Value’ for the field, which will be added if the user doesn’t provide their own information.
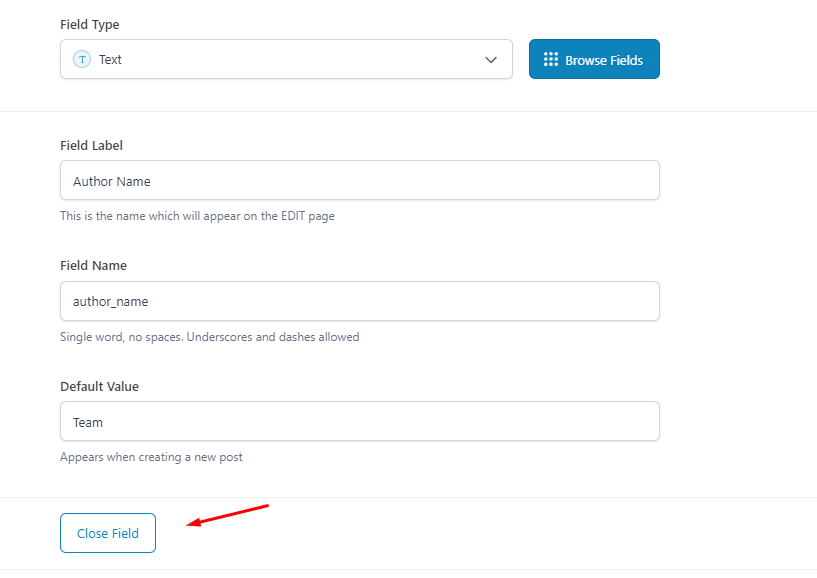
- Once satisfied with the field setup, click ‘Close Field‘ to collapse the section.
- To add other fields to the custom meta box, click ‘Add Field‘ and repeat the procedure.
Add a Custom Meta Box to the WordPress Content Editor
Once you’ve set up your custom meta box to your liking, it’s time to specify where and when it will appear in the WordPress content editor.
Scroll down to the ‘Settings’ section and click on the ‘Location Rules‘ tab.
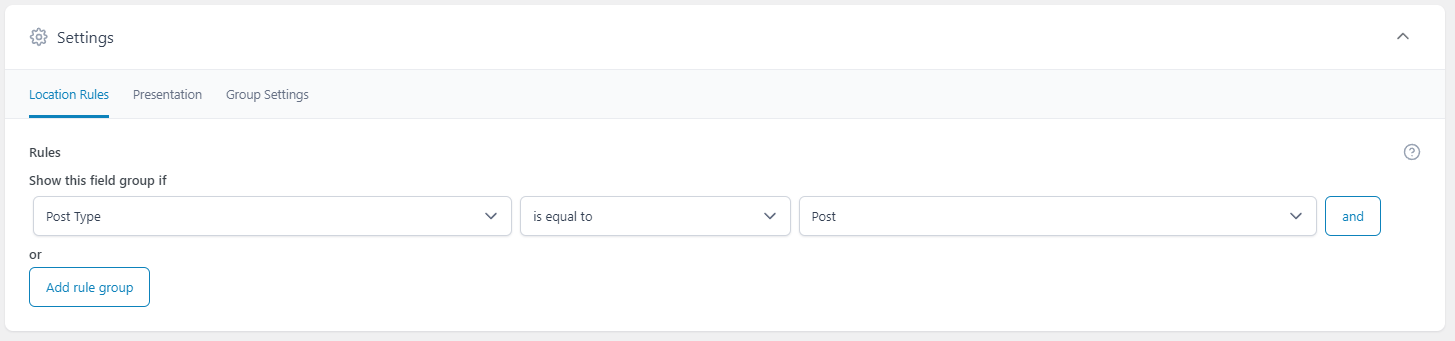
Advanced Custom Fields offers versatile options for displaying the meta box.
You can choose specific post types, categories, taxonomies, navigation menus, and more. For instance, if you accept guest posts, you might want to add the meta box to all posts in the ‘Guest Posts‘ category.
After selecting the desired locations, navigate to the ‘Presentation’ tab.
Here, customize the meta box style, placement on your WordPress blog, and where the label and instructions will appear.
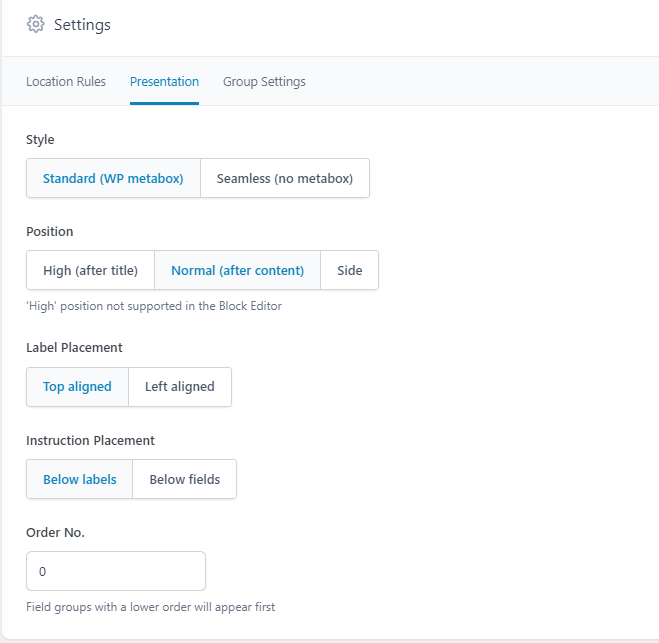
- If you plan to include multiple meta boxes in the same location, you can adjust their order by assigning values in the ‘Order No’ field.
- For example, prioritizing important meta boxes towards the top of the screen can enhance your editorial workflow.
- You’ll also see a list of default fields displayed on the post edit screen. To hide a field, simply check its box. For instance, if you’re using custom fields to create an author info box, you may want to hide the default ‘Author’ field.
- Once satisfied with your settings, click ‘Save Changes‘ to activate the field group.
Now that you have successfully created a custom meta box for the WordPress dashboard, it is time to display it on your website because it won’t appear by default.
With that in mind, let’s make sure your WordPress theme includes the custom information so that visitors can view it.
You may accomplish this by using a shortcode or by modifying the WordPress theme files.
How to Display Custom Metadata with Shortcodes
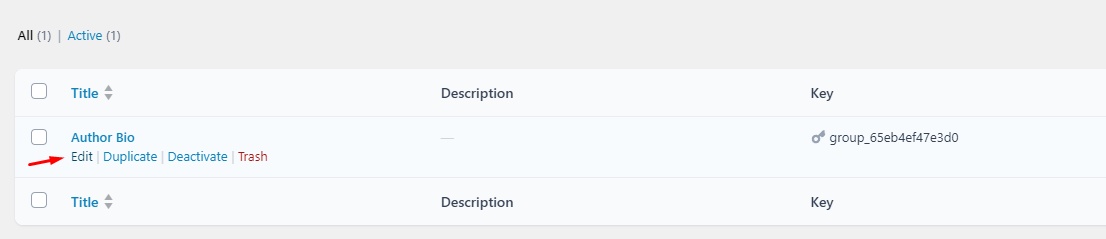
Adding a shortcode in WordPress is easy, simply go to ACF > Field Groups, then hover over the ‘Title’ and click on ‘Edit’.
You can now view all of the fields that make up this group.
Make a note of the ‘Name’ value for each field you want to display.

Once that is completed, go to the page, post, or custom post type where you want to show the custom information.
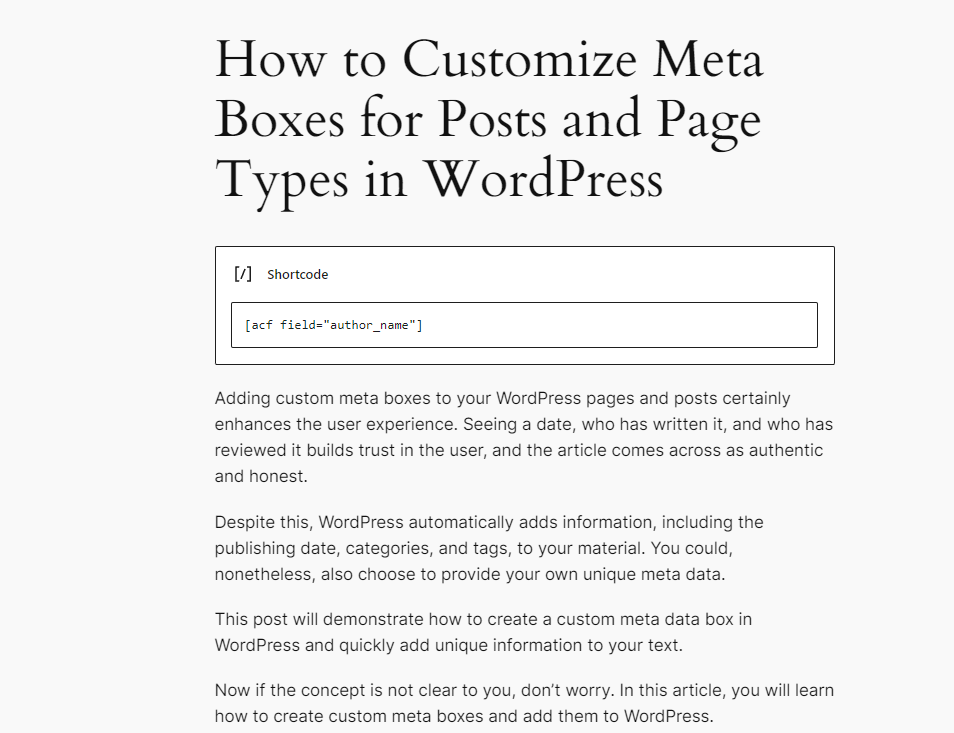
Click the ‘+‘ icon and write ‘Shortcode.’
To add more custom fields to the post, simply follow these instructions again.
Click “Publish” or “Update” whenever you’re satisfied with the modifications you’ve made. To see the custom metadata in action, just go to your WordPress website.
Conclusion
WordPress users benefit greatly from the ability to customize meta boxes for posts and page types using tools such as Advanced Custom Fields. By adding custom fields, users may personalize their editing experience, expedite processes, and improve content management.
Advanced Custom Fields allows users to quickly construct custom meta boxes with specified fields to collect and show more information about their content. From basic text fields to complicated data structures, the options are limitless.
By following the procedures given in this post, WordPress users may smoothly integrate custom meta boxes into their editing process, increasing productivity and improving the overall user experience. Custom meta boxes allow users to generate unique content by adding author bio sections, changing product data, and controlling event information.
FAQs on Customize Meta Boxes
How can I update a post type or page type with a new meta box?
Use the add_meta_box() method in a custom plugin or the functions.php file in your theme to add a new meta box. The arguments needed for this method are the post type to which the meta box should be added, the context (e.g., normal, advanced, side), the meta box ID, the title, and the callback function to show content.
Can I get rid of the post editing screen’s current meta boxes?
Absolutely, you can use the remove_meta_box() method to get rid of any existing meta boxes. The ID of the meta box you wish to delete and the post type from which you wish to remove it are required by this method.
How can I save and access the data that I add into my own meta boxes?
You usually use the save_post hook in conjunction with the required checks to make sure data is only saved when necessary in order to save data submitted into custom meta boxes. Get_post_meta() and other methods are used to retrieve stored data.
