
In today’s fast-moving digital world, timely and effective communication is essential. Whether you’re facing an urgent deadline, dealing with unexpected service interruptions, or need to address a burst of news or controversy, your website must deliver key information quickly and clearly.
Picture this: a crucial deadline is looming, or a service issue is affecting your business hours. Maybe severe weather leads to an unplanned closure, or you’re dealing with a temporary outage. In these crucial moments, clear communication isn’t just important—it’s a competitive edge.
This is where an alert bar comes in. Positioned prominently at the top of every page, above the logo and navigation, the alert bar guarantees that your message gets seen right away. It’s an effective tool for grabbing attention and delivering critical updates that can’t be missed.
By incorporating an alert bar into your website strategy, you streamline the management of urgent messages. With WordPress, turning the alert bar on or off is simple, giving you the flexibility to handle pressing situations with ease.
What is a WordPress Alert Bar?

A WordPress alert bar is a slim, unobtrusive banner that stretches across a webpage without blocking the main content. Typically positioned at the top of the page, it can include text, links, call-to-action buttons, and a close or hide option. On mobile devices, alert bar text often appears at the bottom, making them easy to interact with, especially for users on touchscreens.
Alert bars are one of the first things a visitor sees when landing on a website, making them an essential tool for conveying urgent information without disrupting the overall user experience.
Must-Have Features for an Effective WordPress Alert Bar
1. Website-Wide or Homepage Display
Configure the alert bar to appear across your entire website or just on the homepage, depending on the importance of your announcement. Whether you need to share updates site-wide or a specific message for the homepage, this feature provides flexible control.
2. Easy Setup
Setting up the notification bar is straightforward using the WordPress customizer. No technical expertise is needed—just a few clicks, and you can adjust it to suit your needs. The aim is to make the process simple and efficient.
3. Optional Close Button
Allow users to dismiss the alert bar by adding a close button. This feature enhances the user experience by letting visitors hide the alert once they’ve read it, demonstrating that you value their time and attention.
4. Sticky Display
One of the key features is the sticky bars display option. With this enabled, the notification bar remains visible as users scroll through your site, ensuring your message stays prominent until action is taken.
5. Custom Styling
Personalize the look of your alert bar to align with your website’s branding. Customize the background color, font size, text color, and alignment of the floating bar to ensure the alert integrates seamlessly with your site’s design.
6. Call-to-Action Button
Enhance engagement by adding a call-to-action (CTA) button to your alert bar. Whether you want visitors to “Shop Now,” “Learn More,” or take any specific action, this feature transforms your alert into a powerful tool for driving conversions.
7. Mobile Responsiveness
The alert bar is designed to be fully responsive, ensuring it looks great on any device, whether it’s a desktop, tablet, or smartphone. This ensures a consistent, high-quality experience for all users, regardless of screen size.
8. Lightweight Code
The alert bar operates on minimal code and uses vanilla JavaScript for its functionality. This keeps your site fast and efficient without the need for heavy libraries like jQuery, ensuring a quick load time and smooth performance.
When to Use a WordPress Alert Bar
Alert bars are a powerful tool for sharing urgent or important information with your site visitors. Here’s how they can be used in different scenarios:
- Important Announcements: Alert bars are ideal for updating visitors about significant changes, like changes in office hours, new services, or relocations. For instance, if you need to update your terms and conditions or implement a new cookie consent policy, an alert bar ensures visitors are notified right away using the display settings.
- User Engagement: Want to welcome new users or direct them to specific sections such as FAQs or a help page? The display settings of an alert bar offer a subtle yet effective way to guide them without being intrusive.
- News and Updates: For sites focused on news, sports, or niche topics, alert bars can be used to highlight breaking news, traffic updates, weather alerts, or local emergencies. This way, visitors stay informed without having to dig through content.
- Content Notifications: If your site features serialized content like podcasts, videos, or blog series, use alert bars to announce new episodes or releases. Adjust the display settings to make sure these updates grab your audience’s attention.
- E-Commerce Promotions: Online stores can use alert bars to promote limited-time offers, special discounts, or new product launches. The display settings help create a sense of urgency, prompting visitors to act fast and take advantage of deals.
Methods to Create a WordPress Alert Banner
Method 1: Using OptinMonster
If you’re looking for an easy way to add a notification bar to your website, using a WordPress plugin is your best bet. Plugins are perfect for those who want a quick setup without dealing with coding. They often come with handy features like countdown timers, multiple call-to-action buttons, and animation effects to make your alert bar more engaging.
Among the many options out there, OptinMonster stands out. It provides powerful features like countdown timers, call-to-action buttons, animation effects, and lightbox popups, and it integrates smoothly with popular email marketing services to help grow your email list.
Here’s a simplified guide to setting up an alert bar with OptinMonster:
1.1. Sign Up and Install
Start by signing up for an OptinMonster account on their website. After you’ve created your account, go to your WordPress dashboard to install and activate the OptinMonster plugin. Follow the setup wizard to link your WordPress site with OptinMonster.
1.2. Create and Customize Your Campaign
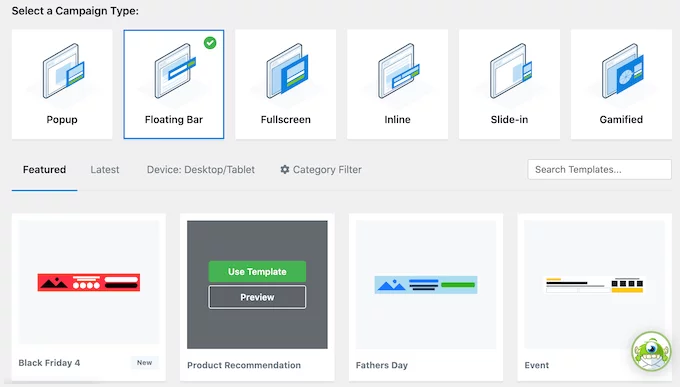
Once you’re connected, head to OptinMonster » Campaigns in your dashboard and click “Create Your First Campaign.” Choose the “Floating Bar” option to keep your alert bar visible on your page. Pick a template that matches your site’s style and give your campaign a name. Use the campaign editor to customize your alert bar by dragging and dropping text, buttons, and images. You can adjust its position and design, including a limited time offer countdown.
1.3. Save and Publish
When you’re happy with your design and settings, click “Save” to make your alert bar live. It will appear on your site based on the preferences you’ve set.
Method 2: Creating an Alert Bar with Thrive Leads
If you’re looking to add an alert bar to your WordPress site, Thrive Leads plugin is a great option. This highly customizable plugin is part of the Thrive Themes suite and is designed to help you generate leads and increase engagement with various opt-in forms and conversion tools. It’s perfect for growing your email list while keeping your visitors informed about important updates.
Here’s a simple guide to setting up an alert bar with Thrive Leads:
2.1. Sign Up for an Account
First, head over to the Thrive Themes website and sign up for an account. Click on the “Start Now” button to begin. Once you’re signed up, you’ll get access to the Thrive Product Manager and other tools in the Thrive Themes suite.
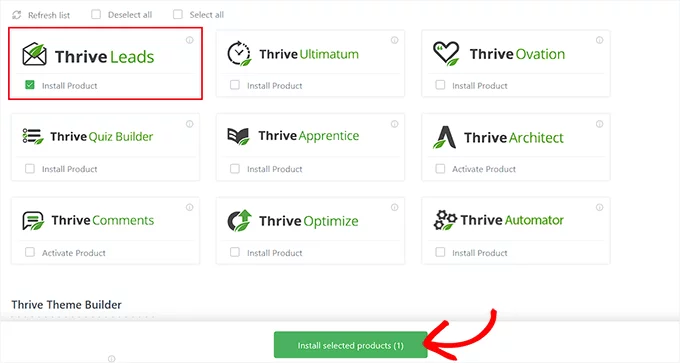
2.2. Install and Activate Thrive Leads
After signing up, install the Thrive Product Manager plugin on your WordPress site. This will let you download and activate Thrive Leads along with other Thrive Themes tools. Once installed, activate Thrive Leads from your WordPress dashboard.
2.3. Create a New Lead Group
In your WordPress dashboard, go to Thrive Dashboard » Thrive Leads and click “Add New” to create a lead group. This lead group will include your alert bar. Name your group and select “Top Ribbon” as the form type to create your alert bar.
2.4. Customize Your Alert Bar
Thrive Leads comes with several pre-designed templates for alert bars. Choose one that fits your site’s style and use the visual editor to make it your own. You can drag and drop text, images, and buttons just like you would with a page builder. Adjust colors, fonts, and layout to match your site’s design.
2.5. Set Display Rules
The Thrive Leads plugin has powerful targeting options that let you control when and where your alert bar appears, and even the display frequency. You can set it to show on specific pages, to certain types of visitors (like new or returning users), or based on user actions such as scrolling or exit intent.
2.6. Activate and Publish
Once you’re happy with your alert bar and its settings, click “Save” and then “Publish.” Your alert bar will go live according to the rules you’ve set.
Thrive Leads also lets you track the performance of your campaigns, so you can see how well they’re working and make any necessary tweaks.
Method 3: Creating and Customizing an Alert Bar Using Custom HTML/CSS
If you prefer not to use plugins like OptinMonster or Thrive Leads to create and customize an alert bar in WordPress, you can go the manual route with custom HTML and CSS. This method gives you full control over the appearance and behavior of your alert bar, but you’ll need a basic understanding of HTML and CSS. Here’s a step-by-step guide to help you create an alert bar using custom code:
3.1. Install the WPCode Plugin
To easily manage and add custom HTML and CSS to your WordPress site, use the WPCode plugin. It helps keep your site organized and makes adding code snippets a breeze. Go to your WordPress dashboard, search for the WPCode plugin, and install it. Once installed, activate the plugin.
3.2. Add a New Custom Code Snippet

After activating WPCode, navigate to Code Snippets » Add Snippet from your WordPress dashboard. Choose the “Add Your Custom Code (New Snippet)” option to create a new snippet.
3.3. Insert the Custom HTML and CSS Code
With your new snippet created, give it a title for easy reference. Paste your CSS code into the Code Preview area to style your alert bar. Here’s a basic example of CSS code for a simple alert bar:
.custom-alert-bar {
background-color: #ffcc00;
color: #000;
text-align: center;
padding: 10px;
position: fixed;
top: 0;
width: 100%;
z-index: 9999;
}
Change the Code Type to “CSS Snippet” from the dropdown menu, then click “Save” to store your custom CSS.
3.4. Add the HTML Structure
Next, you’ll need to add the HTML that displays the alert bar on your site. You can either insert this directly into your theme’s header.php file or, more conveniently, use WPCode’s Header and Footer settings. To do this, go to Code Snippets » Headers & Footer and add the following HTML code:
<div class="custom-alert-bar">
    <p>Important Announcement: Our sale ends tomorrow! <a href="#">Shop Now</a></p>
</div>
This creates a notification bar with a message and a clickable link. Feel free to customize the text and link as needed.
3.5. Customize the Bar’s Appearance and Behavior
Depending on your site’s design, you may need to tweak the alert bar to ensure it doesn’t overlap with your navigation menu or other elements. Adjust the bar’s height, padding, or position in your CSS if needed. For example, if the alert bar overlaps with the navigation menu, you can adjust the top positioning like this:
custom-alert-bar {
    position: relative;
    top: 50px; /* Adjust as needed */
}
3.6. Publish and Test
After adding and customizing your code, test the alert bar on both desktop and mobile devices to make sure it looks and functions correctly. Once you’re satisfied, publish the changes to make the alert bar live on your site.
Method 4: Insert a Custom Alert Message to WordPress Pages Using SeedProd
If you want to add custom alert messages to different sections of your WordPress website—like product pages, checkout pages, or any other area—SeedProd is an excellent tool to use. SeedProd is a powerful drag-and-drop builder that lets you create fully customized pages and elements without touching any code. Here’s a step-by-step guide on how to use SeedProd to add an alert message to your WordPress site:
4.1. Install and Activate SeedProd
To start, you need to install and activate the SeedProd plugin. Go to your WordPress dashboard, search for SeedProd, and click “Install Now.” After it’s installed, activate the plugin so you can begin creating custom alerts and pages.
4.2. Create a New Page or Edit an Existing One
Once SeedProd is activated, you can either create a new page or edit an existing one. SeedProd offers an easy-to-use drag-and-drop interface, so you can build a custom page without any coding. If you have existing pages, just select the one where you want to add your custom alert message.
4.3. Add an Alert Block
SeedProd includes an Alert Block specifically for adding alert messages to your pages. This block is perfect for placing important notifications, warnings, or updates right on your site. Use it to highlight low stock on product pages, inform customers of time-sensitive deals, or display critical site information.To add the Alert Block:
- Open the SeedProd editor for the page you want to modify.
- Drag and drop the Alert Block onto the page where you want the message to appear.
4.4. Customize the Alert Message
Once you’ve placed the Alert Block, you can customize it to fit your needs. SeedProd allows you to:
- Edit the alert’s title and description to deliver your message clearly.
- Add dynamic content, like dates, countdowns, or personalized details, to make the alert more engaging.
- Adjust the alert’s appearance, including font size, color, and alignment, or add icons to draw more attention to the message.
4.5. Display Alerts on Specific Pages
One of SeedProd’s advantages is that you can control exactly where your alert messages show up. For example, display an alert on product pages to notify users of low stock or special offers. You can also add alerts to checkout pages to inform customers about free shipping promotions or upcoming sales.
Drive Conversions with WordPress Alert Bars
In conclusion, adding an alert bar is a brilliant way to grab your audience’s attention and keep them engaged. But as you enhance your site, it’s vital to ensure it remains lightning-fast and responsive.
Don’t let sluggish performance drag you down. Join forces with Nestify for blazing-fast hosting, unbeatable security, and support that feels like having a tech guru in your corner. Ready to supercharge your website’s performance? Dive into Nestify’s WordPress hosting options today and watch your site soar to new heights!
FAQs on Website Alert Banner Efficiency
How can I target specific visitors with my alert bar?
Many alert bar plugins offer targeting options that allow you to display different messages based on visitor behavior, location, or time of day. Check the plugin’s settings for targeting features and configure them according to your needs.
Will using an alert bar affect my site’s performance?
Alert bars generally have minimal impact on site performance. However, choosing a well-coded plugin is essential to ensure it runs smoothly and doesn’t slow down your site.
How can I track the effectiveness of my alert bar?
Some alert bar plugins come with built-in analytics or integration with Google Analytics, enabling you to track metrics like click-through rates and user interactions. This data helps you measure the effectiveness of your alert bar and make data-driven decisions.
Can I combine an alert bar with other notification features?
Yes, you can combine alert bars with other notification features like pop-ups or banners for a comprehensive approach to user engagement. Ensure that the notifications complement each other and don’t overwhelm your visitors.
