
Whether you’re a seasoned WordPress user or new to the platform, you may be overlooking some of its lesser-known features.
Uncovering these hidden gems can significantly enhance your experience with WordPress and boost your productivity. Ignoring or misunderstanding these features might lead to frustration and wasted time.
In this article, I’ll illuminate some of the features within WordPress core that often go unnoticed. By familiarizing yourself with these features, you can streamline your workflow and maximize your efficiency when working with WordPress.
Unusual Yet Effective WordPress Features:
1. The Dashboard:
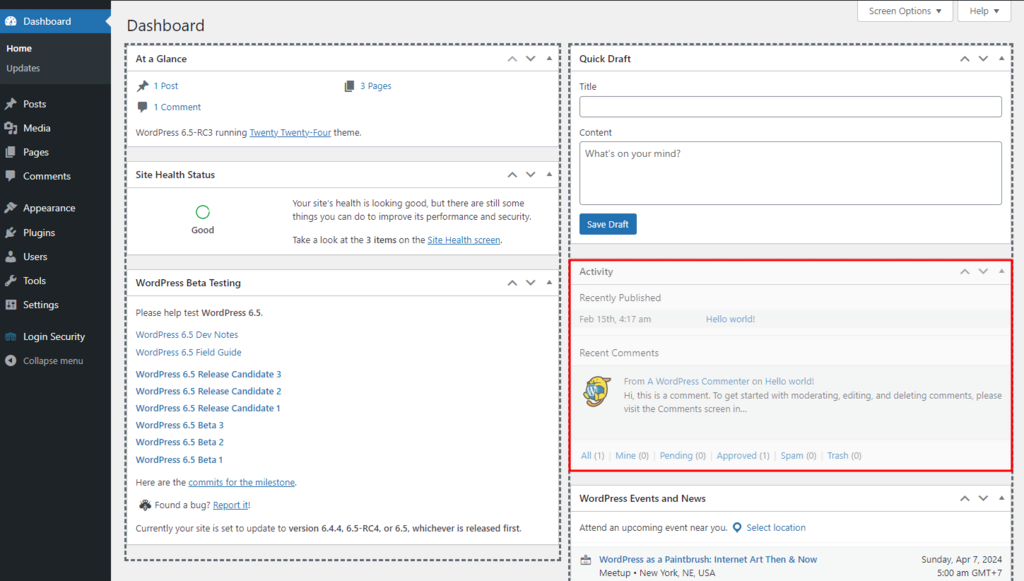
Even though the Dashboard in WordPress might not be the focal point of your attention, it serves as a dynamic hub offering many customizable features. One of its most underrated aspects is the ability to manipulate sections using a simple drag-and-drop interface. These sections, such as “At a Glance,” “Site Health Status,” and “Activity,” can be rearranged, hidden, or organized according to your preferences, allowing for a personalized user experience.
For instance, within the WordPress admin dashboard, I’ve demonstrated how easy it is to relocate the Activity section to the bottom of the right column by simply dragging it to my desired location. This level of flexibility empowers users to tailor the Dashboard layout to suit their specific needs and workflow preferences.
2. Screen Options:
In addition to the Dashboard’s customizable features, many pages within the WordPress admin area offer an often overlooked gem: Screen Options. Positioned conveniently near the upper right-hand corner of these pages, the Screen Options button serves as a gateway to a treasure trove of customization possibilities.
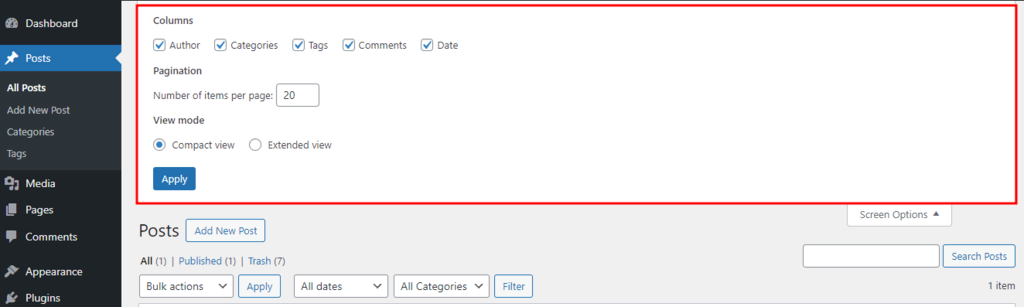
Upon clicking the Screen Options button, a menu unfolds, unveiling an array of options tailored to the specific page you’re on. These options enable you to fine-tune the page’s layout and content presentation according to your preferences. For example, when accessing the Posts page in the WordPress admin area, I showcased how the Screen Options menu allows users to customize the displayed columns, adjust the number of post items shown per page, and even toggle between different view modes such as Compact and Extended.
After making the desired adjustments, it’s essential to click the Apply button to save your preferences. You can then conveniently close the Screen Options menu by clicking the button again, ensuring that your customized settings are preserved for future use.
The Screen Options feature’s versatility extends across various pages within the WordPress admin area, including, but not limited to, the Dashboard, All Posts, Categories, Tags, All Pages, Media, Comments, Menus, Plugins, and Users. This comprehensive integration of customizable options empowers users to tailor their WordPress experience to perfectly align with their unique requirements and preferences.
3. Quick Edit:
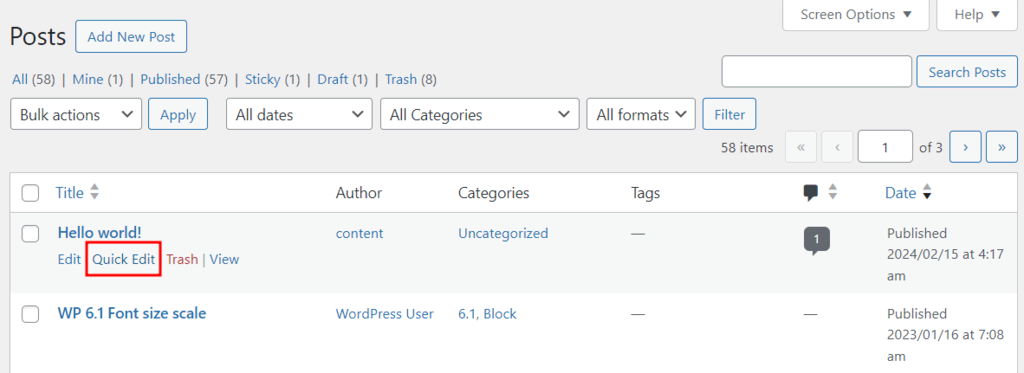
Quick Edit is a convenient feature in WordPress that allows users to make swift modifications to pages or posts without opening the editor in a separate tab or window. Within the Posts section of WordPress, the Quick Edit button stands out, offering users a streamlined editing experience.
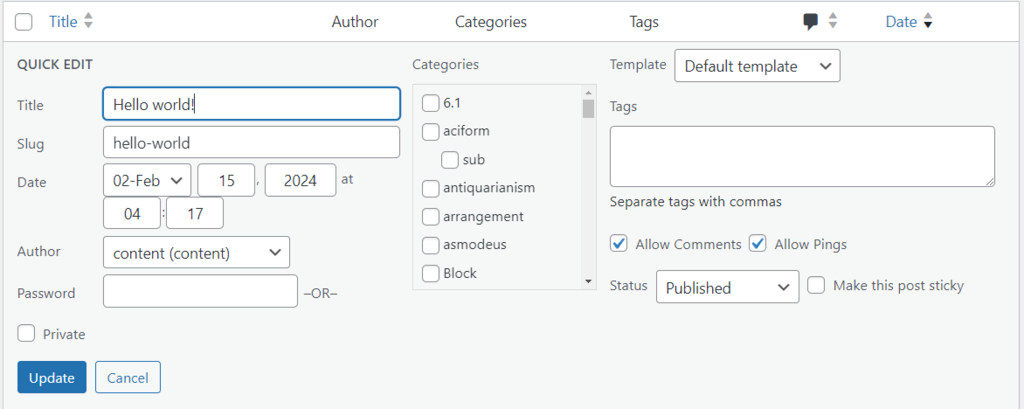
With Quick Edit, users can effortlessly adjust various attributes of a page or post, including:
- Page Title
- URL
- Date or Time of Publication
- Author
- Categories, Tags, Permission To Leave Comments (for posts only)
- Status
A compact editing interface emerges upon clicking the Quick Edit button, presenting users with a concise set of options to tweak their content swiftly. Once the desired changes have been made, users can simply select the Update button to apply the modifications instantly.
4. Bulk Actions:
Similar to Quick Edit but on a broader scale, Bulk Actions is a feature designed for users who need to modify settings for multiple pages or posts simultaneously. This feature proves invaluable when undertaking tasks such as changing authors for multiple pages or reverting the status of numerous posts from Published to Draft.
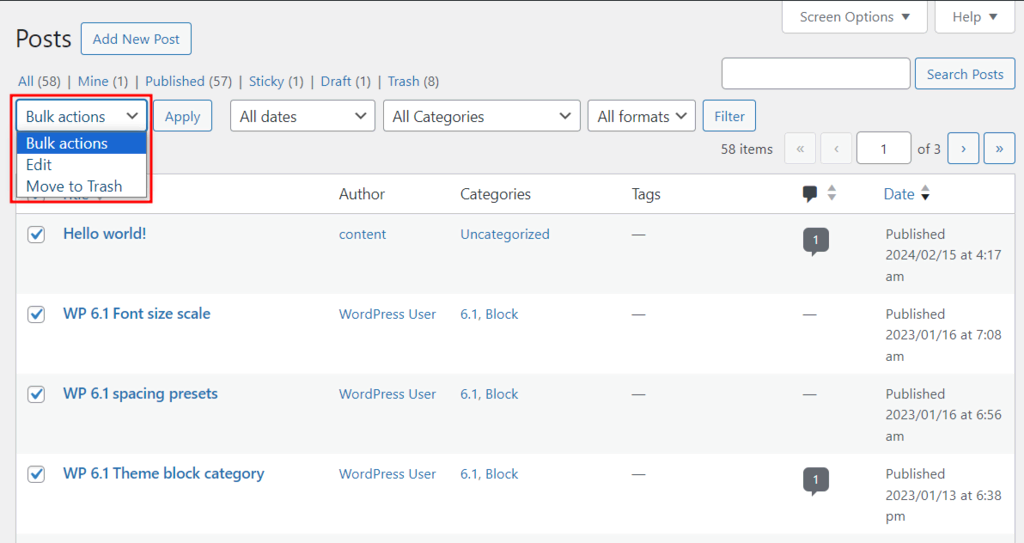
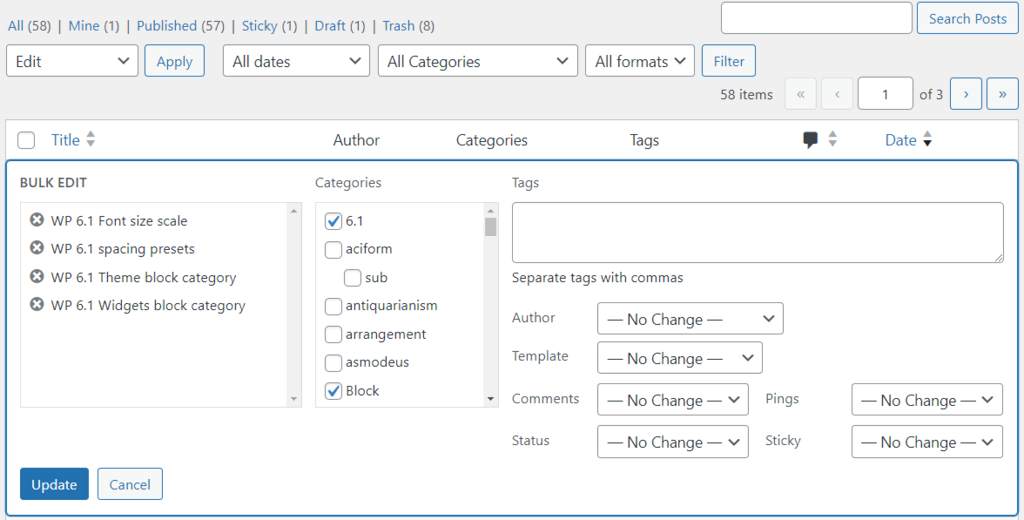
To utilize Bulk Actions, users navigate to the desired section, such as Posts, and select the posts they wish to modify. Then, by accessing the Bulk Actions drop-down menu and choosing the Edit option, users can apply the desired changes across the selected items. After choosing the Apply button, users are presented with various editing options, mirroring those available in Quick Edit.
If users wish to revert changes to a specific post or page, they can easily do so by selecting the X button next to the title. Once all modifications have been finalized, users can simply select Update to ensure the changes take effect.
The Bulk Actions feature is not limited to the Posts section; it is also available across various other pages within the WordPress Admin interface, providing users with a comprehensive toolset for efficient content management.
5. Comments:
When managing a blog with comment functionality enabled, it’s crucial to moderate comments effectively to mitigate spam and security risks.
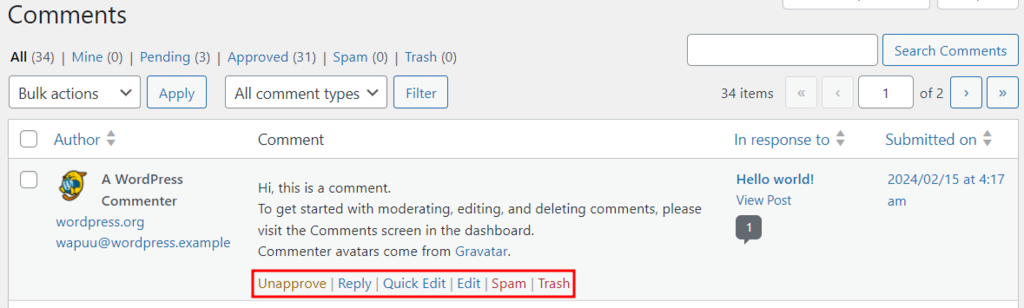
The moderation options may not be immediately apparent in the Comments section otake time to becomemin area. Users must hover over each comment to reveal a menu of actions they can take, as highlighted in the image below.
These are the available options for each comment:
- Approve/Unapprove
- Reply
- Quick Edit
- Edit
- History
- Spam
- Trash
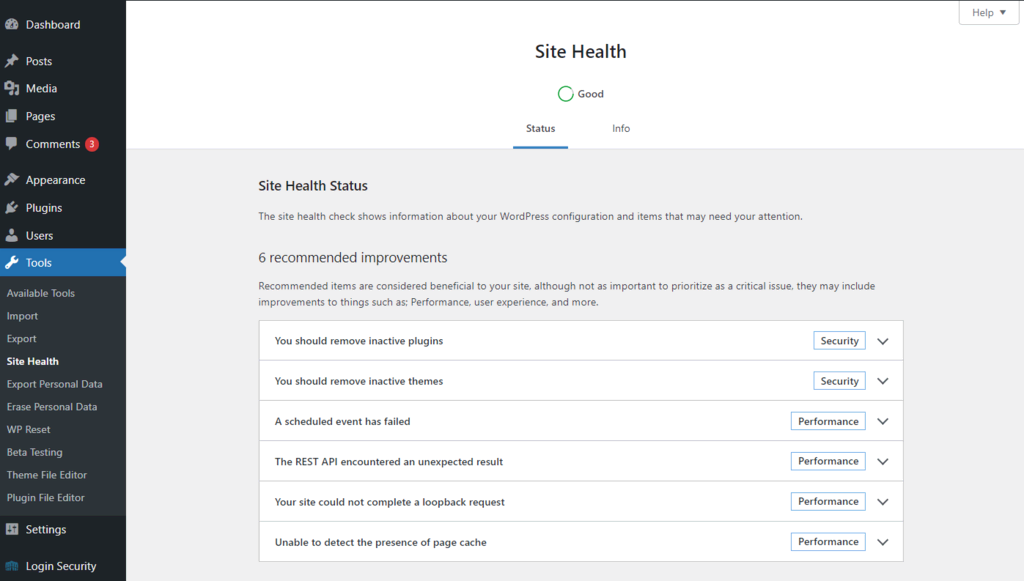
6. Site Health:
Located within the Tools section of the WordPress admin area, Site Health offers a convenient way to assess your website’s overall health. It is divided into two main sections.
The Status page provides insights into actions you can take to enhance your site’s security and performance. Meanwhile, the Info page comprehensively overviews your site’s configuration, including server type and other technical details. This information can be easily exported and shared if needed.
7. The Slash (/) Command:
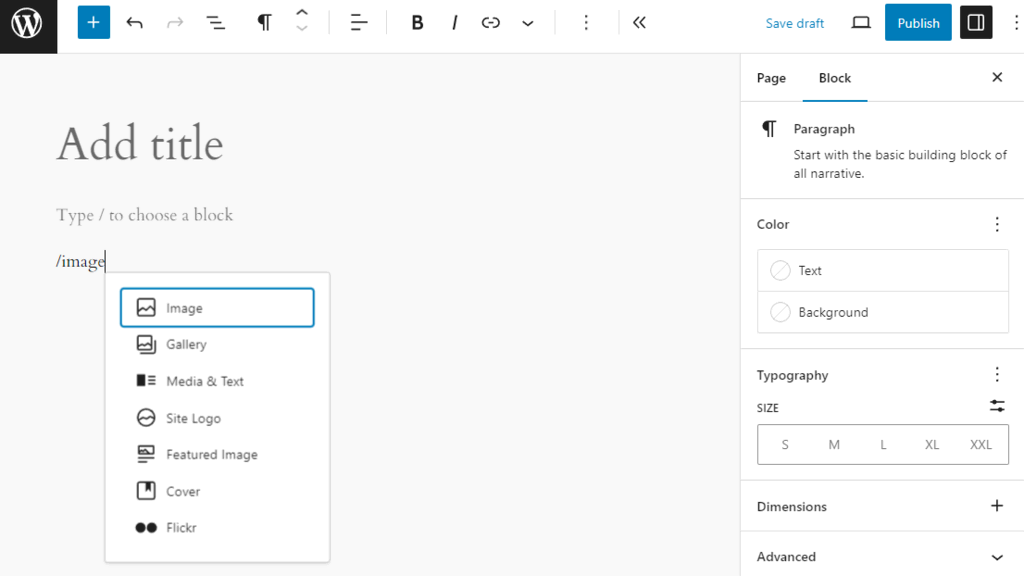
If you’ve repeatedly clicked the Inserter button to add blocks in the WordPress Block Editor, you may need to be made aware of a quicker method. Utilizing the slash (/) command can significantly speed up the block insertion process.
For instance, let’s say you want to add an image to your page. Instead of navigating menus, type “/image” and press enter. This shortcut instantly inserts an image block into your content, saving you valuable time and clicks.
8. Docked Toolbar:
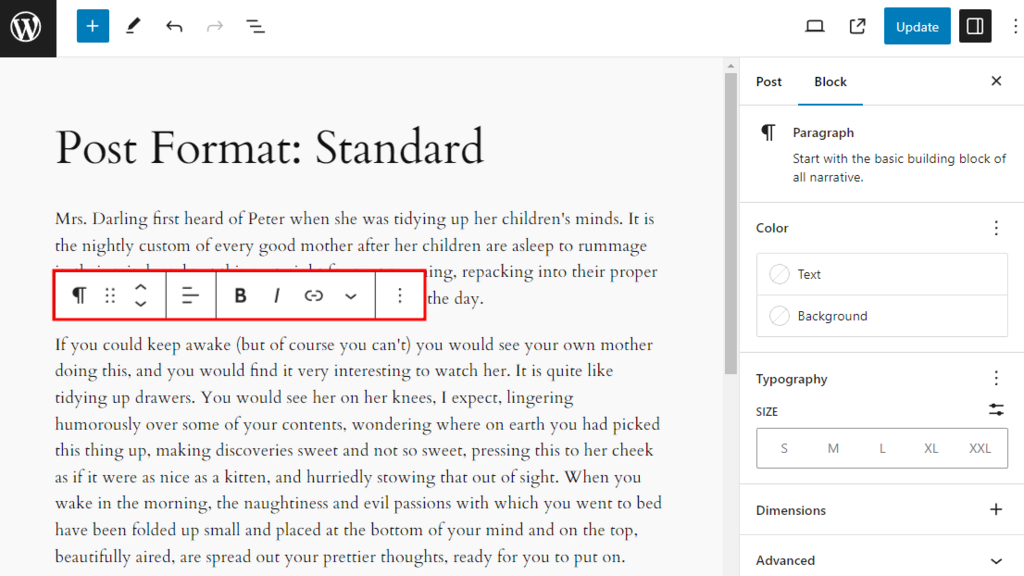
The floating block toolbar in the WordPress Block Editor can sometimes be distracting, hovering over your content while you work. To address this, you can dock the toolbar at the top of the page.
To do so, locate the three dots option at the top-right corner of the editor. Clicking on this will reveal a menu with several options. From there, select the “Top toolbar” option to anchor the toolbar firmly at the top of the page, eliminating distractions and providing a cleaner workspace.
9. Fullscreen Mode:
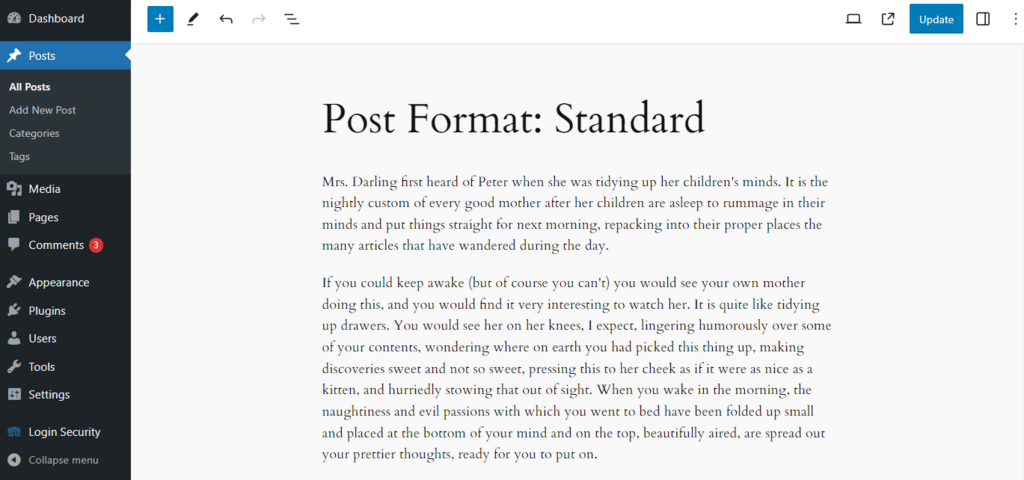
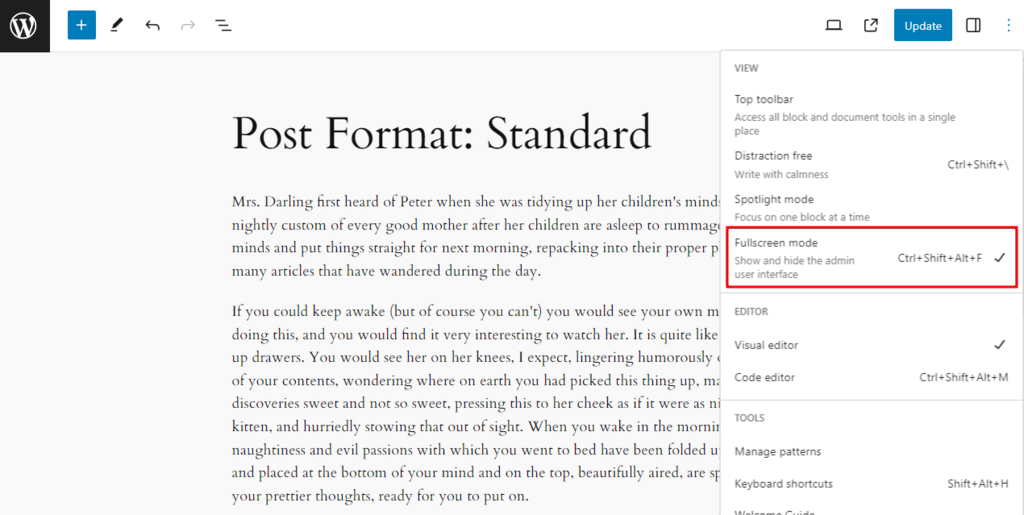
Working in fullscreen mode can provide a more immersive and focused editing experience, especially if you’re dealing with a smaller screen or find the left sidebar in the WordPress admin area intrusive.
To enter fullscreen mode, simply click on the three dots option in the upper right-hand corner of the screen. Select the “Fullscreen mode” option from the dropdown menu that appears. This will remove the sidebar, allowing you to maximize your workspace and concentrate solely on your content.
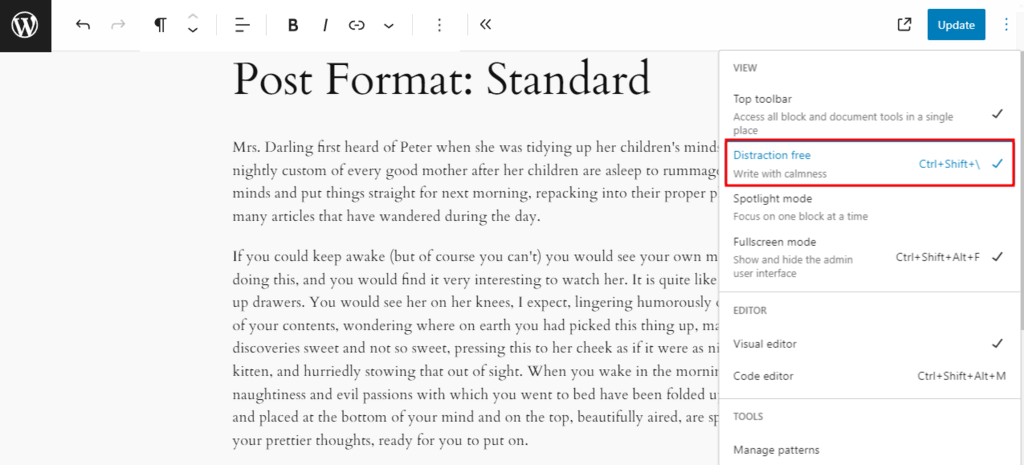
10. Distraction-Free Mode:
If you find the multitude of user interface elements in the Block Editor overwhelming, there’s a solution tailored just for you: Distraction-Free Mode. Accessible through the three dots button, this feature allows you to declutter your editing environment by removing all UI elements outside the editing area.
When enabled, your WordPress dashboard transforms into a serene workspace, free from distractions, as depicted in the image below.
To access the block toolbar and other controls, simply hover over the top of the page. They will reappear, providing quick access to essential features.
11. Spotlight Mode:
Spotlight Mode comes to your rescue when you need to concentrate on a specific block amidst your editing tasks. Clicking on the desired block becomes the focal point, highlighted for easy identification and manipulation.

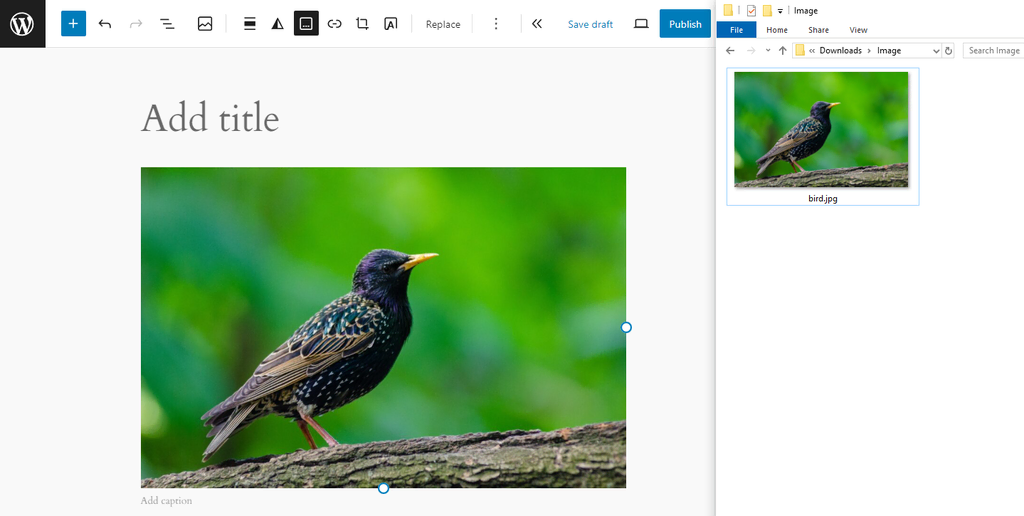
12. Replacing an Image via Drag and Drop:
While you may be familiar with conventional methods of adding images to your pages or posts, a lesser-known yet convenient feature is replacing an image via drag and drop.
In the block editor, simply drag the new image from your computer and drop it onto the existing image you wish to replace, as demonstrated in the following pictures.
Once dropped, the new image seamlessly replaces the old one, with the bonus of being automatically added to your Media Library.
13. Rearranging Blocks Using List View:
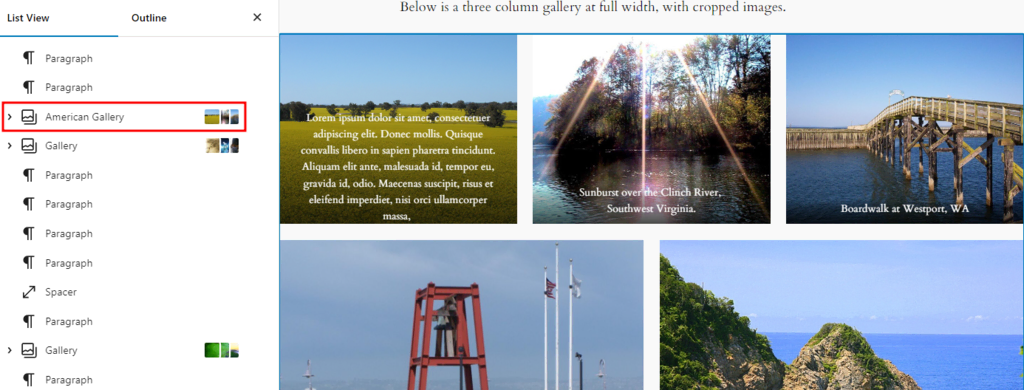
An effective way to manage your layout and blocks within the Block Editor is by utilizing List View. This feature lets you view and organize your blocks in a hierarchical list format, offering enhanced control and flexibility over your content structure.
Moreover, List View now enables you to rename most blocks, ensuring better representation and organization of your content. Simply access the three dots option within the desired block, select “Rename” from the fly-out menu, and customize the block’s name to suit your needs.
Once renamed, your blocks are easier to identify and manage within List View, facilitating smoother editing workflows.
14. Grouping Multiple Blocks Using the Block Toolbar
Creating a cohesive layout in WordPress’s Block Editor often involves arranging multiple blocks together. The Block Toolbar offers a convenient feature allowing users to group adjacent blocks into a cohesive unit.
How to Group Blocks:
- Select Blocks: Begin by selecting the adjacent blocks you wish to group. For instance, if you want to combine two paragraphs into a single block, click on the first paragraph and then hold down the Shift key while clicking on the second paragraph.
- Access the Block Toolbar: Once the desired blocks are selected, the Block Toolbar will appear at the top of the screen, displaying various options for block manipulation.
- Group Blocks: Within the Block Toolbar, locate the option to group the selected blocks. This icon resembles a folder or stack, indicating the action to create a group.
- Click on the Group Icon: Click on the group icon within the Block Toolbar to initiate the grouping process. The selected blocks will be enclosed within a single container block upon activation.
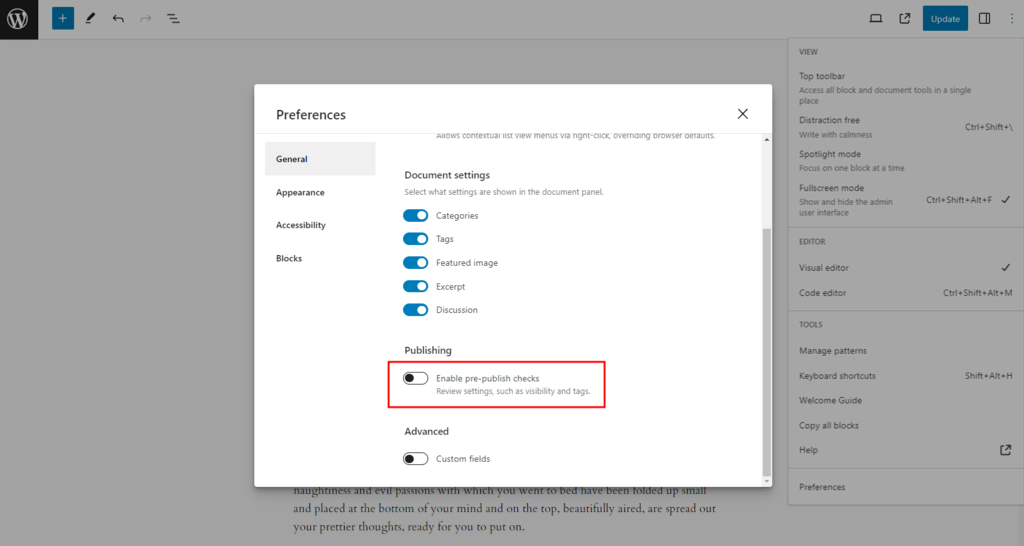
15. Turn Off the Two-Step Publishing Button
WordPress can disable the two-step publishing button for users who prefer a streamlined publishing process, reducing it to a one-click operation.
How to Disable the Two-Step Publishing Button:
- Access Preferences: Begin by clicking on the three dots button located within the WordPress editor interface. This button typically appears in the upper-right corner of the screen.
- Navigate to Preferences: From the dropdown menu that appears, select the “Preferences” option. This will direct you to a settings panel where you can customize various editor preferences.
- Toggle Off Pre-Publish Checks: Within the Preferences settings panel, locate the option labeled “Enable pre-publish checks.” Toggle this switch off to deactivate the two-step publishing button.
- Save Changes: Once you’ve disabled the pre-publish checks, ensure to save your changes by clicking on the appropriate button within the settings panel.
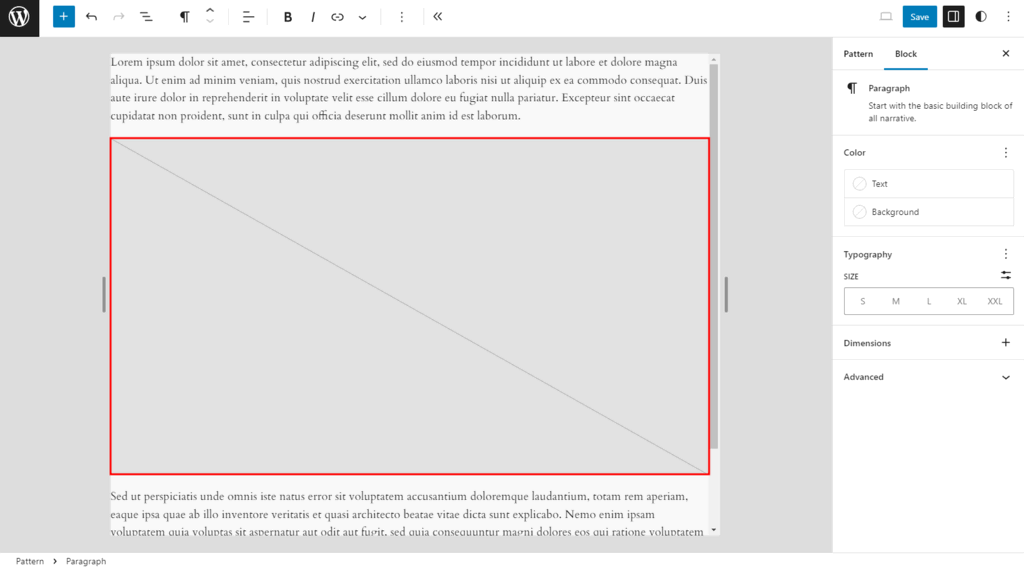
16. Setting Image Placeholder(s) in a Pattern
When creating a reusable template or pattern in WordPress, it’s essential to avoid inserting default dummy images that will require replacement with actual images later. To address this, utilizing image placeholders is a recommended best practice, as they simplify the process of replacing images while maintaining the template’s structure.
Creating Image Placeholders:
- Image Settings: Begin by configuring the image settings within the pattern or template you’re creating. For instance, you may align the image to the left of the text and adjust the aspect ratio to a desired setting, such as 4:3, ensuring consistency across all placeholder images.
- Rendering Image Placeholders: After configuring the image settings, clicking outside the image box will render an image placeholder. You can identify an image placeholder by the presence of a diagonal line through the box, indicating that it’s awaiting the insertion of an actual image.
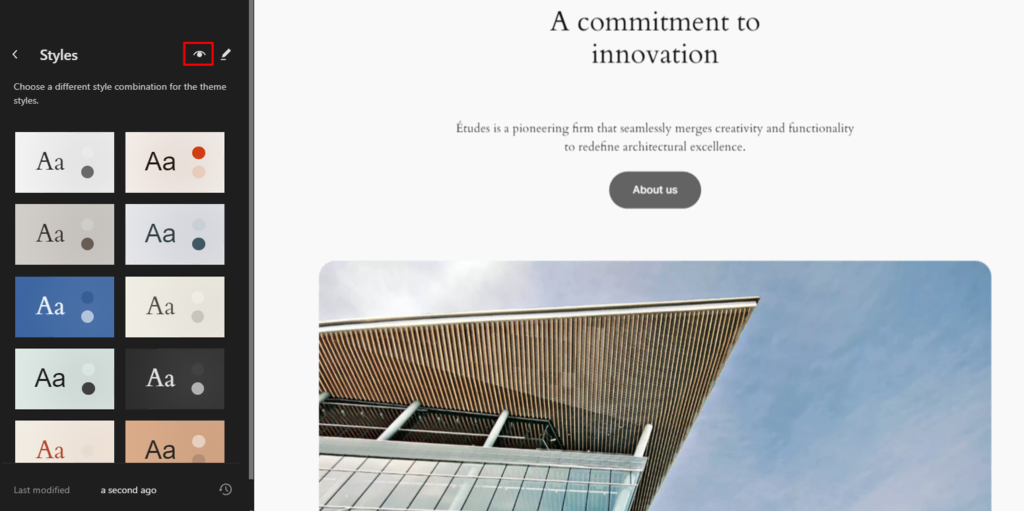
17. The Style Book
Exclusive to block themes, the Style Book offers a comprehensive solution for defining site-wide styles, including colors, fonts, dimensions, and more.
- Navigate to Styles Section: Within the Site Editor, locate the Styles section, typically positioned within the editing interface.
- Access Style Book: Click on the eye icon within the Styles section to access the Style Book, which serves as a centralized hub for managing site-wide styles.
Exploring Style Book Sections:
The Style Book is organized into distinct sections, each focusing on different aspects of site styling:
- Text: Manage typography-related styles, such as font face, size, and weight.
- Media: Define styles for media elements, including images and videos.
- Design: Customize design-related attributes, such as background colors, borders, and spacing.
- Widgets: Configure styles for widgets and other dynamic content elements.
- Theme: Access overarching theme settings and global design parameters.
Customizing Styles:
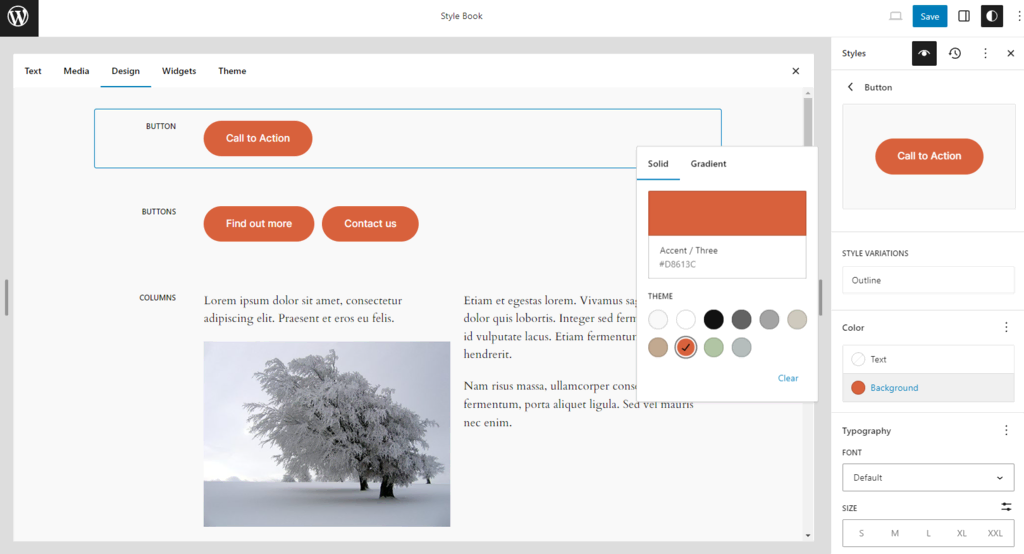
- Selecting Design Elements: Click anywhere within the design canvas to access the Style Book and begin customizing styles.
- Navigating Sections: Explore different sections within the Style Book to adjust specific style attributes. For instance, to modify button background color, navigate to the Design tab.
- Making Changes: Within the relevant section, make desired style modifications, such as selecting a new color for buttons.
Flexibility and Overrides:
Any changes made within the Style Book can be overridden on a block-by-block basis when working within the Page or Post Editor. This allows for granular control over styling elements, ensuring consistency while accommodating unique requirements for individual blocks.
18. Revisions
WordPress has continually evolved to offer users with greater control and flexibility over their website’s design elements. Introduced in WordPress 6.4 and further enhanced in WordPress 6.5, the Revisions feature empowers users to roll back changes made within critical areas of the Site Editor, including the Style Book, Templates, and Patterns.
Accessing Revisions:
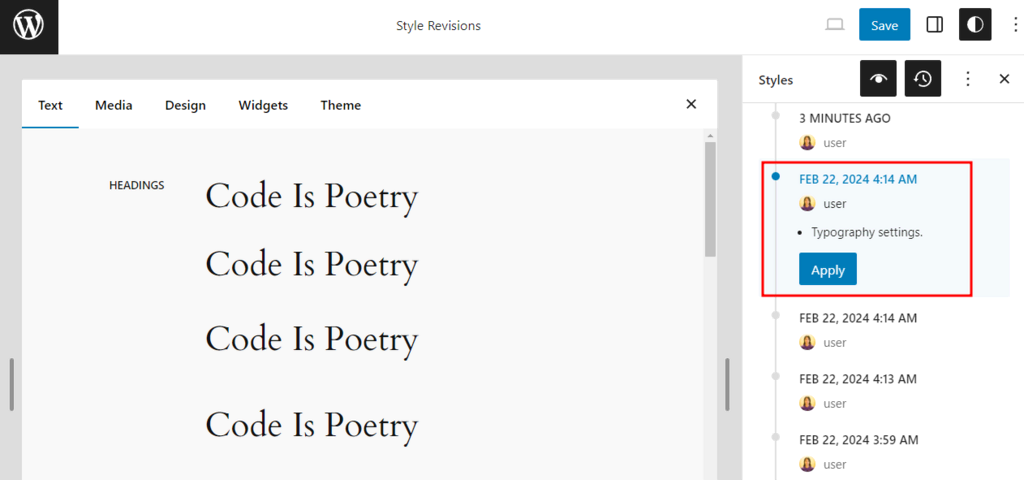
- Navigate to Style Book: To access Revisions within the Style Book, locate and click on the clock icon positioned in the upper right-hand corner of the editor interface.
- Review Revision History: Revisions are presented chronologically, showcasing the most recent versions. Each revision is attributed to the user who made the respective change.
Utilizing Revisions:
Upon accessing the revision history, users can review previous versions of their designs and templates. For instance, if a particular design iteration needs to be reverted, users can select the desired revision from the history.
Rolling Back Changes:
- Select Desired Revision: Choose the design version you wish to revert to from the revision history.
- Apply Changes: Upon selecting the desired revision, users can apply the changes by clicking the “Apply” button. This action restores the selected design style.
- Save Changes: To finalize the applied changes, users can save the design by selecting the “Save” button.
19. Exporting and Importing a Pattern
WordPress facilitates seamless sharing and reuse of design elements by enabling users to export and import patterns as JSON files. Whether you intend to utilize a pattern on another website or contribute it to the wordpress.org Patterns Repository, the export-import functionality streamlines the process.
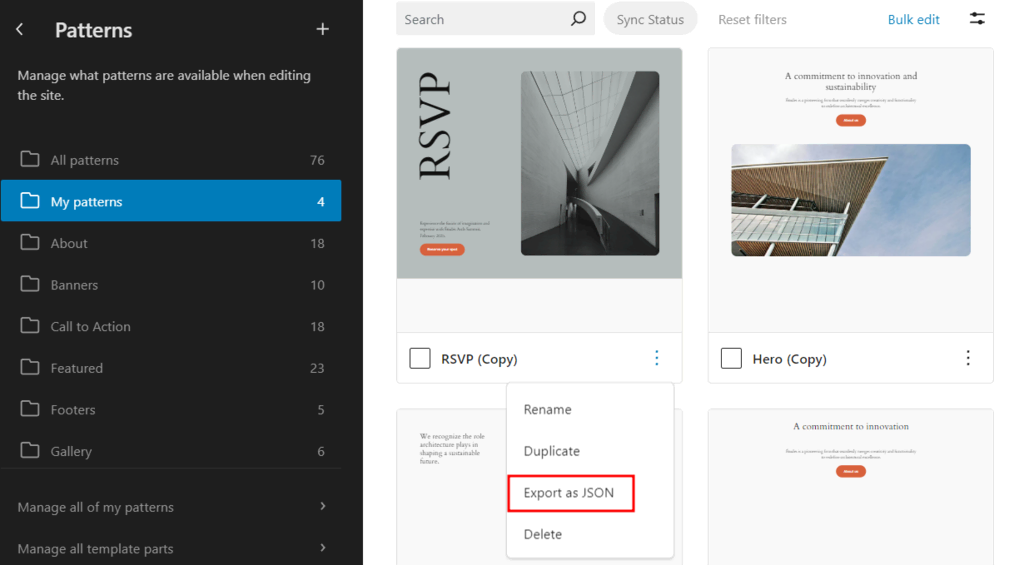
Exporting a Pattern:
- Navigate to Patterns Section: Access the Patterns section within the Site Editor interface, where existing patterns are listed.
- Initiate Export: Select the three dots option associated with the desired pattern and choose the export option. This action generates a JSON file containing the pattern data.
Importing a Pattern:
- Access Import Functionality: On the target website, navigate to the Patterns section within the Site Editor interface.
- Initiate Import: Click on the plus sign to reveal the import option, allowing users to upload the previously exported JSON file.
Conclusion:
In conclusion, while WordPress boasts intuitive usability, many of its advanced features often go unnoticed. By leveraging hidden features such as Revisions and export-import capabilities for patterns, users can enhance their workflows and maximize efficiency. Embracing these tips and tricks empowers users to unlock the full potential of WordPress, ensuring a seamless and productive website management experience.
