
WordPress allows you to add increased features, and Custom widgets are one of them. Whether you want to encourage users to take action, get information, do some tasks, or follow links.
Custom widgets can do that for you.
In this article, I’ll explain everything there is to know about WordPress Custom widgets.
How to add them to your website, make widget spaces for them to go,codes to add, develop your own widgets, and many other things. So, let’s get right into it.
What are WordPress Custom Widgets?
WordPress widgets are modular components that allow you to add different types of content and functionality to specific areas of your website. These areas, known as widget areas, include sidebars, footers, header areas, and other designated sections determined by your theme.
By default, WordPress provides a set of built-in widgets that cover common functionalities such as displaying recent posts, archives, categories, and more.
Why use Create Custom Widgets?
While using the default widgets is useful, there are several reasons why you might want to create custom widgets for your WordPress website:
- Unique Functionality: Custom widgets enable you to add unique functionality tailored to your needs.
- Branding and Design: You can create widgets that match your website’s branding and design, ensuring a cohesive user experience.
- Enhanced User Engagement: Custom widgets can engage users with interactive content like social media feeds or subscription forms.
- Efficient Content Management: Widgets provide a convenient way to manage and update content without modifying the theme’s code.
- Flexibility and Control: With custom widgets, you have full control over the appearance, behavior, and placement of the added functionalities.
How do WordPress Custom Widgets work?
There are over 20 functions on Custom Widgets, but the 4 below are minimum conditions for you to get started.
- __construct(): Initializes the WordPress custom widget by setting its name, description, and other parameters.
- widget(): Renders the output of the custom widget on the website.
- form(): Displays the form for configuring the settings of the custom widget in the WordPress admin dashboard.
- update(): Saves the updated settings of the custom widget when the form is submitted in the WordPress admin dashboard.
Create your WordPress Custom Widgets
This tutorial will guide you through creating a straightforward custom widget named “Welcome to Nestify!” This will help you understand the basic concepts of Custom Widget design in WordPress. Once you have completed this tutorial, you can progress to developing more intricate widgets independently.
It’s important to mention that we will be writing the code in the functions.php file of the active theme. However, you can employ the same code for any custom plugin you create.
WP-Widget Class
Open any text editor on your computer and create a new class file that extends the base WP_Widget class.
E.g.:
class nestify_widget extends WP_Widget {
//Insert functions here
}
- __construct()
function __construct() {
// Call the parent class’s __construct() function.
parent::__construct(
// Widget ID
‘nestify_widget’,
//Widget name
__(‘Nestify Sample Widget’, ‘nestify_widget_domain’),
// Widget description
array(‘description’ => __(‘Nestify Widget Tutorial’, ‘nestify_widget_domain’), )
);
}
- widget()
public function widget( $args, $instance ) {
$title = apply_filters( ‘widget_title’, $instance[‘title’] );
echo $args[‘before_widget’];
// If the title is present
if ( ! empty( $title ) ) {
echo $args[‘before_title’] . $title . $args[‘after_title’];
}
// Output
echo __( ‘Welcome to Nestify!’, ‘nestify_widget_domain’ );
echo $args[‘after_widget’];
}
- form()
public function form( $instance ) {
if ( isset( $instance[ ‘title’ ] ) )
$title = $instance[ ‘title’ ];
else
$title = __( ‘Default Title’, ‘nestify_widget_domain’ );
?>
<p>
<label for=”<?php echo $this->get_field_id( ‘title’ ); ?>”><?php _e( ‘Title:’ ); ?></label>
<input class=”widefat” id=”<?php echo $this->get_field_id( ‘title’ ); ?>” name=”<?php echo $this->get_field_name( ‘title’ ); ?>” type=”text” value=”<?php echo esc_attr( $title ); ?>” />
</p>
<?php
}
- update()
public function update( $new_instance, $old_instance ) {
$instance = $old_instance;
$instance[‘title’] = ( ! empty( $new_instance[‘title’] ) ) ? sanitize_text_field( $new_instance[‘title’] ) : ”;
return $instance;
}
Insert the code into the function.php file.
We’ve added a new function named nestify_register_widget() to the mix. It registers our Widget with the ID supplied in the __construct() function.
The function is then linked using widgets_init, which loads the Widget into WordPress via the built-in add_action() method.
This is how your WordPress custom widget code should look.
class nestify_widget extends WP_Widget {
function __construct() {
parent::__construct(
//Widget ID
‘nestify_widget’,
//Widget name
__(‘Nestify Sample Widget’, ‘nestify_widget_domain’),
// widget description
array( ‘description’ => __( ‘Nestify Widget Tutorial’, ‘nestify_widget_domain’ ), )
);
}
public function widget( $args, $instance ) {
$title = apply_filters( ‘widget_title’, $instance[‘title’] );
echo $args[‘before_widget’];
// If title is present
if ( ! empty( $title ) )
echo $args[‘before_title’] . $title . $args[‘after_title’];
// Output
echo __( ‘Greetings from Nestify!’, ‘nestify_widget_domain’ );
echo $args[‘after_widget’];
}
public function form( $instance ) {
if ( isset( $instance[ ‘title’ ] ) )
$title = $instance[ ‘title’ ];
else
$title = __( ‘Default Title’, ‘nestify_widget_domain’ );
?>
<p>
<label for=”<?php echo $this->get_field_id( ‘title’ ); ?>”><?php _e( ‘Title:’ ); ?></label>
<input class=”widefat” id=”<?php echo $this->get_field_id( ‘title’ ); ?>” name=”<?php echo $this->get_field_name( ‘title’ ); ?>” type=”text” value=”<?php echo esc_attr( $title ); ?>” />
</p>
<?php
}
public function update( $new_instance, $old_instance ) {
$instance = array();
$instance[‘title’] = ( ! empty( $new_instance[‘title’] ) ) ? sanitize_text_field( $new_instance[‘title’] ) : ”;
return $instance;
}
}
function nestify_register_widget() {
register_widget( ‘nestify_widget’ );
}
add_action( ‘widgets_init’, ‘nestify_register_widget’ );
How to the code in the function.php file.
To add the code, simply go to the WordPress backend.
- Go to Appearance ->Theme File Editor
- Paste the code and hit Update File
And you’re done implementing the custom widget code.

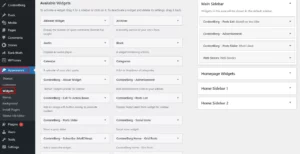
Now simply go to the Appearance menu and select Widget. There, you can see the widget name “‘Nestify‘ in our case” in the Available Widgets.
Furthermore, drag and drop the Widget into the Sidebar section on the right side of the page.
Conclusion
Creating custom widgets in WordPress allows you to extend the functionality of your website and provide fantastical experiences for your users. By following the step-by-step process outlined in this guide, you can create your own custom widgets and tailor them to suit your specific requirements. Don’t forget to test your widgets thoroughly and make necessary improvements to ensure their reliability and compatibility. With custom widgets, you have the power to augment the visual appeal and functionality of your WordPress site, providing a more engaging and dynamic user experience.
