
The power of expressing gratitude and providing clear direction after users complete certain actions on your website cannot be underestimated. Thank You Pages, often overlooked, serve as one of the most valuable elements in fostering a positive user experience. Whether you’re a business owner, marketer, or website administrator, understanding the impact of a well-crafted Thank You Page can transform the way your audience interacts with your brand and leave a lasting impression.
In this blog, we will dive deep into the significance of Thank You Pages, discussing why they are more than just a polite gesture and how they contribute to your website’s user experience. These pages serve not only to express gratitude but also to guide your users toward the next steps, whether it’s continuing their journey on your site, completing another action, or reinforcing their decision to engage with your brand.
What is a Thank You Page?

A Thank You Page is a dedicated webpage that users are directed to after completing a specific action on a website. This action could include making a purchase, submitting a form, signing up for a newsletter, or any other desired user interaction. It serves as a confirmation that the action has been successfully completed and provides an opportunity to thank the user for their engagement.
Key Elements of a Thank You Page
1. Confirmation Message
The confirmation message is the most important component of a Thank You Page. It should clearly inform the user that their action was successful, whether it’s completing a purchase, signing up for an event, or submitting a form. This reassurance helps reinforce a positive experience and prevents any uncertainty the user might have about whether their action was completed correctly.
2. Gratitude
Expressing genuine thanks to the user is key to building a strong relationship. Whether it’s thanking them for their purchase, registration, or simply their time, a sincere expression of appreciation fosters goodwill and leaves users feeling valued. Gratitude plays a huge role in establishing trust and encourages future engagement with your brand.
3. Next Steps Guidance
A Thank You Page should also provide users with clear instructions on what they can do next. This could include suggestions like checking their email for confirmation details, exploring related products or services, or even encouraging them to follow your brand on social media. Offering next steps ensures the user continues their journey with your brand and stays engaged.
4. Additional Resources
To maximize the opportunity for further interaction, a Thank You Page can provide users with links to relevant content, products, or services. For example, if someone made a purchase, you could recommend complementary products, or if they subscribed to a newsletter, you could link them to a popular blog post or webinar. This not only enriches the user experience but also keeps users engaged with more of what your site has to offer.
5. Call-to-Action (CTA)
Including a strong and compelling CTA on your Thank You Page is a great way to guide users toward your next desired action. Whether it’s prompting them to make another purchase, sign up for additional services, or share their experience on social media, a well-placed CTA can help drive further conversions and engagement. It encourages users to take that extra step and keeps them active on your site.
The Importance of Thank You Pages
1. User Engagement
Thank You Pages enhance the user experience by acknowledging and appreciating their actions. When users feel acknowledged, it creates a positive, memorable impression, which contributes to better long-term engagement.
2. Relationship Building
A simple “thank you” can go a long way in building a strong relationship with your audience. By demonstrating that their actions are valued, you can foster trust and encourage users to return to your site for future interactions. It’s a small gesture that has a significant impact on customer loyalty.
3. Opportunity for Further Interaction
The Thank You Page is a prime opportunity to continue the conversation with your users. By suggesting next steps or offering additional content, you can encourage users to explore your site further, increasing their engagement and boosting the likelihood of future conversions.
4. Post-Conversion Experience:
Especially in e-commerce, the Thank You Page plays a critical role in providing a positive post-purchase experience. It’s an opportunity to confirm order details, suggest related products, and build excitement for future purchases. This helps maintain customer satisfaction, which is essential for encouraging repeat business and positive reviews.
Step-by-step Guide to Creating Thank You Pages on WordPress
Step 1: Access Your WordPress Dashboard
The first step is to log in to your WordPress admin dashboard. To do this, navigate to yourdomain.com/wp-admin and enter your login credentials. Once logged in, you’ll be taken to your WordPress dashboard, which serves as the control center for your website.
Step 2: Navigate to Pages
In the left-hand menu of your dashboard, find and click on Pages. This will take you to the page management section, where you can view, edit, and create new pages for your website.
Step 3: Add a New Page

To create a new page, click on the Add New button located at the top of the Pages section. This will open up the page editor where you can start building your Thank You Page.
Step 4: Design Your Thank You Page
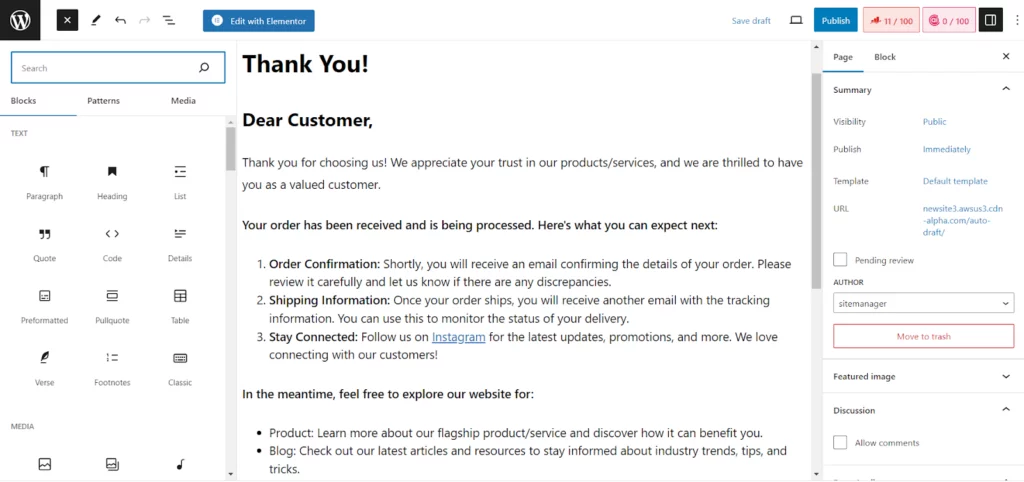
Now, it’s time to design your Thank You Page using the WordPress editor. In this editor, you can add text, images, and other content to express your gratitude and guide your users further. Here are some key elements to consider when designing your Thank You Page:
- Thank You Message: Start with a clear and heartfelt message that acknowledges the user’s action. Whether they’ve made a purchase, subscribed to your newsletter, or completed a form, expressing gratitude reinforces positive feelings and strengthens their connection with your brand.
- Next Steps: Include guidance on what the user should do next. For example, suggest exploring other pages on your website, checking their email for order confirmations or subscription details, or even using a discount code for a future purchase. This keeps the user engaged and moving through your site.
- Social Media Links: Encourage users to connect with you on social platforms by providing links to your social media accounts. This can increase brand visibility and offer users another way to interact with your business.
- Additional Resources: Provide links to related blog posts, products, or services that align with the user’s recent action. This helps guide users toward relevant content, enhancing their experience and keeping them engaged.
Step 5: Implement a Call-to-Action (CTA)

A key component of your Thank You Page should be a Call-to-Action (CTA). This could be a button or a link that guides users to take further action. Whether you want them to make another purchase, explore more content, or sign up for another service, a clear and compelling CTA will direct them to the next step in their journey with your brand.
For example, a CTA might be a button that says, “Explore Our Latest Products” or “Sign Up for Exclusive Offers.”
Step 6: Save and Publish
Once you are happy with the content and design of your Thank You Page, you have two options:
- Save Draft: If you’re not quite finished or want to review it later, click Save Draft to store your progress.
- Publish: Once you’re satisfied with the design, click Publish to make the page live on your website, allowing visitors to access it after completing their action.
Step 7: Set Up a Thank You Page for Form Submissions
If you want to create a Thank You Page specifically for form submissions, such as contact forms or newsletter sign-ups, you can use plugins like Contact Form 7 or WPForms. These plugins often allow you to redirect users to a custom Thank You Page after they submit a form.
To set this up, go into the form plugin settings and configure the Confirmation or Redirect settings to point to your newly created Thank You Page. This ensures that users will be automatically redirected after completing the form.
Step 8: Set Up a Thank You Page for E-commerce Transactions
For e-commerce websites, the process is slightly different. If you’re using an e-commerce plugin like WooCommerce, you can set up a Thank You Page that appears after a successful transaction. WooCommerce automatically redirects users to a Thank You Page after a purchase, but you can customize it to display order details, product recommendations, or special offers.
To configure your Thank You Page for WooCommerce, go to the plugin’s settings and find the order confirmation or thank you page settings. Customize the content of the page by adding custom messages, product suggestions, or discounts for future orders.
Step 9: Test Your Thank You Page
Before you start promoting your Thank You Page, it’s essential to test it. Complete the desired action (such as making a purchase or submitting a form) to verify that the user is redirected to the Thank You Page. Check for any broken links, incorrect messages, or other issues that may negatively impact the user experience.
Step 10: Monitor and Optimize
Once your Thank You Page is live, it’s important to monitor its performance. You can use tools like Google Analytics to track how users interact with the page. Look at metrics such as click-through rates on CTAs, the number of visitors to the page, and overall user engagement.
Based on your findings, optimize the page to improve user experience. This could mean adjusting the design, changing the wording of your CTA, or adding new resources to keep users engaged. Continuously optimizing your Thank You Page will help maximize its impact and ensure it continues to deliver value to your visitors.
Real-Life Examples of Thank You Pages
1. Amazon (Order Confirmation):
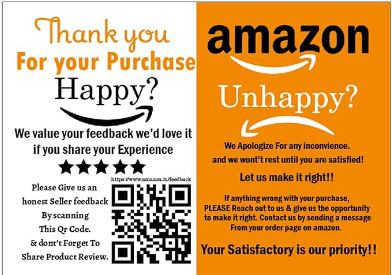
Amazon’s Thank You Page is designed to provide clarity and reassurance to customers after they complete their orders. The page ensures customers are informed and confident in their purchases by including relevant details such as the order summary, estimated delivery time, and other useful information. By combining transparency with product recommendations, Amazon takes full advantage of this touchpoint to keep users engaged and potentially increase future sales.
Features:
- Order Details: Amazon displays a comprehensive summary of the order, including the purchased items, total cost, and estimated delivery date, helping users track their purchases easily.
- Estimated Delivery: The page highlights the expected delivery date, reducing customer anxiety and minimizing follow-up questions regarding shipping.
- Related Product Recommendations: Amazon suggests related items based on the user’s purchase history, enticing them to explore more products and increasing the chances of further sales.
2. HubSpot (Form Submission):
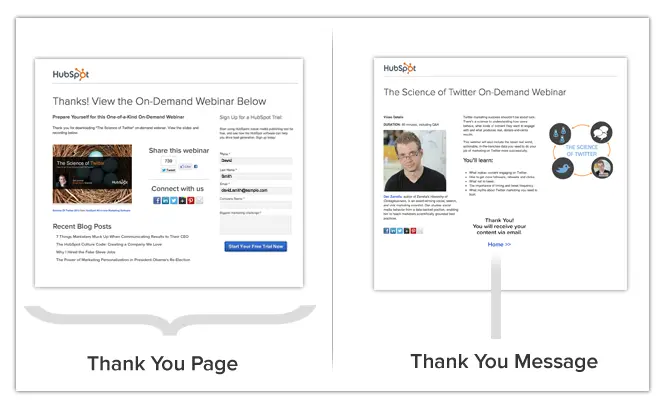
HubSpot’s Thank You Page for form submissions is designed to keep users engaged with the platform while also guiding them toward relevant actions. After submitting a form, users are presented with clear next steps, encouraging them to continue their journey with HubSpot and explore valuable resources. This approach helps keep leads engaged, nurturing them toward the next phase of conversion.
Features:
- Gratitude Expression: HubSpot thanks users for submitting their forms, reinforcing a positive interaction and making users feel valued.
- Next Steps: The page clearly outlines what the user should do next—whether it’s booking a demo, accessing more content, or contacting customer support. This keeps users engaged and helps maintain momentum.
- Resource Exploration: HubSpot includes links to relevant blog posts, guides, and eBooks, enabling users to explore more about the platform and learn how to maximize their use of HubSpot’s tools.
3. Dropbox (Account Creation):
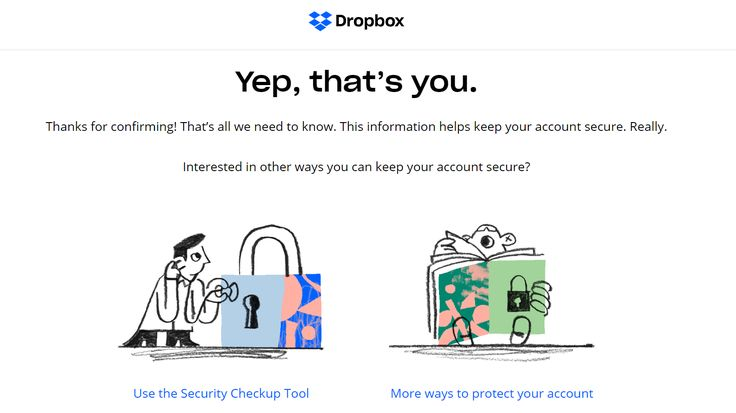
When a user creates an account on Dropbox, the Thank You Page provides a welcoming and informative experience. It not only thanks users for signing up but also takes them through the next steps in exploring Dropbox’s features. By offering an easy link to the desktop app and highlighting key functionalities, Dropbox ensures that users feel prepared and excited to start using the service immediately.
Features:
- Welcome Message: Dropbox’s Thank You Page greets new users with a friendly message, acknowledging their account creation and reinforcing a positive first impression.
- Key Features Explanation: The page highlights useful Dropbox features, helping users understand how they can get the most out of their new account.
- Download Link for Desktop App: Dropbox provides a direct link to download the desktop application, making it easy for users to integrate Dropbox into their daily routine seamlessly.
4. Airbnb (Booking Confirmation):

Source: Padlifter
Airbnb’s Thank You Page after a booking confirmation provides users with all the information they need about their reservation while enhancing their experience. By offering detailed booking information, along with suggestions for local experiences or attractions, Airbnb creates an engaging, informative experience that adds value to the booking process and helps users make the most of their upcoming stay.
Features:
- Booking Confirmation: The page confirms reservation details, including the accommodation, location, dates, and pricing, ensuring that customers have all the necessary information at a glance.
- Reservation Summary: The page includes a comprehensive summary of the booking, such as check-in instructions and host contact details, providing clarity for the upcoming stay.
- Local Experience Suggestions: Airbnb suggests activities and experiences near the destination, encouraging guests to explore the area and enhance their travel experience.
Thank You Pages: The Hidden Gem in Your Website’s User Experience Strategy
Thank You Pages are crucial touchpoints that play a significant role in enhancing user engagement and overall experience. These pages offer the perfect opportunity to express appreciation, reinforce trust, and guide users toward their next steps. By integrating key features like clear communication, helpful next steps, and personalized suggestions, you can significantly boost user satisfaction and create a seamless journey that encourages further interaction. Whether you’re confirming an action, offering additional resources, or suggesting related products, a well-designed Thank You Page helps strengthen relationships with users, drive conversions, and improve engagement across your platform.
If you’re looking to enhance your website experience and host your site with a platform that ensures fast load times and reliable performance, give Nestify a try! Sign up now for a free trial and experience optimized WordPress hosting that will take your site to the next level.
FAQs on Elevating Your Website’s UX with Optimized Thank You Pages
What should I include in my Thank You Page to make it effective?
Include a clear thank you message, guide users on the next steps, add a call-to-action for further engagement, and consider incorporating social media links or additional resources.
How do I set up a Thank You Page for a newsletter sign-up form?
Use a plugin like “WPForms” or “Mailchimp for WordPress” to create a newsletter sign-up form and configure it to redirect users to a custom Thank You Page upon successful submission.
Can I create a Thank You Page without using plugins?
Yes, you can create a Thank You Page manually using the WordPress editor. However, plugins can simplify the process and offer additional customization options, especially for specific actions like form submissions or e-commerce transactions.
What should I include on a Thank You Page for e-commerce transactions?
For e-commerce transactions, include order details, a summary of the purchase, and possibly product recommendations or special offers. This enhances the post-purchase experience and encourages users to explore more products.
