
Every coder wants to write code that shines: clean, clear, and built to last. We all care about quality, especially when it’s heading out into the real world. But how do we ensure our code is truly production-ready?
Sure, Test Driven Development (TDD) can be a superhero when it comes to designing code. But let’s be honest, it sometimes throws curveballs. Questions start flying: What exactly do we test? What can we skip? And how do we choose the right tests to prioritize?
Fear not, code warriors! There’s another approach that champions clarity and collaboration, Behavior Driven Development (BDD). This article will unlock its secrets and show you how it can take your code from good to gold with XSLT (a techy friend) by its side.
So, buckle up and get ready to ditch the testing headaches and write code that sings with confidence. Let’s dive into the BDD world, where everyone wins – your users, your code, and even your peace of mind!
BDD (Behavior Driven Development)
Software engineer Dan North developed a new methodology, Behavior Driven Development (BDD). Dissatisfied with his test development process, he shifted the focus from testing individual system parts to examining the behavior of functionality.
- Collaboration for Quality-Based Requirements
BDD emphasizes collaboration between various roles, converging toward the common goal of quality-based requirements for software. In an agile team, individuals responsible for business objectives contribute their product knowledge, while the development team addresses engineering concerns. The QA area, with a critical eye on defects and failures, determines which scenarios to test based on accepted criteria, encompassing functional and non-functional requirements.
- Transformation of Roles
Traditionally known as the Product Owner (PO), the role has evolved into the Product Manager (PM). This transformation allows for a more comprehensive contribution to the BDD process.
- Feature Documentation through Collaboration
The collaboration of these three key roles—business objectives contributor, development team, and QA expert—produces detailed documentation known as a Feature. This documentation serves as a guide, outlining accepted criteria for the product under development.
Benefits of BDD with Abstract Frameworks
Working with BDD alongside frameworks that abstract its principles offers several advantages:
- Involvement of stakeholders in the process through Outside-in Development
- Team alignment with the upcoming development activity
- Creation of an artifact (Feature) guiding the development process
- Live documentation reflecting current system behaviors
- Automated testing based on accepted criteria for rapid feedback
Since BDD adheres to TDD principles, it follows a similar cycle, reinforcing the iterative and collaborative nature of behavior-driven development.
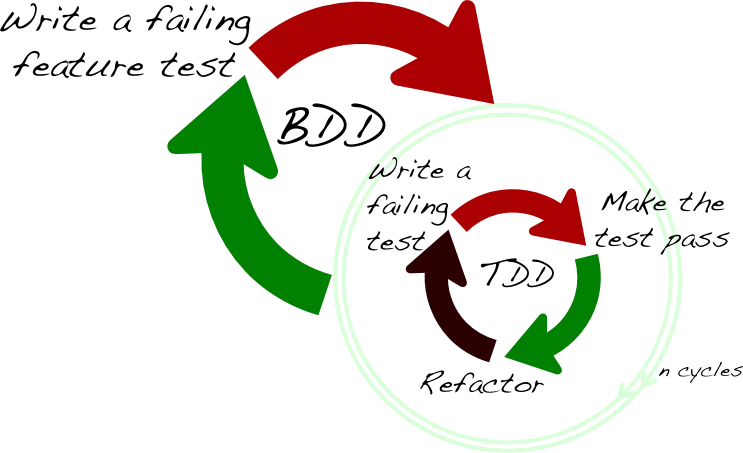
Follow these steps for Behavior Driven Development (BDD) using Cucumber:
- Write the Test:
Start by creating a test based on the expected behavior outlined in the Feature documentation. Since the code doesn’t exist yet, the test should naturally fail.
- Code Implementation:
Develop the code based on the expected behavior described in the Feature documentation. The goal is to make the failing test pass.
- Refine and Apply Best Practices:
After the initial implementation, refine and optimize your code. Apply coding best practices and refactor as needed. Ensure the test continues to pass, confirming that the desired behavior remains unchanged.
- Collaborative Scenario Development:
In our organization, Quality Assurance (QA) professionals, along with developers, collaboratively create scenarios to be developed. Developers then implement the solutions. At the end of the delivery cycle, QAs automate specified scenarios to enhance Acceptance tests.
- Automation Tools:
Various tools facilitate the execution of specifications described in the Feature format. Some notable tools include Lettuce, JBehave, Spinach, and Cucumber. In this post, Cucumber, a tool with which I have experience from consulting and parallel projects, is highlighted.
Setting Up Cucumber in Your Project (Assuming Cucumber 3.0 or later)
- Gemfile Configuration:
- Open your project’s Gemfile.
- Add the following lines to the :test group:
group :test do
gem ‘cucumber-rails’
gem ‘capybara’
end
Note that the :require => false option for cucumber-rails is no longer necessary as of Cucumber 3.0.
- Install Dependencies:
- Run the following command in your terminal to install the specified gems:
bundle install
- Create Project Structure (Optional):
- You have two options to create the Cucumber project structure:
Option A: Use cucumber –init
- Run this command in your terminal to generate a basic structure:
cucumber –init
This will create directories like features, step_definitions, and support.
Option B: Create Structure Manually
If you prefer more control, create the following directories manually:
- features: This directory will house your feature files, which describe the behavior of your application in plain language.
- step_definitions: This directory will contain step definitions, which are Ruby codes that implement the steps outlined in your feature files.
- support: This directory can store additional files, such as hooks for setup and teardown tasks or helper modules for common steps.
- Additional Considerations:
- Cucumber Version: Always check the documentation for your specific Cucumber version, as directory structures or setup steps might have minor variations.
- Project Type: These instructions are primarily for Rails projects, but the general setup is similar for other Ruby projects. Consult Cucumber’s documentation for specific guidance if you’re not using Rails.
- Next Steps:
Once the structure is in place, you’re ready to start writing Cucumber features and step definitions to test your application’s behavior!
Cucumber Features
In Cucumber, features are like blueprints that describe how your application should behave from the user’s perspective. To ensure Cucumber can interpret these blueprints, we use a language called Gherkin, which has specific keywords and structure.
Key Ingredients of a Feature:
Title: A clear, concise summary of the feature’s purpose.
Description: A brief explanation of the feature’s benefits or context.
Acceptance Criteria or Scenarios: These outline specific examples of how the feature should work, using the Gherkin syntax:
- Given: Set the scene, describing preconditions.
- When: Describe the action or trigger.
- Then: Outline the expected results.
Keywords: Connect the steps and add clarity:
- As a… I want to… So that… (To define roles and goals)
- Background (Shared context for multiple scenarios)
- Scenario Outline (Template for similar scenarios with varying data)
Feature Example: Logging In
# language: en
@login
Feature: Login to the digital results management system
In order to validate authentication
As a system user
I want to login and validate administrator, manager, and executive permissions
Background: User can access the login screen
Given the user can access the login screen of the system
Scenario Outline: Login with valid users
When I enter a valid <User>
And I enter a valid <Password>
Then the system should allow user authentication
And the <Permission> type of the user should be displayed
Examples:
| User | Password | Permission |
| “Jorge” | “0001” | “Administrator” |
| “Sonia” | “0004” | “Manager” |
| “Jose” | “0006” | “Executive” |
Running Specific Features with Tags:
Use tags to organize and execute specific features:
- Add tags: Mark features with @tagname.
- Run tagged features: cucumber -t @tag1,@tag2
Step Definition
While features outline user-centric behavior, step definitions are the heart of Cucumber, translating those expectations into executable code.
Creating Step Definitions:
- Prompt Cucumber: Run cucumber -t @tagname to identify unimplemented steps from your feature.
- Generate Skeletons: Cucumber provides step definition templates for you to fill in with code.
- Implement Actions: Write code within each step definition to interact with your application and verify outcomes, aligning with the feature’s Gherkin syntax.
Given(/^that user can access the system login screen$/) do
visit system_rd_path
end
When(/^inform a “([^”]*)” valid$/) do |user|
login_page.type_user(user)
end
# … (other step definitions)
Preparing the Stage: Hooks
Sometimes, tests need extra setup or cleanup. Hooks handle these tasks before or after scenarios:
- Before hooks: Run preparatory code, like creating test data.
- After hooks: Clean up after tests, like deleting temporary data.
Example:
Before ‘@login’ do
account = FactoryGirl.create(:account, uuid: ‘kwfNGUf8G74454855548GH’)
@user = FactoryGirl.create(:confirmed_user_exemple, accounts: [account])
end
After ‘@login’ do
account = FactoryGirl.delete(:account, uuid: ‘kwfNGUf8G74454855548GH’)
end
Key Points:
- Step definitions create a bridge between human-readable features and automated testing.
- Hooks ensures a clean testing environment and prepares necessary data.
- Together, they make Cucumber a powerful tool for aligning development with user expectations.
Organizing Directories
Like a well-organized workshop, a clear directory structure keeps your Cucumber project efficient and maintainable. Here’s a recommended setup:
Core Cucumber Directories:
- features: Houses your feature files, describing the desired application behavior in user-friendly language.
- step_definitions: Contains step definitions, the code that translates feature steps into executable actions.
- support: Stores supporting files like hooks (for setup and cleanup actions) and global configuration settings.
Additional Directories (Optional):
- page_objects: Organizes Page Object classes, representing elements of your application’s web pages, to enhance test readability and maintainability.
- specifications: Isolates feature files for specific components or functionalities, promoting a modular approach.

Customizing Paths for Flexibility:
- Cucumber doesn’t enforce a rigid structure. Adapt it to your preferences using the cucumber.yml configuration file:
default: -r features/support/ -r features/step_definitions -r features/specifications
This example instructs Cucumber to load files from these specific directories, ensuring it finds everything it needs to execute your tests smoothly.
Reporting and Running Logs
Just as a map guides your journey, Cucumber’s reports illuminate your testing progress, revealing valuable insights and areas for improvement.
Tailored to Your Needs:
Choose Your Format: Cucumber offers a variety of report formats to suit different preferences and integration needs:
- Pretty: Simple, human-readable text output for quick overviews.
- HTML: Interactive, visually appealing format for sharing and analysis.
- JSON: Machine-readable format for integration with tools and dashboards.
- JUnit: Compatible with popular CI/CD systems for test reporting and tracking.
Generating Reports Effortlessly:
Add Formatting Flags: Generate reports during test execution with simple commands:
cucumber -t @login –format html –out report
Key Information at Your Fingertips:
- Scenario Status: Identify successes (“Passed”), failures, and unexecuted scenarios.
- Execution Details: Track the number of scenarios and steps executed.
- Time Metrics: Gauge the overall execution time of your tests.
Transform Data into Action:
- Analyze Trends: Uncover areas that need attention or optimization.
- Share Progress: Communicate testing results effectively with stakeholders.
- Track Improvements: Measure the impact of changes and enhancements.
XSLT: The Master of XML Transformations
- XML’s Shapeshifter: XSLT, short for Extensible Stylesheet Language Transformations, specializes in transforming XML documents into various formats, making it indispensable for industries handling large datasets.
- Tightly Integrated: It works seamlessly with XML, XPath, and XSD, providing the most effective solution for XML data transformation.
Building Trust with Unit Testing
- XSpec: The BDD Framework for XSLT: XSpec, inspired by Ruby’s RSpec, introduces behavior-driven development (BDD) to XSLT, XQuery, and Schematron.
- Describe Behavior: Use XSpec’s syntax to outline the expected behavior of your XSLT code clearly.
- Test Against Descriptions: XSpec enables you to verify that your code aligns with these expectations.
Tools for Streamlined Testing
- Oxygen: XSpec Integration for Seamless Testing: Oxygen XML Editor offers built-in XSpec support, making it easy to create and execute XSLT unit tests.
Key Benefits of XSLT Unit Testing
- Confidence in Code Quality: Ensure your XSLT transformations produce accurate and consistent results.
- Early Problem Detection: Catch errors and potential issues early in development, saving time and effort.
- Refactoring Safety Net: Feel secure making code changes, knowing tests will identify any unintended consequences.
- Collaboration and Clarity: Promote a shared understanding of XSLT code behavior within teams.
Conclusion
As we conclude this comprehensive exploration of structuring your project through the dynamic duo of Behavior-Driven Development (BDD) and eXtensible Stylesheet Language Transformations (XSLT), it’s evident that the amalgamation of these methodologies transcends mere project organization. It’s about creating a symphony of collaboration, clarity, and consistency in software development.
By embracing BDD, teams elevate their communication, foster a user-centric approach, and fortify their codebase with comprehensive, executable specifications. Simultaneously, integrating XSLT empowers projects with consistent data formatting, modular code structures, and the efficient reuse of transformations. Together, they form a powerful alliance that not only structures your project but also propels it towards success.
FAQs on Structuring Your Project
How does BDD foster collaboration in a project?
BDD serves as a bridge between technical and non-technical stakeholders, fostering collaboration through executable specifications. This shared language ensures a unified vision and understanding of the project’s requirements.
2. Can XSLT be adapted for non-XML data transformations?
While tailored for XML, XSLT principles can be repurposed for non-XML data with careful adjustments. However, it’s crucial to acknowledge that its optimal strength lies in its proficiency with XML structures.
3. What practices enhance the structuring of BDD scenarios?
Effective structuring involves maintaining focus, conciseness, and user-centric language in BDD scenarios. Incorporating background steps for common preconditions adds readability and sustainability to scenario structures.
