
Planning and organizing an event can be a formidable task, but with the right tools and resources at your disposal, you can streamline the process and significantly enhance its efficiency. An indispensable element of event planning revolves around the creation of an event registration form. This form is designed to enable attendees to register for your event, providing you with critical information while ensuring a seamless registration process.

WordPress, a renowned and user-friendly content management system, offers a vast array of plugins and features, allowing you to customize your website to your heart’s content.
Understanding the Importance of Event Registration Forms:

The form is an essential tool for organizers, as it serves multifaceted purposes and offers a multitude of advantages.
- Streamlining the Registration Process: An event registration form stands as an indispensable asset by simplifying the registration process for both organizers and attendees. It replaces conventional methods such as paper forms or email inquiries with a streamlined online registration system, allowing attendees to register conveniently at any time and from any location. This eliminates the need for cumbersome physical paperwork and significantly reduces the administrative workload.
- Gathering Essential Information: It provides a structured framework for collecting vital information from your attendees. By including specific fields within the form, you can compile essential details, including names, email addresses, contact numbers, organizational affiliations, dietary preferences, and any other information that is pertinent to your event. This dataset plays a pivotal role in planning, communication, and ensuring a personalized experience for your attendees.
- Managing Attendee Data: Efficient event management hinges on the centralization and organization of attendee data. The registration form simplifies this process by allowing you to store and manage attendee information in a structured database. This not only facilitates easy access and updates but also proves valuable for various purposes such as generating attendee lists, delivering personalized communications, and monitoring attendance.
- Enhancing Communication and Engagement: Through this form, you can amass email addresses and other contact information from your attendees, thereby establishing direct communication channels. This facilitates the dissemination of vital event updates, schedule changes, and crucial announcements. Sustained communication cultivates engagement, stirs anticipation, and ensures a memorable experience for your attendees.
- Facilitating Payment and Ticketing: If your event necessitates ticketing or registration fees, an the registration form can efficiently streamline the payment process. The integration of payment gateways within your form empowers attendees to make payments online with ease, eliminating the complexities of manual handling of cash or checks. This not only saves time and effort but also guarantees a secure and seamless payment experience.
- Tracking Attendance and Capacity Management: The registration form offers a mechanism to track registration numbers and monitor attendance. This information proves invaluable for managing event capacity, ensuring that the venue can accommodate the desired number of attendees without overbooking. Accurate attendance data supports logistical planning, seating arrangements, and necessary adjustments to create a comfortable and enjoyable experience for attendees.
- Collecting Feedback and Evaluating Success: Beyond the event itself, the registration form can be employed to gather post-event feedback and assess the overall success of your gathering. By incorporating feedback fields within the form, attendees can share their thoughts, suggestions, and insights regarding their event experience. This feedback, replete with valuable insights, becomes instrumental in refining future planning, enabling you to make enhancements and orchestrate even more exceptional events.
Why a Plugin is Necessary for Event Registration:

WordPress plugins are dynamic tools that extend your website’s functionality without necessitating coding expertise. When it comes to registration, opting for a dedicated plugin offers several notable advantages:
- Efficiency: Event registration plugins are custom-crafted to manage the intricacies of event management, making the registration process smoother and more efficient for both organizers and attendees.
- Customization: Plugins bestow a wide array of customization options, allowing you to tailor the registration form to mirror your event’s branding and precise requirements.
- Integration: Event registration plugins seamlessly integrate with various WordPress features and other plugins, be it email marketing tools or payment gateways, enhancing the overall functionality of your website.
- Automation: These plugins automate a multitude of event registration aspects, from sending confirmation emails to generating tickets and managing attendee data. This automation proves an invaluable time and effort saver.
Steps to Create an Event Registration Form for WordPress:
1. Comparing Popular Registration Plugins:

Within the WordPress landscape, several plugins have garnered acclaim and widespread usage, each presenting unique features and functionalities. Let’s conduct a comparative analysis of a few of the most prevalent plugins:
- Event Espresso: Event Espresso stands as a comprehensive management plugin, enabling you to create and tailor registration forms, manage attendees, handle ticketing, and more. It extends its capabilities to features such as calendar integration and seating management.
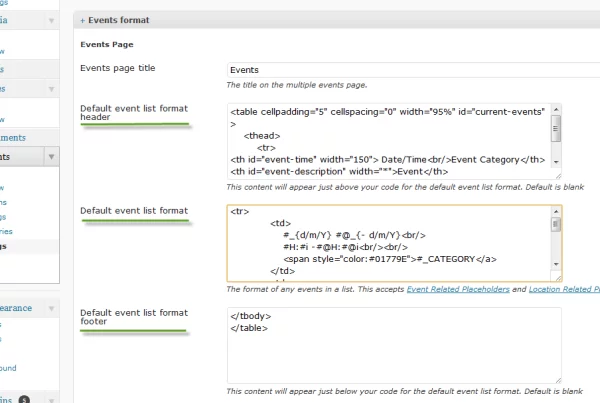
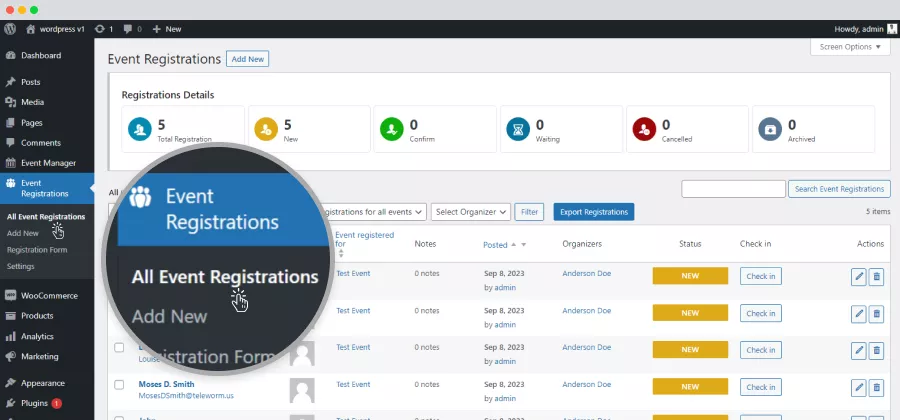
- WP Event Manager: WP Event Manager, in contrast, embodies a lightweight approach, focusing on simplicity and user-friendliness. It offers fundamental event management features, including submission forms, event listings, and registration management.
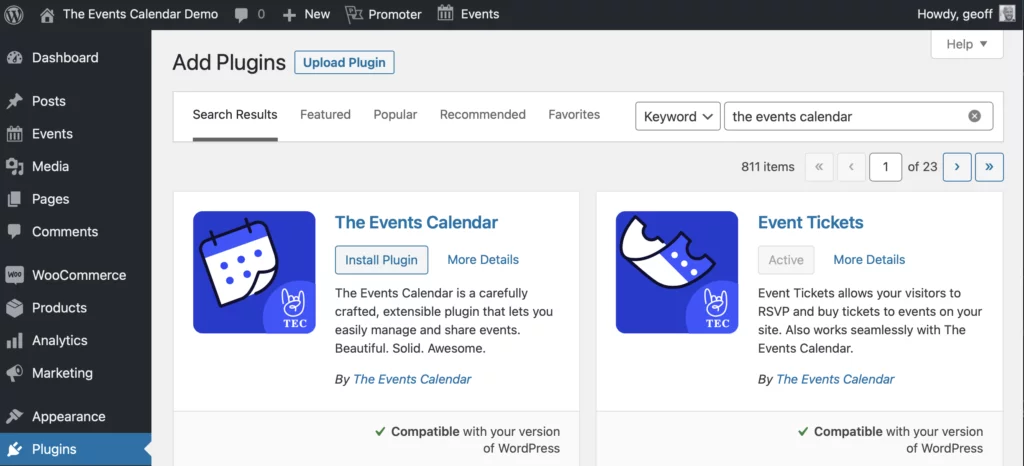
- The Events Calendar: The Events Calendar plugin is celebrated for its robust event management capabilities. While it does not offer direct registration features, it harmoniously integrates with other plugins like Event Tickets Plus, which enables you to incorporate registration functionality into your events.
- Gravity Forms: Gravity Forms, while not tailored explicitly for registrations, functions as a versatile form builder plugin that provides extensive customization options. With supplementary add-ons like the Event Registration add-on, you can craft convincing registration forms.
2. Installing Your Chosen Plugin
Once you’ve zeroed in on the registration plugin that seamlessly aligns with your requirements, the subsequent step involves installing and activating it on your WordPress website. The installation process typically encompasses the following steps:
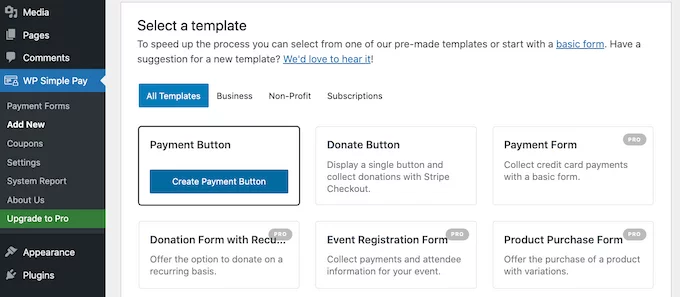
- Accessing the Plugin Directory: Within your WordPress dashboard, navigate to the “Plugins” section and click on “Add New.” This action directs you to the WordPress Plugin Directory.
- Search and Install: Utilize the search bar within the Plugin Directory to input the name of your chosen event registration plugin. Upon locating it in the search results, click on the “Install Now” button adjacent to the plugin.
- Activating the Plugin: Following the completion of the installation, activate the plugin by clicking on the “Activate” button. This step officially integrates the plugin into your website.
- Configuring Plugin Settings: The exact steps for this phase may vary depending on the chosen plugin. Configure the settings to customize the registration form to align with your specific prerequisites. This might encompass aspects such as payment gateways, email notifications, form fields, and more.
3. Creating Your Event Registration Form
The creation of your registration form stands as a pivotal stage in establishing an efficient and user-friendly registration process.
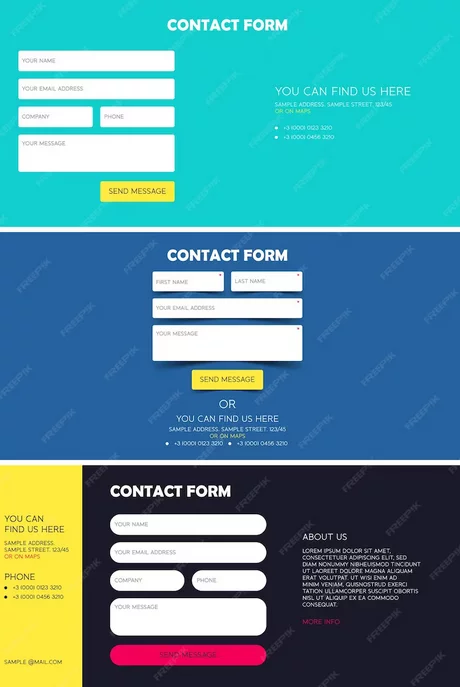
a. Designing the Layout of Your Form
The layout of your registration form carries significant weight in attracting attendees and shaping a positive user experience. Several key considerations must be kept in mind when designing the layout:
- Branding: It is paramount that the form seamlessly aligns with your event’s branding, using colors, fonts, and imagery that echo the event’s theme or your organization’s identity.
- Clear and Concise: A clean, straightforward form layout devoid of clutter and distractions is imperative. Implement clear labels and instructions to seamlessly guide users through the registration process.
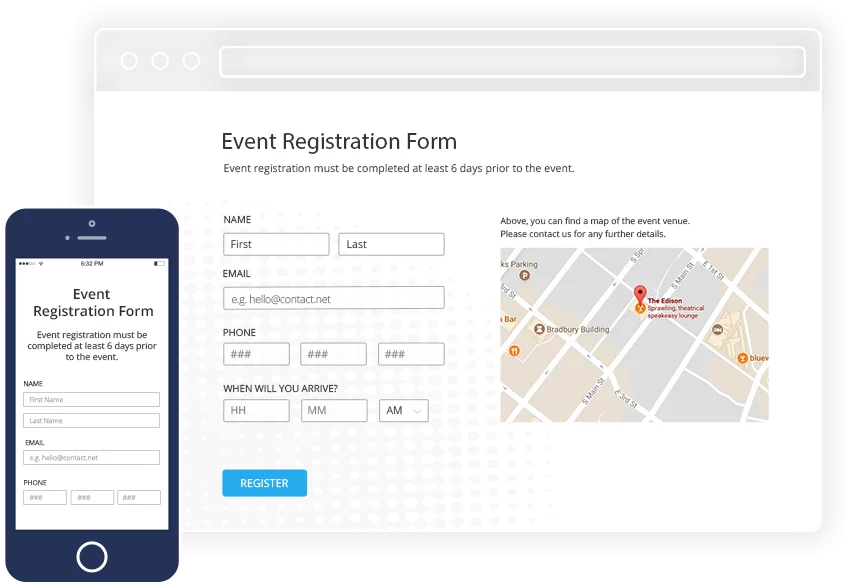
- Mobile-Friendly: Given the surging usage of mobile devices, it is essential that your form is responsive and mobile-friendly. Rigorously test the form on varying screen sizes to ensure a seamless experience for mobile users.
- Progress Indicators: If your registration form spans multiple steps, the inclusion of a progress indicator is advantageous. This helps attendees gauge their progress in the registration process and understand how much information remains to be provided.
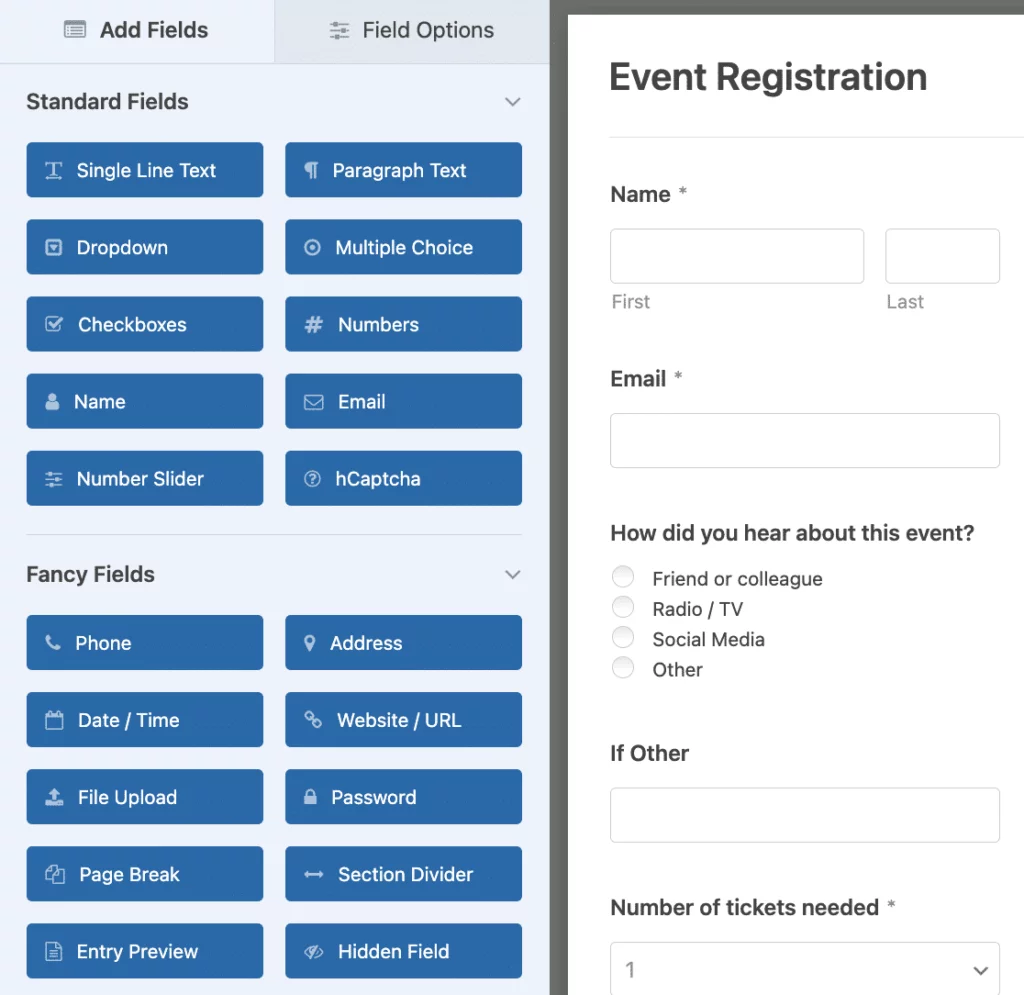
b. Choosing the Necessary Fields
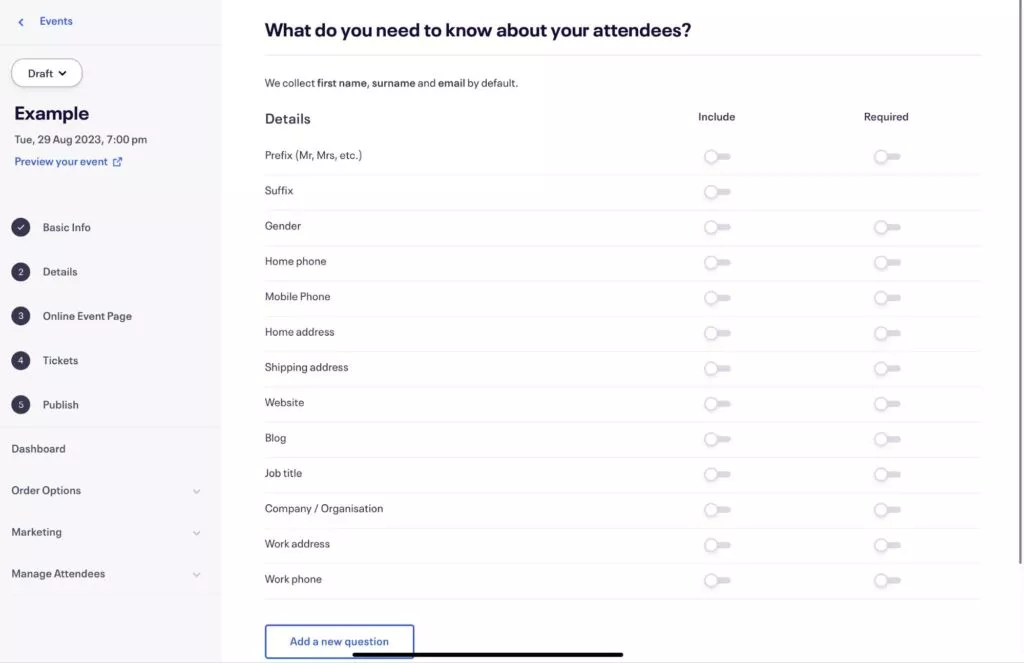
The fields you opt to include within your registration form should align with the specific information you need from your attendees. While these requirements may differ depending on your event, here are some common fields to consider:
- Name: Request the attendee’s full name, encompassing both the first name and last name.
- Email Address: Collect email addresses to facilitate communication, including the dissemination of event updates and confirmation emails.
- Contact Number: To reach out to attendees, it is prudent to request a contact number.
- Organization (Optional): If your event is pertinent to particular industries or organizations, it can be valuable to include a field for attendees to specify their company or organizational affiliation.
- Event-Related Questions: Incorporate event-specific questions that are pertinent to your planning, such as dietary restrictions, t-shirt size preferences, or workshop selections.
- Payment Information: If your event necessitates registration fees, be sure to include fields for payment information, such as credit card details or the selection of a preferred payment method.
It is pivotal to strike a balance between gathering necessary information and avoiding overwhelming attendees with an excessive number of fields. Keep the form concise and user-friendly to ensure a smooth registration experience.
4. Adding the Form to Your Event Page
After the layout has been meticulously designed, and the requisite fields have been selected for your registration form, the subsequent step involves embedding the form within your page. The following steps elucidate this process:
- Access Form Settings: Depending on the registration plugin you have chosen, navigate to the settings area for your registration form. Here, you should look for options related to embedding or displaying the form on your event page.
- Generate Shortcode: In the majority of cases, the plugin will provide you with a shortcode that you can copy.
- Edit Event Page: Navigate to the page on your WordPress website where you intend to display the registration form. Employ the WordPress editor to either edit the existing page or create a new page specifically dedicated to your event.
- Paste Shortcode: Within the editor, paste the shortcode provided by the plugin into the designated section of the page where you wish to display the form.
- Publish or Update: Save the changes you’ve made, then publish or update the event page to make it live.
By adhering to these steps, you will successfully integrate the form within your event page. This allows attendees to readily access the form and complete their registration directly through your website.
5. Configuring Payment Settings

The configuration of payment and notification settings stands as a pivotal phase in the setup of your registration form.
a. Setting up Payment Options
Should your event necessitate registration fees or ticket purchases, it is essential to configure payment options to facilitate secure and convenient transactions. The following steps outline how to set up payment options:
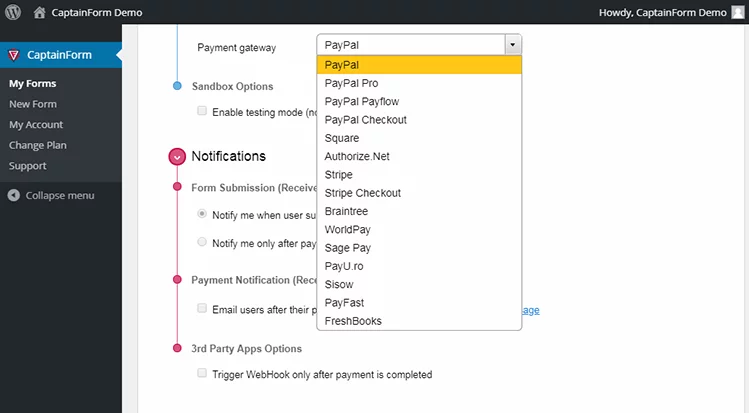
- Payment Gateways: Most registration plugins seamlessly integrate with renowned payment gateways such as PayPal, Stripe, Authorize.net. Your choice should hinge on your unique needs. Follow the plugin’s instructions to set up your chosen payment gateway.
- Configuration Settings: Access the payment settings within your chosen registration plugin. Here, you will enter your payment gateway credentials, such as API keys or account details, to forge the crucial connection between your website and the payment gateway.
- Currency and Pricing: Specify the currency in which you will accept payments. Additionally, define the registration fees or ticket prices for your event, encompassing early bird discounts or promotional offers if applicable.
- Confirmation and Redirects: The final step involves the configuration of settings related to payment confirmation and redirects. This encompasses the creation of a confirmation page that attendees will view after successfully completing their payment. You may also opt to redirect them to a designated page upon successful payment.
Through the configuration of payment options, you guarantee a seamless and secure payment process for your attendees, heightening their registration experience.
6. Configuring Email Notifications
Email notifications serve as essential conduits for keeping your attendees informed regarding their registration status, updates, and other pertinent information. These steps outline how to configure email notifications for your registration form:
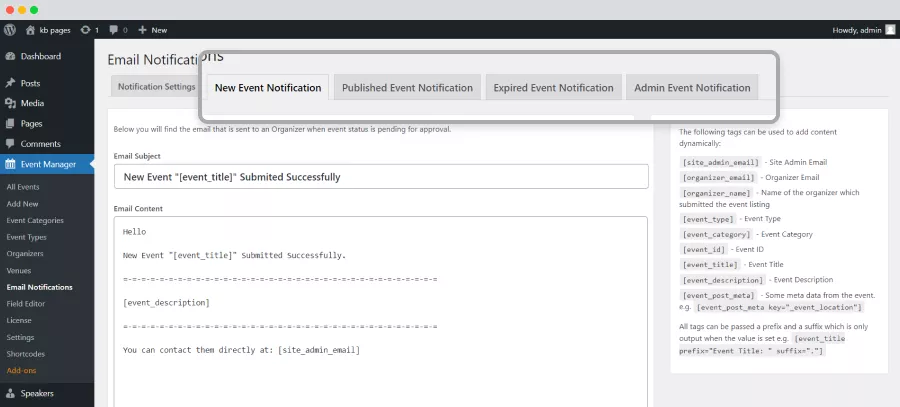
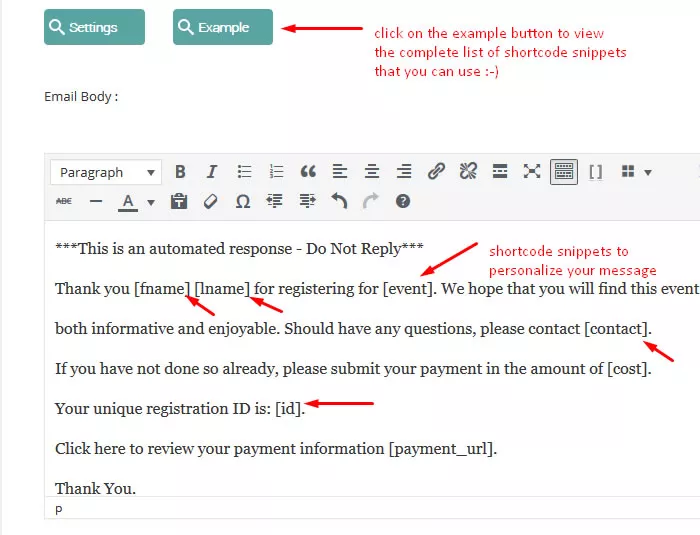
- Registration Confirmation: Set up an automatic confirmation email to be dispatched to attendees upon the successful completion of their registration. Customize the content of this email to encompass details like the date, time, location, and any supplementary instructions.
- Payment Confirmation: If your event necessitates payment, configure a payment confirmation email that is automatically dispatched to attendees following the successful processing of their payment. This email should include information such as the payment amount, transaction ID, and other pertinent payment-related details.
- Event Updates and Reminders: Consider the establishment of automated email reminders to keep attendees informed about updates, alterations in the schedule, or any additional instructions they need to be privy to.
- Customize Email Templates: Numerous registration plugins empower you to personalize and customize email templates according to your branding and messaging preferences. Personalizing these emails to align with the tone and style of your event serves to create a more personalized attendee experience.
By configuring email notifications, you ensure that your attendees receive timely and pertinent information, cultivating engagement and keeping them closely connected.
7. Setting Confirmation Messages
Confirmation messages play a pivotal role in the attendee experience by displaying essential information upon the successful completion of registration or payment. These steps elucidate how to configure confirmation messages:
- Customize Confirmation Messages: Access the settings within your registration plugin to customize the confirmation messages. Tailor them to encompass all relevant information, such as event details, payment confirmation, and any additional instructions attendees need to be aware of.
- Include Important Information: Ensure that your confirmation messages encompass all necessary details that attendees require, including event date, time, location, and any specific instructions they should follow.
- Redirects and Thank You Pages: Consider the setup of a thank-you page or the redirection of attendees to a specific page after the conclusion of their registration or payment. This page can serve as a confirmation and offer additional information or resources.
By configuring confirmation messages, you deliver a transparent understanding of attendees’ registration status, enhancing their overall experience.
8. Testing and Launching Your Event Registration Form
Once you have successfully crafted and configured your registration form, it is imperative to subject it to thorough testing before unveiling it to the public.
a. Running Test Registrations
Prior to opening your registration form to the public, it is essential to conduct test registrations to ascertain that all components function seamlessly. Follow these steps to execute test registrations:
- Use Test Data: Enter test data, such as dummy names, email addresses, and payment information, to simulate the registration process.
- Submit Test Registrations: Complete the registration process by submitting test registrations using the provided test data.
- Verify Confirmation Emails: Confirm that confirmation emails are sent accurately and contain the correct information.
- Test Payment Integration: If your form incorporates payment options, be certain to test the payment gateway integration to ensure that payments are processed correctly.
Through test registrations, you can identify any issues or errors in your registration form and promptly address them before unveiling it to the public.
9. Reviewing and Managing Registrations
After successfully testing your event registration form, it is pivotal to review and manage registrations efficiently. These steps offer guidance on how to undertake this process:
- Access Registration Data: Utilize the backend of your event registration plugin to access the registration data submitted by attendees. Review the provided information and ensure its completeness and accuracy.
- Export Registrations: Export the registration data into a manageable and analyzable format, such as a spreadsheet. This facilitates tracking attendees and performing any necessary data analysis.
- Send Confirmation Emails: Once registrations have been thoroughly reviewed, dispatch confirmation emails to attendees to validate their registration and furnish any additional event details or instructions.
- Manage Waitlists or Capacity: If your event has a limited capacity, keep a vigilant watch on registration numbers. If required, manage waitlists or introduce measures to guarantee that the venue’s capacity is not exceeded.
By adeptly reviewing and managing registrations, you establish an organized framework and ensure a seamless registration process for your attendees.
10. Launching Your Event Registration Form
With your registration form meticulously crafted, tested, and reviewed, you are now prepared to launch it to the public. Here are the steps to launch your form:
- Promote the Event: Create promotional materials for your event registration form, such as social media posts, newsletters, and website announcements. Disseminate these materials to generate awareness and entice potential attendees.
- Announce Registration Opening: Clearly communicate the date and time when registration for your event will commence. Announce this information across your marketing channels to stimulate anticipation and interest.
- Monitor Registration: After the launch, keep a vigilant watch on registration numbers to ensure that your event does not overbook. Update your registration materials or website as necessary to reflect the current registration status.
- Attendee Communication: Keep the lines of communication open with your attendees. Provide updates, reminders, and any vital instructions leading up to the event.
By launching your form systematically and keeping attendees informed, you establish an atmosphere of anticipation and ensure a streamlined registration process for all those who wish to attend your event.
Conclusion:
In conclusion, the creation of an event registration form within the WordPress ecosystem necessitates careful planning, selection of the right plugin, thoughtful design, and diligent configuration. By understanding the importance of the registration form, selecting the appropriate plugin, designing the form layout, choosing necessary fields, and configuring payment and notification settings, you pave the way for a smooth and efficient event registration process. Additionally, rigorous testing and careful review, management of registrations, and a well-planned launch all contribute to the success of your registration form.
