
In the landscape of web development, navigating through technical challenges has become an inherent aspect of the journey. Amid the multitude of potential hurdles, one particularly formidable obstacle that induces a ripple of apprehension among developers and website owners alike is the notorious “White Screen of Death” associated with Elementor. This cryptic predicament unfolds as a stark, blank canvas, replacing the anticipated vibrant web page or the familiar Elementor editor.
Ill Effects of Elementor White Screen of Death:
- User Frustration and Engagement Decline: Users faced with a white screen are likely to become frustrated, impacting their overall experience. The inability to access content or complete actions on the website can lead to a decline in engagement, affecting metrics such as page views and session duration.
- Loss of Traffic and Revenue: Prolonged instances of WSoD result in website downtime, leading to a loss of traffic. For businesses and online platforms relying on continuous online presence, this downtime translates into potential revenue loss. E-commerce websites, in particular, may see a direct impact on sales.
- SEO Ranking Fluctuations: Search engines favor websites that are consistently accessible and provide a positive user experience. Frequent occurrences of WSoD can trigger fluctuations in search engine rankings, affecting the website’s visibility and discoverability.
- Brand Reputation Damage: The perception of a website experiencing WSoD as unreliable or poorly maintained can harm the brand’s reputation. Users may lose trust in the website, impacting brand loyalty and credibility.
- Content Creation and Publishing Disruptions: Content creators who rely on platforms like Elementor for website building may face disruptions in their workflow. Inability to access the editor or publish new content hampers productivity and timely updates.
- Development Resource Allocation: Developers need to allocate time and resources to diagnose and resolve the issues causing WSoD. This can divert attention from planned development tasks, impacting project timelines and potentially delaying new features or updates.
- Security Concerns and Exploitation Risks: Persistent white screen issues may indicate underlying vulnerabilities. If not promptly addressed, these vulnerabilities can be exploited by malicious actors, posing security risks to sensitive data and the overall integrity of the website.
Approaches to Fixing White Screen of Death in Elementor:
A. Memory Insufficiency Resolution Guide
Firstly, it is imperative to ensure that your system meets Elementor’s specified requirements. Verify the following system parameters:
- WordPress: Ensure you are using the latest version of WordPress.
- PHP Version: Elementor requires PHP version 8.0+ or at least 7.4.
- MySQL: Your system should have MySQL 5.6 or a more recent version.
- WordPress Memory Limit: Maintain a WordPress Memory Limit of at least 256 MB, with 512 MB or more recommended.
- SSL Certificate: Make sure your website is equipped with an SSL certificate.
- Browsers: Elementor page editing is best supported on browsers such as Chrome, Safari, and Firefox.
- Device: It’s essential to use desktop computers for editing Elementor pages; mobile devices are not compatible.
- X-Frame Options: Confirm that X-Frame options are set to “same origin.”
To assess these parameters, navigate to Elementor > System Info.
On this page, you’ll also find a log detailing potential issues. Review this log to identify any underlying problems. If the issue pertains to memory, an associated message will be visible in the log.
To address a memory-related concern, follow these steps:
- Check Hosting Plan: Examine your hosting plan to determine the maximum memory allocated for your website. If necessary, consider upgrading your hosting plan to accommodate higher memory limits. The location of this setting may vary depending on your hosting provider.
- Update Memory via Dashboard:
- Locate and open the config.php file in the root folder of your WordPress website using an FTP client.
- Find the line /* That’s all, stop editing!.
- Insert the following line above it:sql
define('WP_MEMORY_LIMIT', '256M');- Adjust the number as per your memory limit, for example, ‘512M’ or ‘768M’.
B. Addressing Issues with Memory Limit
If you encounter performance issues or errors related to memory limitations while using Elementor, it’s crucial to investigate and resolve the problem promptly. Here’s a detailed guide to help you address memory-related concerns:
System Requirements Check:
- Latest WordPress Version: Ensure that you are using the latest version of WordPress compatible with Elementor.
- PHP Version: Elementor requires PHP version 8.0 or at least 7.4. Check your PHP version and upgrade if necessary.
- MySQL Version: Verify that your MySQL version is 5.6 or greater.
- WordPress Memory Limit: The recommended memory limit for WordPress is at least 512 MB. You can check and adjust this by:
- Navigate to Elementor > System Info.
- Examine the WordPress Memory Limit. If it’s below 512 MB, consider increasing it.
- SSL Certificate: Ensure your website has an SSL certificate installed.
- Supported Browsers and Devices: Elementor works best with Chrome, Safari, and Firefox browsers. Additionally, editing Elementor pages is optimized for desktop computers, not mobile devices.
- X-Frame Options: Set X-Frame options to “same origin.”
Identifying Issues:
- Elementor System Info: Navigate to Elementor > System Info. Here, you can find valuable information about your system and potential issues.
- Log Analysis: Examine the log provided on the same page for error messages or warnings. This can offer insights into the nature of the problem.
Resolving Memory Limit Issues:
- Check Hosting Plan: Review the maximum memory allocated for your website according to your hosting plan. Upgrade the plan if necessary.
- Increase WordPress Memory:
- Locate the memory limit settings on your hosting dashboard.
- Increase the memory limit as per your hosting plan.
- Edit config.php:
- Use an FTP client to access the
config.phpfile in the root folder of your WordPress site. - Locate the line
/* That’s all, stop editing!and insert the following line above it:php
- Use an FTP client to access the
define('WP_MEMORY_LIMIT', '256M');- Adjust the number based on your specific memory limit.
Learn about optimization here.
C. Configuring Loader Method for Improved Performance
To optimize Elementor’s performance and troubleshoot potential issues, you can utilize the Loader Method settings. Follow these detailed steps to enable and configure the Elementor Loader Method:
- Log in to your WordPress Dashboard.
- Go to the “Elementor” menu in the left sidebar of the Dashboard.
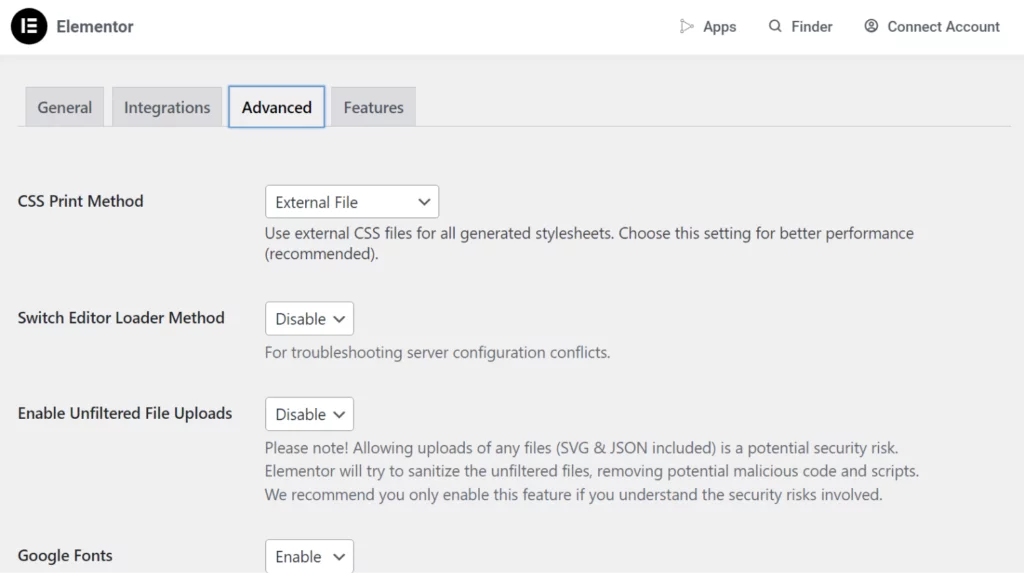
- Within the Elementor settings, locate and click on the “Settings” option. This will open the settings panel. Navigate to the “Advanced” tab. The Advanced tab contains various settings that allow you to customize Elementor’s behavior.
- Scroll down until you find the “Switch Editor Loader Method” section. This option allows you to choose how Elementor loads on your website.
- In the “Switch Editor Loader Method” dropdown menu, select “Enable.” This instructs Elementor to use the chosen loader method for improved performance.
- After selecting “Enable,” locate the “Save Changes” button at the bottom of the settings panel. Click on it to save the changes you’ve made.
- Once the changes are saved, revisit your Elementor editor or any pages where Elementor is utilized. Check for improvements in loading times or any resolved issues.
Additional Tips:
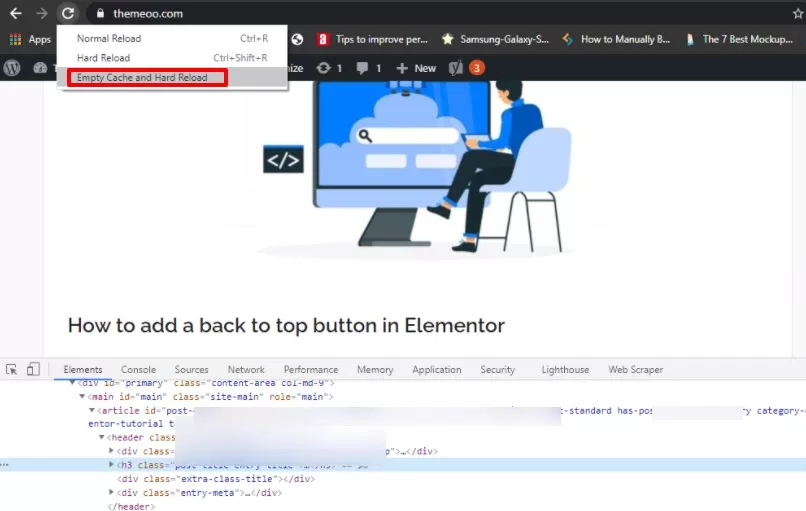
- Clear Browser Cache: After making changes, it’s advisable to clear your browser cache to ensure that the latest settings take effect.
- Check Website Performance: Monitor your website’s overall performance to ensure that enabling the Loader Method has a positive impact.
- Review Elementor Documentation: If you encounter any unexpected behavior or have specific performance requirements, refer to official documentation for additional guidance.
Read the official blog here.
4. Incorrect URL Configuration Resolution:
If you encounter issues related to an incorrect URL configuration, follow these detailed steps to rectify the problem:
- Access WordPress Dashboard:
- Log in to your WordPress Dashboard using your administrator credentials.
- Navigate to General Settings:
- In the Dashboard, locate and click on “Settings” in the left-hand menu.
- A dropdown menu will appear; choose “General” from the options.
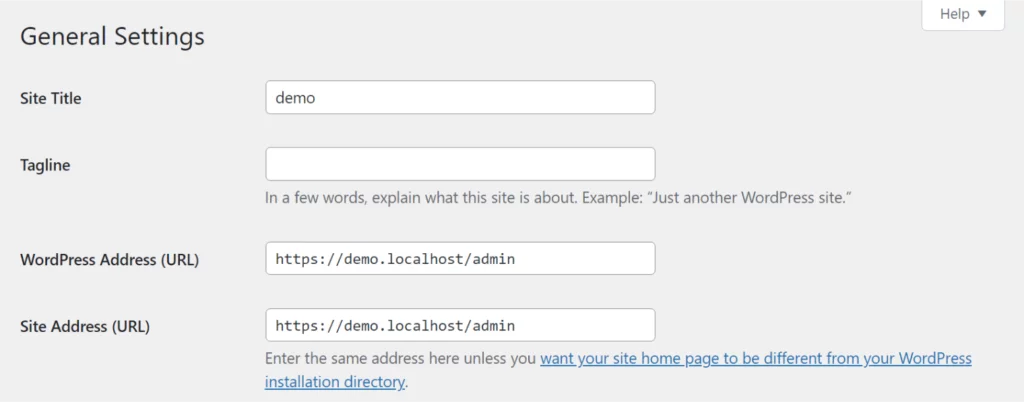
- Check Backend and Frontend URLs:
- In the General Settings, you’ll find two fields labeled “WordPress Address (URL)” and “Site Address (URL).”
- Ensure that both URLs are identical. The URLs should reflect the correct address of your website.
- If any discrepancies exist, correct them by entering the appropriate URL.
- Save Changes:
- Scroll down to the bottom of the General Settings page.
- Click on the “Save Changes” button to apply the corrected URL configuration.
- Verify Website Functionality:
- After saving the changes, navigate to your website’s frontend and backend to confirm that the issue has been resolved.
- Check different pages and functionalities to ensure that the URLs are consistent throughout the site.
- Update Permalinks (Optional):
- While in the WordPress Dashboard, you may also want to visit the “Permalinks” section (Settings > Permalinks).
- Adjusting permalinks can sometimes help in resolving URL-related issues.
- Choose a suitable permalink structure and save changes if necessary.
- Clear Browser Cache:
- To ensure the changes take effect, clear your browser cache.
- This step prevents any cached data from interfering with the corrected URL configuration.
- Additional Considerations:
- If you recently migrated your WordPress site or made changes to your domain, review comprehensive guides on handling URL changes for specific insights.
- Double-check any plugins or themes that might be manipulating URLs and adjust settings accordingly.
5. Resolving WordPress White Screen Due to Plugin Conflict:
Encountering a white screen on your WordPress site can often be attributed to plugin conflicts. Follow these detailed steps to identify and resolve the issue:
- Access WordPress Dashboard: Log in to your WordPress Dashboard using your administrator credentials.
- Deactivate All Plugins (Except Elementor): Navigate to the “Plugins” section in the Dashboard. Deactivate all plugins except Elementor. This step involves a bulk deactivation of all installed plugins.
- Check Elementor Functionality: After deactivating other plugins, check if Elementor starts working without the white screen issue. If Elementor functions correctly, it indicates a potential conflict with one or more plugins.
- Activate Plugins One by One: Begin reactivating your plugins one at a time. After activating each plugin, reload a site page in Elementor to observe whether the white screen issue reoccurs.
- Identify Problematic Plugin: The plugin that triggers the white screen upon activation is likely causing the conflict. Once you identify the problematic plugin, consider finding an alternative solution or seeking support from the plugin developer.
- Check Plugin Compatibility: Ensure that all plugins are updated to their latest versions, as outdated plugins may contribute to conflicts. Verify compatibility between plugins and your WordPress version.
- Check Elementor and JetPlugins Compatibility: Note that Elementor and JetPlugins are designed to be fully compatible with each other. If you encounter issues with JetPlugins, ensure you are using the latest versions and check for any updates or patches released by the developers.
- Alternative Plugin Solutions: If a specific plugin consistently causes conflicts, explore alternative plugins that serve a similar purpose. Consider consulting with the WordPress community or plugin developers for advice on suitable alternatives.
- Regular Plugin Audits: Perform regular audits of your plugins, especially after major WordPress updates. Disable or remove unnecessary plugins to minimize the risk of conflicts and ensure optimal site performance.
- Check Theme Compatibility: In rare cases, conflicts may also arise between plugins and your WordPress theme. Ensure your theme is updated and compatible with the installed plugins.
6. Resolving WordPress White Screen Due to Theme Incompatibility:
If you’re experiencing a white screen issue in WordPress, it could be attributed to theme incompatibility, especially following theme or Elementor updates. Follow these detailed steps to troubleshoot and resolve the problem:
- Access WordPress Dashboard: Log in to your WordPress Dashboard using your administrator credentials.
- Deactivate Current Theme: Navigate to the “Appearance” section and select “Themes” from the WordPress Dashboard. Deactivate the current theme causing the issue.
- Switch to Hello Elementor Theme: Activate the Hello Elementor theme, a lightweight and compatible theme designed for seamless integration with Elementor.
- Check Elementor Functionality: After switching themes, check if Elementor functions correctly without the white screen issue. If the problem persists, it may not be related to the theme.
- Browser Extensions Check: Browser extensions can sometimes cause conflicts. Open the Elementor editor page in Incognito mode to disable extensions temporarily. Alternatively, try using another browser to see if the white screen issue persists.
- Fatal Error Identification: In cases where the issue is due to a fatal error, examine the error message displayed. Look for the term “Elementor” in the error message; if present, it indicates an issue with the Elementor page builder. If the error message does not reference Elementor, another code error may be causing the problem.
- Check PHP Error Logs: Access the PHP error logs to gain insights into the nature of the error. Check for available logs in the WordPress Dashboard panel and, if necessary, explore the hosting panel for additional error details.
- Troubleshoot Non-Elementor Code Errors: If the error message does not involve Elementor, address the specific code error causing the issue. Review the PHP error logs for information on non-Elementor-related errors. Resolve coding issues, update plugins or themes, and ensure compatibility.
- Update Themes and Plugins: Regularly update both themes and plugins to their latest versions. Compatibility issues may arise when using outdated versions of themes or plugins.
- Consult Theme Documentation: Refer to the documentation of the theme in use for any specific troubleshooting steps or compatibility considerations. Contact the theme developer’s support for assistance if necessary.
7. Dealing with Viruses:
In some instances, your server may be vulnerable to PHP injections, leading to the presence of harmful files. Access your hosting provider panel and utilize the virus check service available. If such a service is not provided by your hosting, reach out to support and request them to conduct a virus check on your behalf.
8. Troubleshooting with Debugging:
To identify the source of an issue, consider examining the wp-config.php file in your WordPress root folder. Navigate through the file and locate the line: define( 'WP_DEBUG', false ). If this line is absent, add it to the top, replacing “false” with “true.” Reload your site, and instead of a mere white screen, you will now encounter error messages. Analyze these messages to gain insights into the issue and proceed with necessary fixes.
9. Optimizing Revisions:
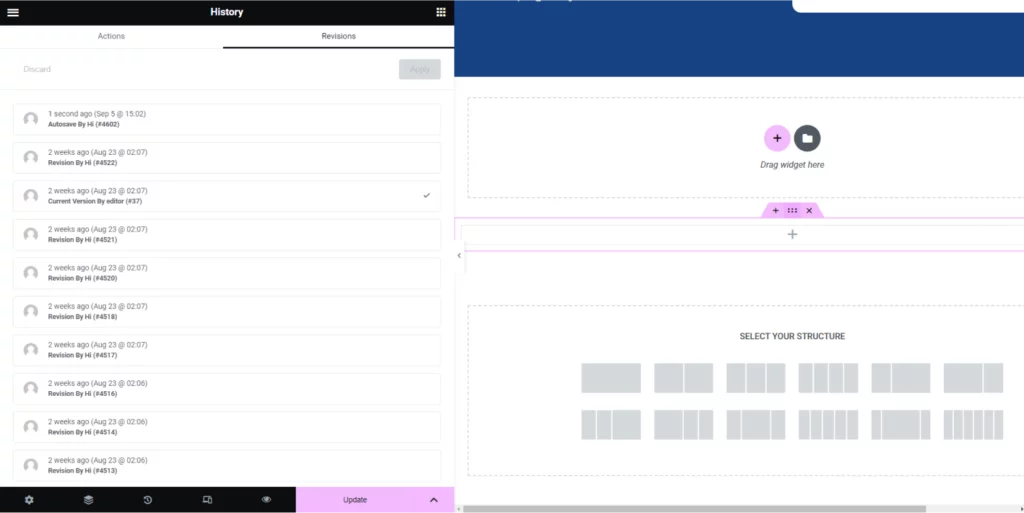
WordPress retains template revisions as a precautionary measure, allowing you to recover changes effortlessly. Once a post is published, the revisions data becomes unnecessary but remains stored in the WordPress database. Streamline your database cache automatically by employing tools like WP-Optimize to efficiently manage and clear unnecessary revisions data.
10. Query Monitor:
- Disable Query Monitor:
- Query Monitor, a free debugging plugin, can sometimes conflict with Elementor.
- Temporarily deactivate Query Monitor to rule out conflicts.
- Navigate to the WordPress dashboard > Plugins > Installed Plugins, find Query Monitor, and deactivate it.
- Check if Elementor functions properly after deactivation.
Conclusion:
Addressing the Elementor white screen problem involves a combination of plugin management, system optimization, and staying informed about potential causes. By following these comprehensive steps, you can resolve the issue efficiently and enhance the overall stability of your Elementor-powered website.
FAQs on Elementor White Screen of Death:
What Should I Do if Elementor WSoD Persists After Troubleshooting?
If WSoD persists, consider seeking assistance from the Elementor community forums or reaching out to Elementor’s support. Professional developers experienced with Elementor can also provide tailored solutions based on the specific nature of the issue.
Are There Preventive Measures Against Elementor WSoD?
Proactive measures include keeping themes, plugins, and Elementor itself updated, regular backups, and ensuring compatibility with the latest version of WordPress. Regular monitoring and addressing issues promptly contribute to a healthier website environment.
Can Elementor WSoD Impact SEO?
Yes, persistent WSoD instances can negatively impact SEO. Search engines prioritize accessible and reliable websites. The downtime and potential content inaccessibility associated with WSoD can result in search engine ranking fluctuations.
